Centralized patch compliance reporting
What is patch compliance?
Patch compliance is the process of ensuring all computing resources have the latest security updates and bug fixes installed according to organizational policies. A system is considered "patch compliant" when all required patches defined in your patch baseline have been successfully applied. Non-compliant systems may have missing critical security updates, potentially exposing your organization to security vulnerabilities that could be exploited by malicious actors.
In modern cloud environments spanning multiple AWS accounts and regions, decentralized patch management creates significant challenges including visibility gaps, inconsistent reporting, delayed responses to vulnerabilities, complex audit processes, and duplicated effort across teams. These challenges can lead to extended security exposure and inefficient use of resources throughout your organization.
Centralized patch compliance reporting addresses these challenges by consolidating data from all accounts and regions into a single location, providing a comprehensive view of your security posture. This approach delivers numerous benefits: a single source of truth for compliance status, real-time awareness of vulnerabilities, consistent metrics across environments, simplified auditing, trend analysis capabilities, improved resource efficiency, and the foundation for automated remediation workflows.
AWS Systems Manager provides the foundation for this centralization through Patch Manager to automate patching processes, resource data syncs to aggregate compliance data into a central S3 bucket, and analytics services like AWS Glue, Amazon Athena, and Amazon QuickSight to transform, query, and visualize the data. The solution described in this recipe leverages these components to create a comprehensive reporting system that works across your entire AWS organization, enabling more efficient operations and faster vulnerability remediation.
The resource data sync provides inventory and patch compliance metadata in the form of a JSON file. As an alternative to using Athena and QuickSight, you can use any BI or analytics tool that can pull the data from the S3 bucket.
Purpose
The purpose of this recipe is to provide sample CloudFormation templates which can be used to provision the resources required for centralized patch compliance reporting. This recipe does not cover deploying patch scan or install operations.
For more information on how to prepare for patching managed nodes, see Patching managed nodes using AWS Systems Manager and tagging.
Prerequisites
Before beginning deployment, ensure you have:
- AWS Organizations setup: A properly configured AWS Organization with a management account and member accounts.
- Managed nodes configured: Amazon Elastic Compute Cloud (EC2) instances, AWS Internet of Things (IoT) Greengrass core devices, on-premises servers, edge devices, and VMs must be Systems Manager managed nodes to perform patching operations and report patch compliance.
- Patch operations implemented: At minimum, a patch scan operation must be configured and executed at least once. Without this, there will be no compliance data to report on. For more information on different types of patching and how to implement patching, see the Patch Management Best Practices guide and the section Different types of patching.
- IAM permissions: Appropriate permissions to deploy CloudFormation templates and create the required resources in both the central reporting account and member accounts.
- Amazon QuickSight: In order to visualize patch compliance information using QuickSight, you must sign up for QuickSight.
- Amazon QuickSight Permissions to S3: You must ensure QuickSight has permissions to the S3 buckets created in Phase 1: Central account setup. More information is provided in Prerequisites to complete before deploying the CloudFormation template for QuickSight.
Considerations
Resource data sync
Currently, the AWS::SSM::ResourceDataSync resource in AWS CloudFormation does not support the DestinationDataSharing property within the S3Destination property which is required to create an inventory resource data sync which supports a simplified S3 bucket policy.
Due to this, this recipe uses a custom CloudFormation resource in the Sample CloudFormation template for organization resource data sync section to use a Lambda function to create the resource data sync.
Alternatives to using the custom resource to create the resource data sync:
- Use the standard resource data sync which is supported by CloudFormation.
- To accomplish this, you must create and use a bucket policy which grants permissions based in AWS account IDs. For more information and an example S3 bucket policy, see Before you begin.
- Update the S3 bucket policy in the Sample CloudFormation template for central reporting using Athena to use the new policy which lists out the AWS account IDs.
- Use CloudFormation StackSets to deploy the
AWS::SSM::ResourceDataSyncresource. For an example CloudFormation resource snippet, see Create a SyncToDestination resource data sync.
- Use an alternative method to create the organization resource data sync, for example, scripting via the AWS CLI or other SDKs.
Cost considerations
Implementing centralized patch compliance reporting involves several AWS services, each with associated costs:
- Amazon S3 pricing:
- Standard storage costs for inventory and patch compliance data
- Data transfer costs for syncing data from multiple accounts and regions
- Cost increases linearly with the number of managed nodes and scan frequency
- AWS Glue pricing:
- Crawler costs
- For the default configuration (daily crawler run)
- Amazon Athena pricing:
- Query costs
- Cost varies based on query complexity and frequency
- Using partitioning and filtering can significantly reduce costs
- AWS Lambda pricing:
- Minimal costs for the custom resource Lambda function
- Free tier typically covers this usage for most implementations
- Amazon QuickSight pricing (optional):
- Author licenses and Reader licenses
Architecture overview
Central reporting account
In the following diagram, the Central Reporting account is an AWS account within your AWS Organization dedicated for storing the patch and inventory metadata and querying or visualization.
It is not recommended to use the AWS Organization management account as the Central reporting account. AWS best practices for the management account recommends that you use the management account and its users and roles for tasks that must be performed only by that account. Store all of your AWS resources in other AWS accounts in the organization and keep them out of the management account.
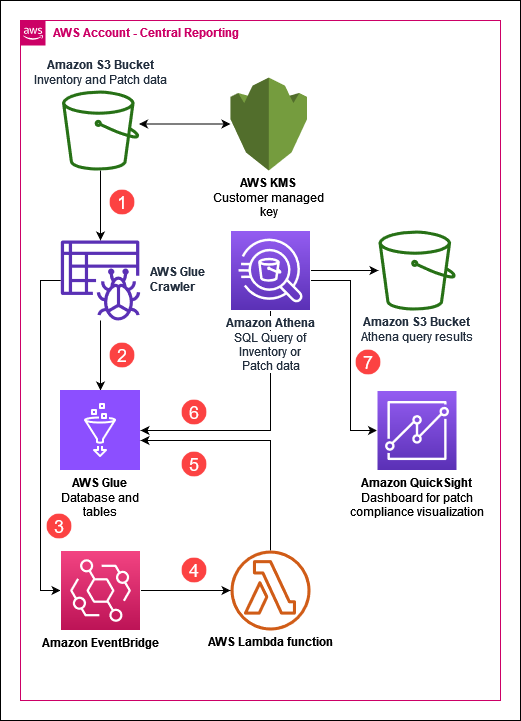
- The Glue crawler runs once a day to crawl the S3 bucket which hosts the resource data sync provided metadata.
- The Glue crawler updates the database and tables based on the metadata in the S3 bucket.
- After the Glue crawler completes its run, an event is sent to EventBridge.
- An EventBridge rule invokes the Lambda function.
- The Lambda function removes a duplicative column for the AWS:InstanceInformation table.
info
The
AWS:InstanceInformationtable includes a column namedresourcetype, which is also a partition key, which causes Athena queries to fail. The EventBridge rule is triggered by the Glue crawler execution, which then invokes the Lambda function to delete the column. - Athena queries the Glue database and tables based on the queries you run.
- (Optionally) You can create a QuickSight dashboard to visualize patch compliance information. Note: QuickSight is not included in the example CloudFormation template.
Member account(s)/Region(s) with managed nodes
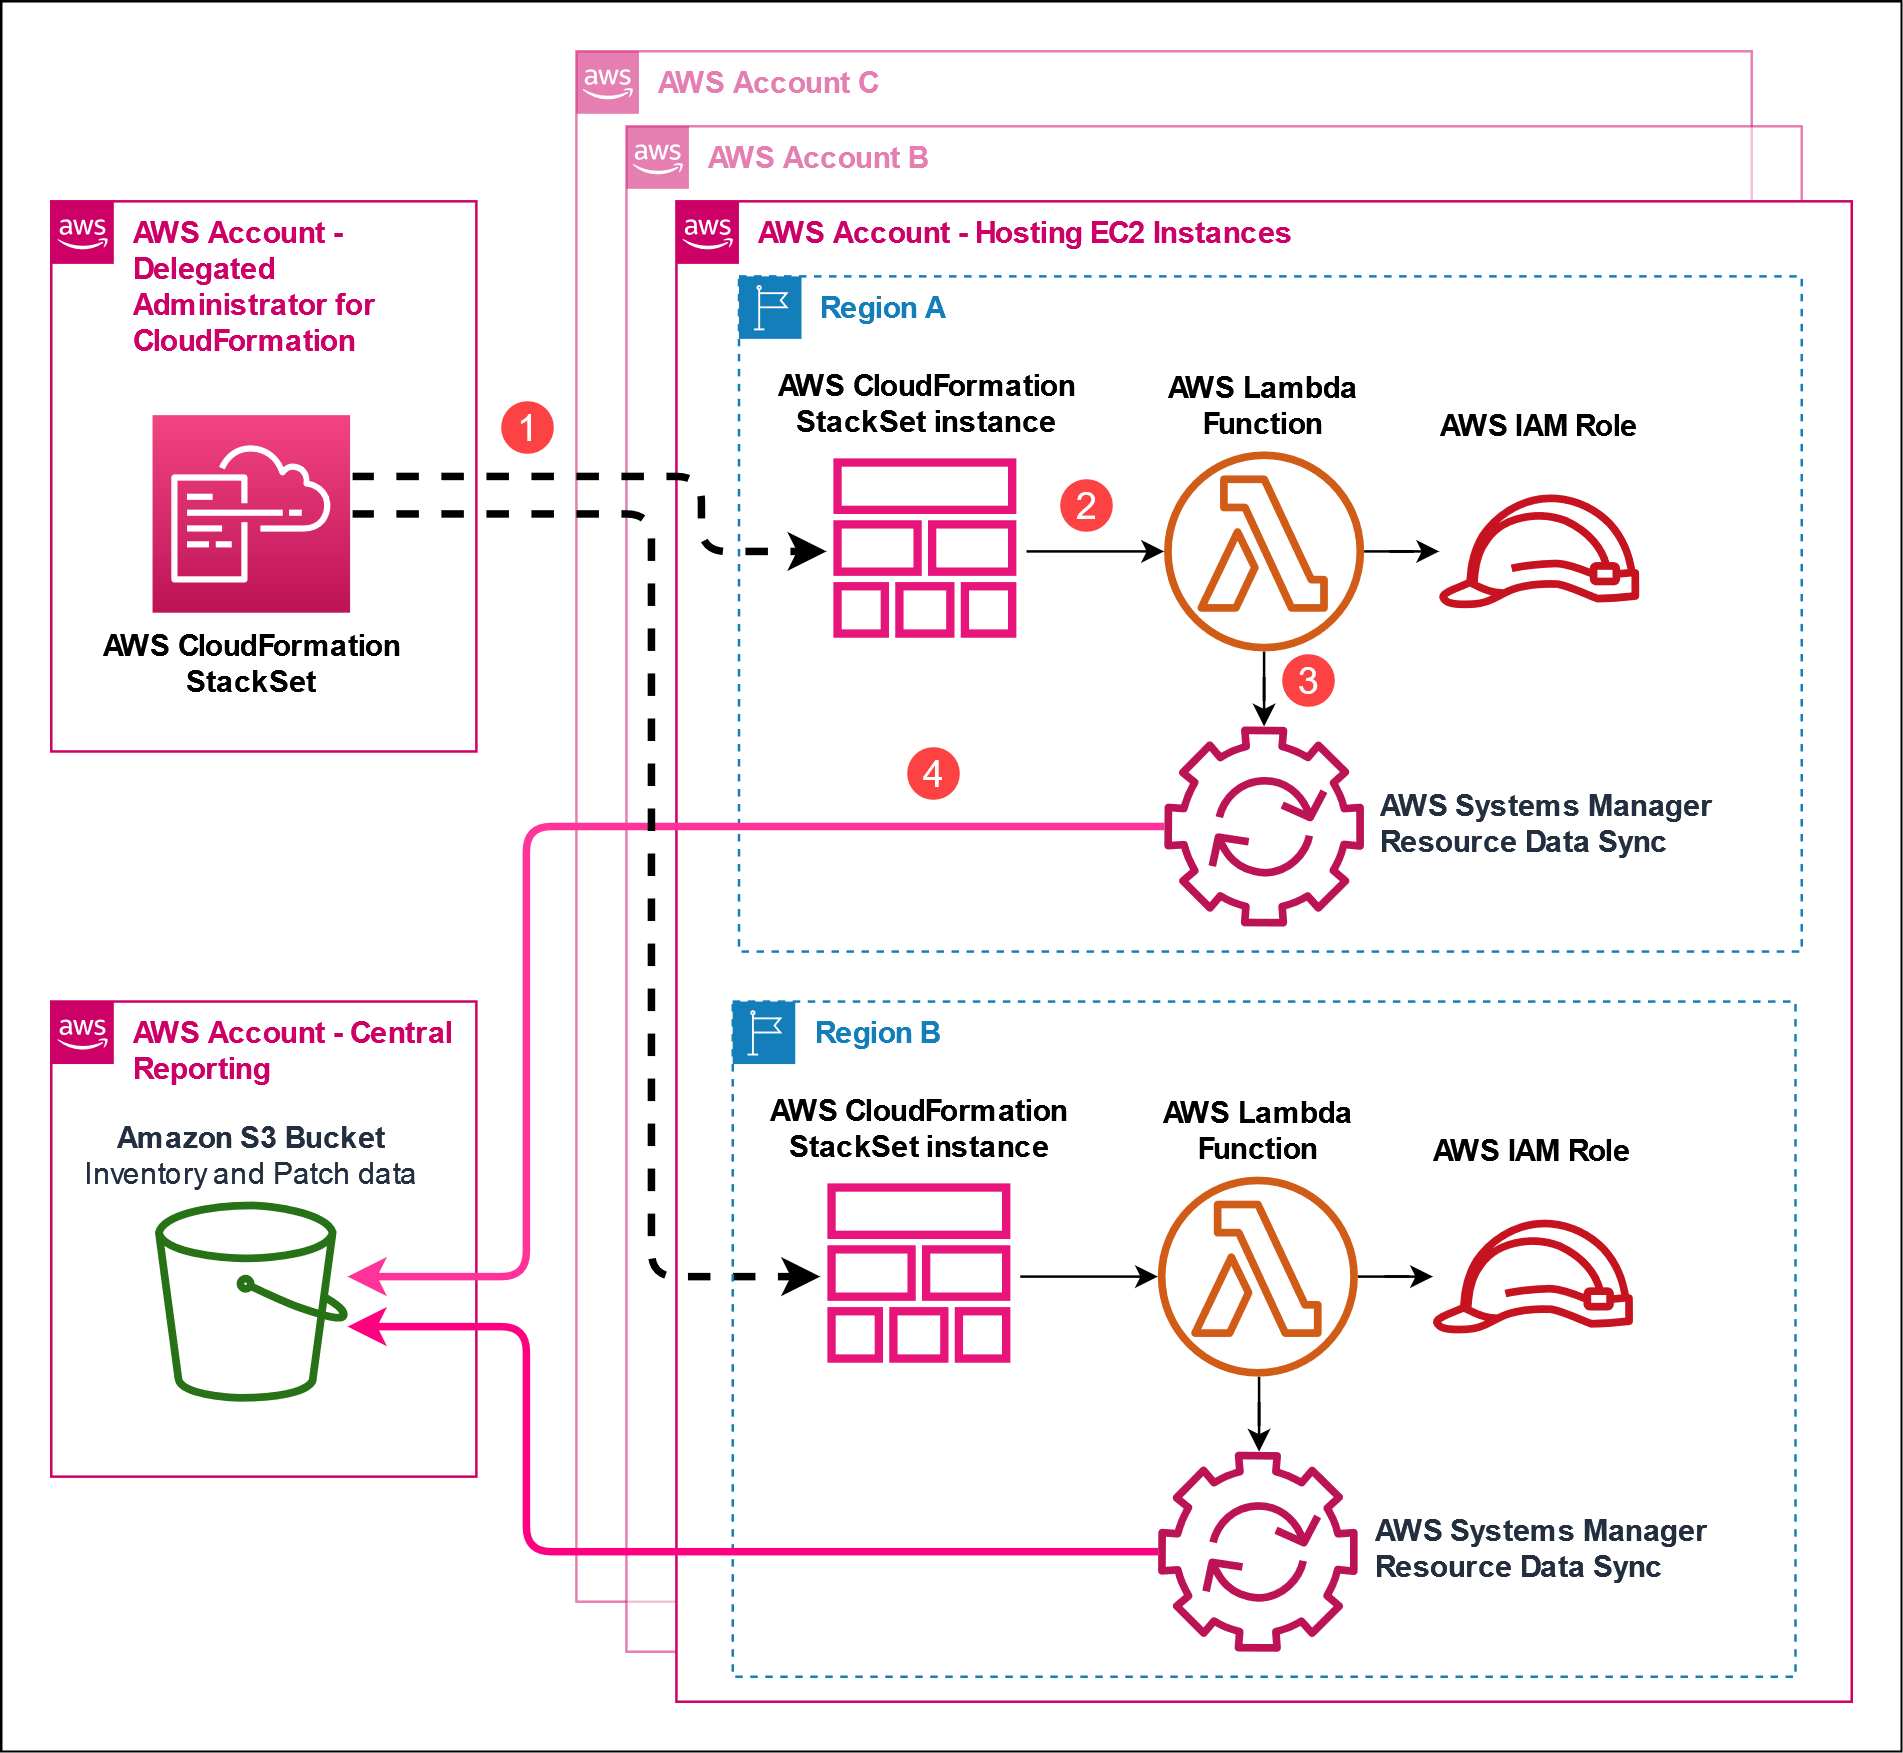
- The CloudFormation StackSet in the delegated administrator account creates stack instances in the target AWS accounts/Regions to create the required resources.
- The stack instance creates an IAM service role, Lambda function, and custom CloudFormation resource.
- The Lambda function creates a Systems Manager resource data sync for AWS Organizations.
- The resource data sync sends inventory and patch compliance metadata to the S3 bucket specified in the central reporting account.
Process timeline
The following diagram displays the process timeline of querying patch compliance for managed nodes.
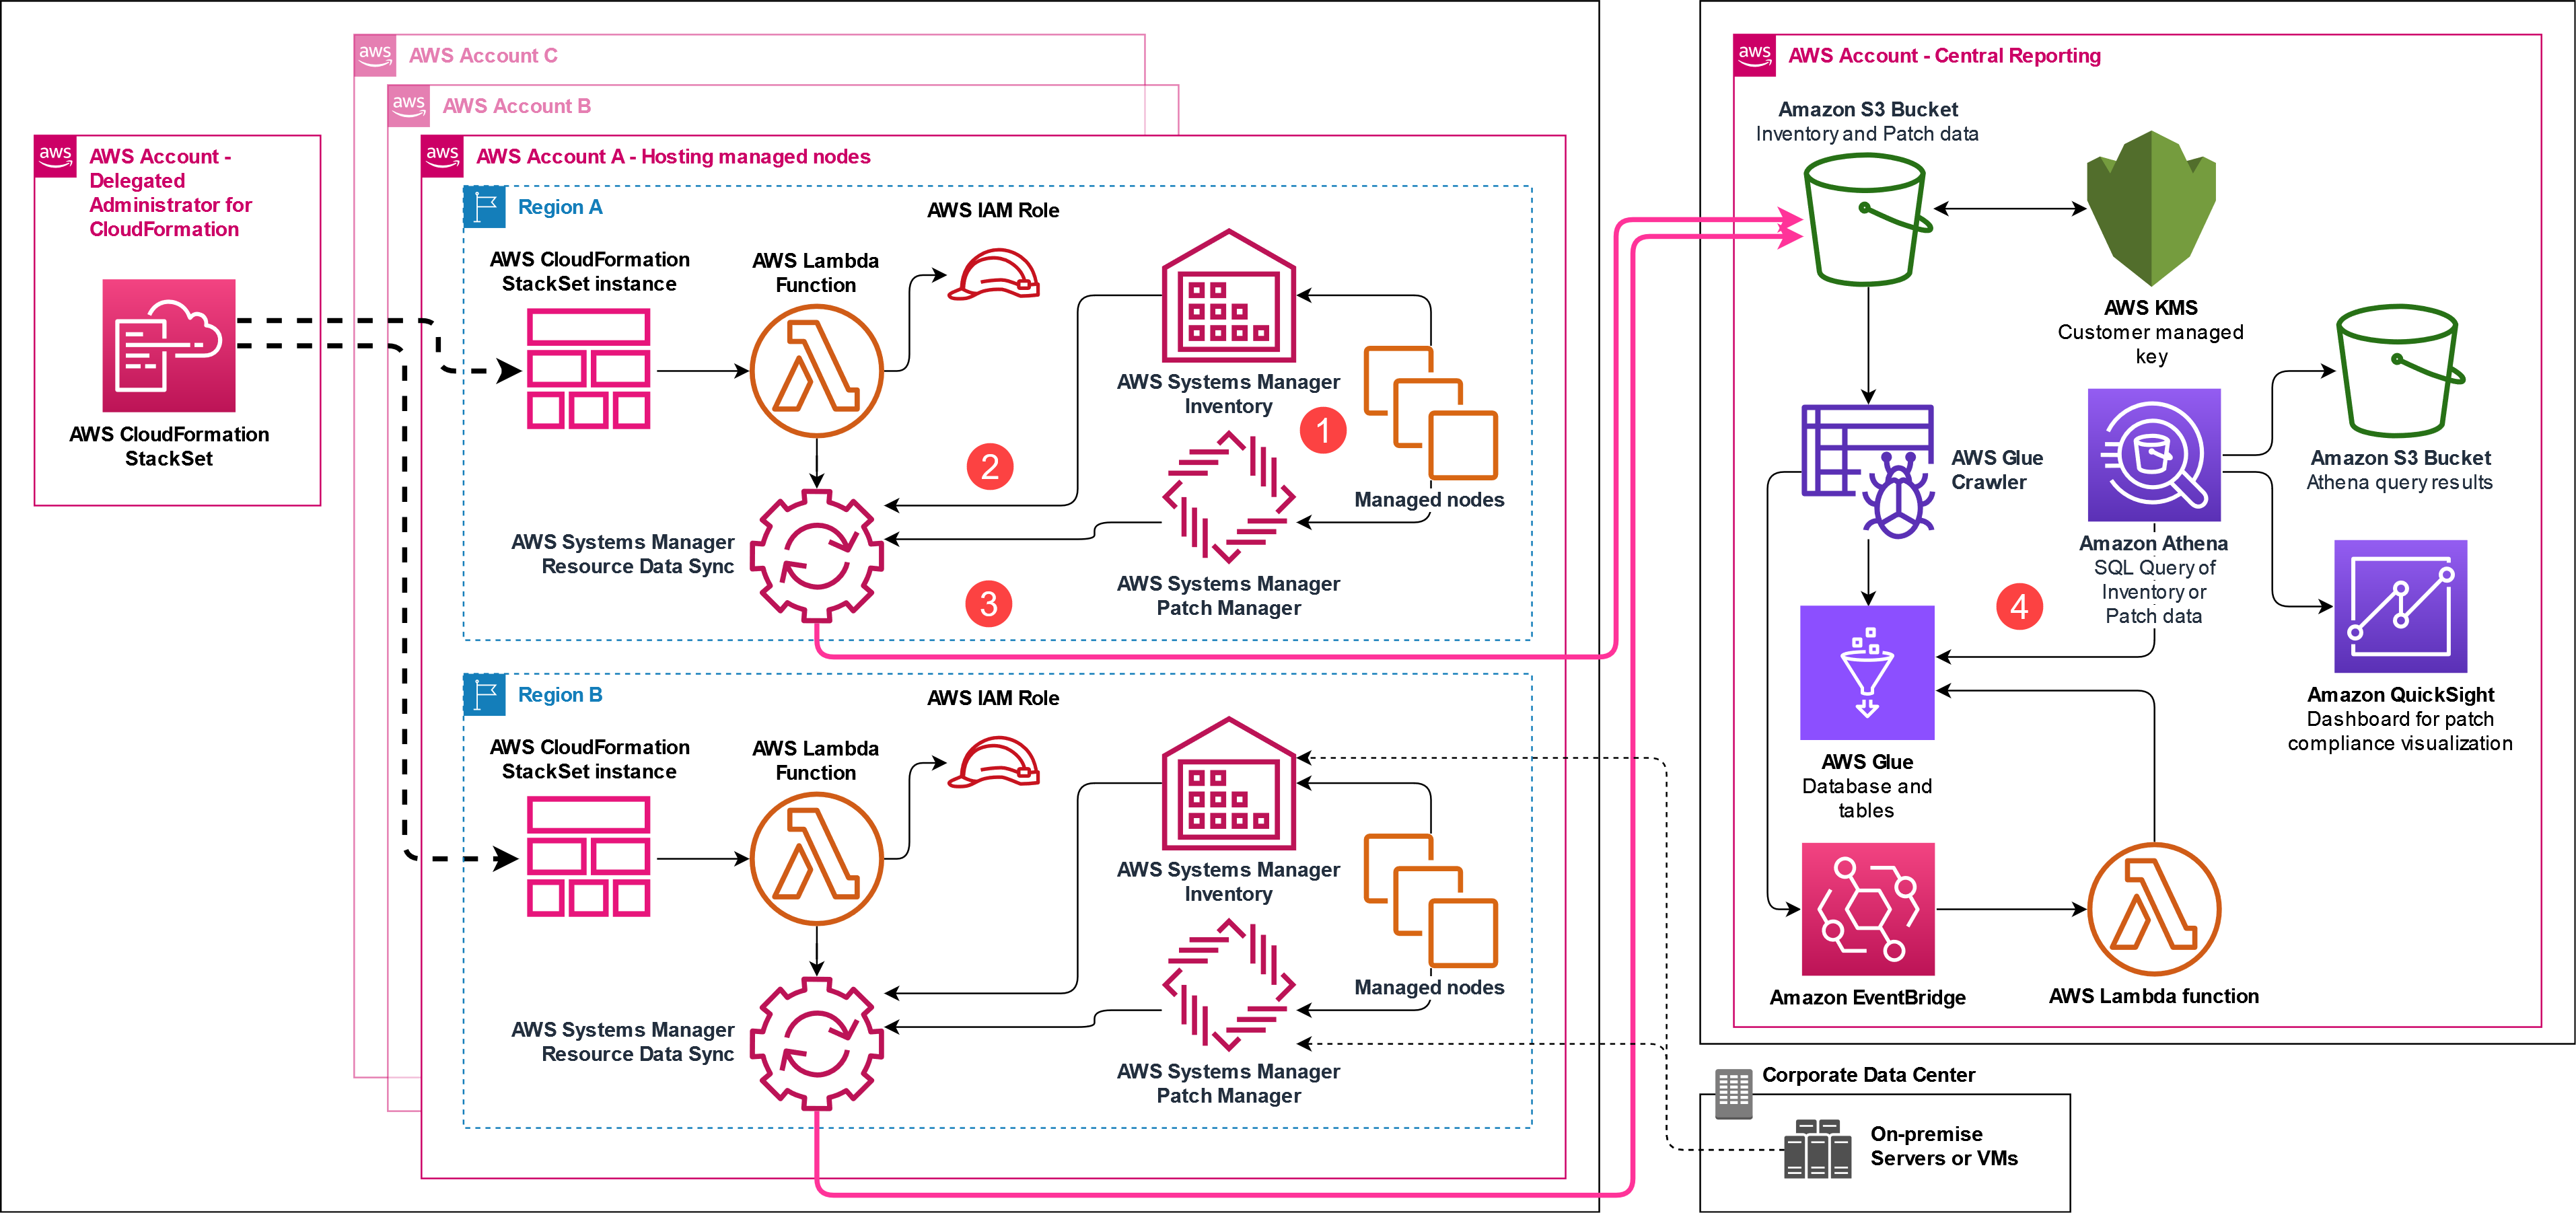
- Following a patch scan, install, or inventory metadata gathering operation, SSM agent on the managed node reports back data to Systems Manager.
- The patch and inventory metadata updates are identified by the resource data sync based on actions taken.
- The resource data sync ships the metadata to the S3 bucket specified in the central reporting account.
- You can then use Athena to query the results following the operation.
As noted in the diagram above, you can register hybrid managed nodes for patching or inventory metadata gathering and the data will flow into the same S3 bucket as EC2 instances.
Deployment steps
Deployment checklist
Below you can find a checklist for the deployment steps included in this recipe.
Central reporting account tasks
- Deploy CloudFormation stack for Athena resources
- Note S3 bucket names from stack outputs
- Configure QuickSight permissions for S3 buckets
- Deploy CloudFormation stack for QuickSight visualization
- Verify access to QuickSight analysis
Member account tasks (via StackSets)
- Deploy organization resource data sync CloudFormation StackSet
- Verify resource data syncs are created in member accounts
Phase 1: Central account setup
Sample CloudFormation template for central reporting using Athena
Below you can find details about the resources created by the CloudFormation template and their purpose.
Sample CloudFormation template for central reporting using Athena
| Resource Name | Purpose |
|---|---|
| KMS resources | |
| ManagedInstanceDataEncryptionKey | Customer managed key (CMK) to encrypt managed node metadata in the resource data sync S3 bucket. |
| ManagedInstanceDataEncryptionKeyAlias | Alias for the CMK. |
| S3 resources | |
| AthenaQueryResultsBucket | S3 bucket to store Athena query results. |
| ResourceSyncBucket | S3 bucket used to store managed node metadata provided by the resource data sync. |
| ResourceSyncBucketPolicy | S3 bucket policy for the resource data sync S3 bucket. |
| Glue resources | |
| GlueDatabase | Glue database for resource data sync metadata. |
| GlueCrawler | Glue crawler to create database and tables. |
| GlueCrawlerRole | IAM role used by Glue crawler. |
| DeleteGlueTableColumnFunctionRole | IAM role for DeleteGlueTableColumnFunction Lambda function. |
| DeleteGlueTableColumnFunction | Lambda function to remove duplicate resourcetype partition key. |
| DeleteGlueTableColumnFunctionEventRule | Amazon EventBridge rule to invoke the DeleteGlueTableColumnFunction Lambda function. |
| DeleteGlueTableColumnFunctionCloudWatchPermission | Granting EventBridge permissions to invoke the DeleteGlueTableColumnFunction Lambda function. |
| Athena resources | |
| AthenaWorkGroup | Athena workgroup for named queries. |
| AthenaQueryCompliantPatch | Example query to list managed nodes that are compliant for patching. |
| AthenaQueryNonCompliantPatch | Example query to list managed nodes that are non-compliant for patching. |
| AthenaQueryComplianceSummaryPatch | Example query to provide a compliance summary for patch for managed nodes. |
| AthenaQueryPatchSummary | Example query to provide a patch summary for managed nodes. |
| AthenaQueryInstanceList | Example query to return a list of non-terminated managed nodes. |
| AthenaQueryInstanceApplications | Example query to return a list of non-terminated managed nodes and their applications installed. |
| AthenaQuerySSMAgent | Example query to list SSM Agent versions installed on managed nodes. |
| S3 cleanup resources | |
| S3CleanupLambdaExecutionRole | IAM role to clean up S3 buckets |
| S3BucketCleanup | Lambda function to clean up S3 buckets |
| S3Cleanup | Custom resource to clean up S3 buckets |
Deploy a CloudFormation stack for Athena in the central reporting account
- Download the Sample CloudFormation template for central reporting using Athena to your local machine.
- In the central reporting account and Region, navigate to the AWS CloudFormation console.
- In left navigation pane, choose Stacks, and then choose Create stack.
- From the dropdown list, choose With new resources (standard).
- On the Create stack page, select Upload a template file, select Choose file, choose the
patch-reporting.yamlfile, and then choose Next. - On the Specify stack details page, perform the following steps:
- For Stack name, enter a descriptive name, such as
patch-reporting. - For Organization ID, enter the AWS Organization ID for your AWS Organization. For example,
o-abcde12345.
tipFor more information on how to retrieve the AWS Organization ID, see Viewing details of an organization from the management account.
- For Enable Glue Crawler Schedule, choose to enable or disbale scheduled execution of the Glue crawler.
- For Glue Crawler Schedule (cron), enter a cron schedule expression for the Glue crawler.
- For Enable KMS permissions for QuickSight service role, choose to enable or disable KMS permissions for the QuickSight IAM service role. Note: If you do not grant KMS permissions, you will not be able to visualize patch compliance data using QuickSight.
- Choose Next.
- For Stack name, enter a descriptive name, such as
- On the Configure stack options page, add any required tags, select I acknowledge that AWS CloudFormation might create IAM resources with custom names, and then choose Next.
- On the Review and create page, review all the information and then choose Submit to create your stack.
After the page is refreshed, the status of your stack should be CREATE_IN_PROGRESS. When the status changes to CREATE_COMPLETE, you can then deploy the QuickSight visualization.
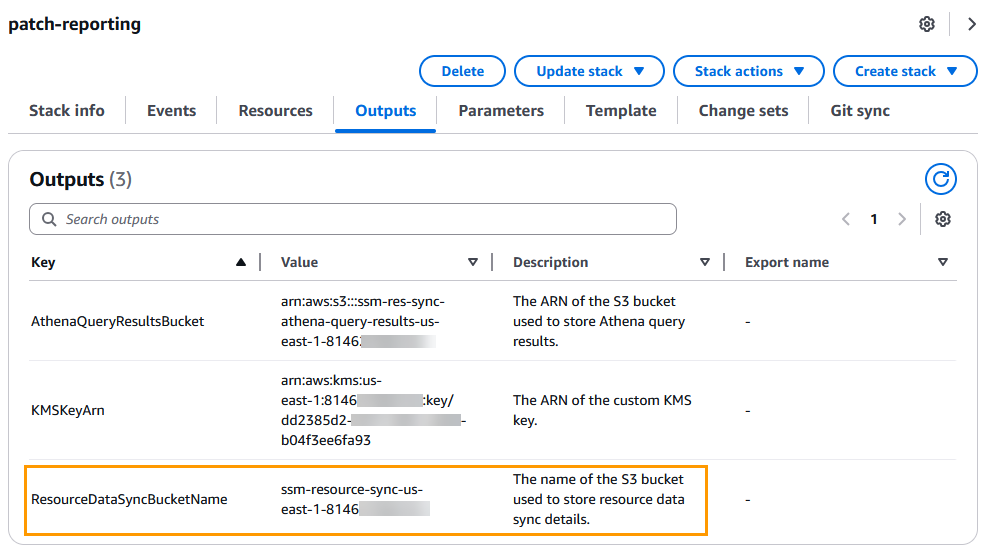
Take note of the names of the Amazon S3 buckets for AthenaQueryResultsBucket and ResourceDataSyncBucketName which can be found in the Outputs tab of the CloudFormation stack. You will need these two values in the next section to deploy QuickSight.
Sample CloudFormation template for Amazon QuickSight visualization
Below you can find details about the resources created by the CloudFormation template and their purpose.
Sample CloudFormation template for Amazon QuickSight visualization
| Resource Name | Purpose |
|---|---|
| SSMDataSyncSource | QuickSight data source pointing to the Athena workgroup, patch-workgroup. |
| ApplicationDataSet | QuickSight dataset for the application metadata |
| ComplianceItemDataSet | QuickSight dataset for the compliance item metadata |
| ComplianceSummaryDataSet | QuickSight dataset for the compliance summary metadata |
| InstanceDetailedInformationDataSet | QuickSight dataset for the instance detailed information metadata |
| InstanceInformationDataSet | QuickSight dataset for the instance information metadata |
| TagDataSet | QuickSight dataset for the tag metadata |
| JoinedDataSet | QuickSight dataset which joins aws_instanceinformation, aws_compliancesummary, aws_tag |
| ManagedNodeAnalysis | QuickSight analysis dashboard |
The sample CloudFormation template uses the DIRECT_QUERY method which allows near real-time querying of the data source. An alternative is to use SPICE to cache the data in QuickSight. If you use SPICE, the sample template also includes example refresh schedules on lines 551-647. For more information on which mode to use, see Best practices for Amazon QuickSight SPICE and direct query mode
Prerequisites to complete before deploying the CloudFormation template for QuickSight
In order for QuickSight to access the patch compliance and inventory metadata, you must grant access to QuickSight for the S3 buckets created in Deploy a CloudFormation stack for Athena in the central reporting account: ssm-res-sync-athena-query-results-us-east-1-$AccountId and ssm-resource-sync-us-east-1-$AccountId.
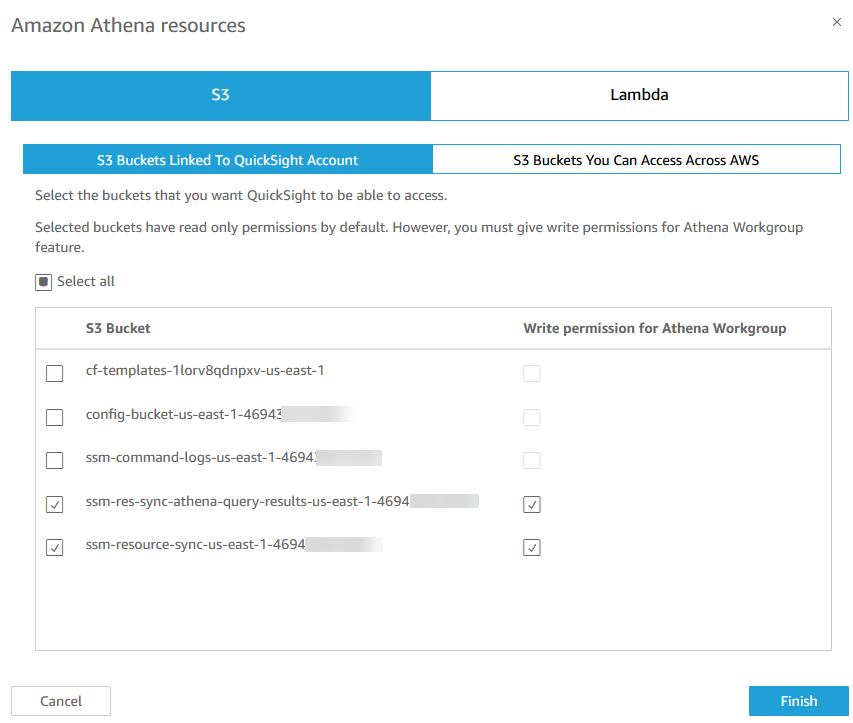
For more information on how to grant access, seeI can't connect to Amazon S3.
Deploy a CloudFormation stack for QuickSight in the central reporting account
- Download the Sample CloudFormation template for Amazon QuickSight visualization to your local machine.
- In the central reporting account and Region, navigate to the AWS CloudFormation console.
- In left navigation pane, choose Stacks, and then choose Create stack.
- From the dropdown list, choose With new resources (standard).
- On the Create stack page, select Upload a template file, select Choose file, choose the
quicksight.yamlfile, and then choose Next. - On the Specify stack details page, perform the following steps:
- For Stack name, enter a descriptive name, such as
quicksight. - For QuickSightUser, enter the name of the QuickSight user to be granted permissions to the QuickSight data sources and analysis dashboard.
- For Workgroup, leave the default value
patch-workgroup. - Choose Next.
- For Stack name, enter a descriptive name, such as
- On the Configure stack options page, add any required tags, and then choose Next.
- On the Review and create page, review all the information and then choose Submit to create your stack.
After the page is refreshed, the status of your stack should be CREATE_IN_PROGRESS. When the status changes to CREATE_COMPLETE, deploy resource data syncs into the member account(s)/region(s).
Phase 2: Member account configuration
Sample CloudFormation template for organization resource data sync
Below you can find details about the resources created by the CloudFormation template and their purpose.
Sample CloudFormation template for organization resource data sync
| Resource Name | Purpose |
|---|---|
| Resource data sync resources | |
| ResourceDataSyncLambdaRole | IAM service role for Lambda to create organization resource data sync |
| ResourceDataSyncLambdaFunction | Lambda function to create organization resource data sync |
| ResourceDataSyncCustomResource | CFN custom resource to invoke the Lambda function |
Deploy a CloudFormation StackSet
The following walkthrough will use a delegated administrator account for CloudFormation to deploy a StackSet with service-managed permissions to deploy the AWS Organization compatible resource data sync.
- Download the Sample CloudFormation template for organizational resource data syncs to your local machine.
- In the delegated administrator account for CloudFormation, navigate to the AWS CloudFormation console.
- In left navigation pane, choose StackSets, and then choose Create StackSet.
- On the Choose a template page, perform the following steps:
- For Permission model, leave the default option selected, Service-managed permissions.
- For Prerequisite - Prepare template, leave the default option selected, Template is ready.
- For Specify template, choose Upload a template file, select Choose file, choose the
organization-resource-data-sync.yamlfile, and then choose Next.
- On the Specify StackSet details page, perform the following steps:
- For StackSet name, enter a descriptive name, such as
org-resource-data-sync. - For Name of the resource data sync S3 bucket, enter the name of the S3 bucket you created in the previous section.
tipIn the central reporting account, you can find the S3 bucket name in the Outputs of the CloudFormation stack provisioned.

- For Prefix for the resource data sync S3 bucket, enter a name for the prefix used for the S3 bucket, such as
ResourceDataSync. - For AWS Region for the resource data sync S3 bucket, enter the Region for the resource data sync S3 bucket.
- For Name of the resource data sync, enter the name for the resource data sync.
- Choose Next.
- For StackSet name, enter a descriptive name, such as
- On the Configure StackSet options page, add any required tags, select I acknowledge that AWS CloudFormation might create IAM resources, and then choose Next.
- On the Set deployment options page, perform the following steps:
- For Deployment targets, choose to deploy to the organization or to specific organization units (OUs).
tipIt is recommended to deploy resource data syncs to all accounts and Regions where you have nodes managed by AWS Systems Manager to ensure all available inventory and patch metadata is aggregated into a single S3 bucket for querying, reporting, and visualization.
- For Specify Regions, select the Regions where you want to deploy the resource data sync.
- Leave all other options as their defaults and choose Next.
- On the Review page, review all the information, and then choose Submit to create your StackSet.
After the page is refreshed, you will be able to see your StackSet. The status will change to SUCCEEDED after it’s been created.
Phase 3: Verification and Testing
Verify metadata in resource data sync S3 bucket
In the central reporting account, navigate to the Amazon S3 console and select the S3 bucket created by CloudFormation named similarly to ssm-resource-sync-${region}-${account-id}. In the S3 bucket, select the bucket prefix you provided when deploying the CloudFormation StackSet.
In the bucket, you can see the various data types that are synchronized by the resource data sync automatically. If you have previously configured Inventory metadata gathering and performed at least a patch scan operation, you should see additional folders (e.g. AWS:Application, AWS:AWSComponent) in the S3 bucket. Each folder represents metadata collected by Inventory.
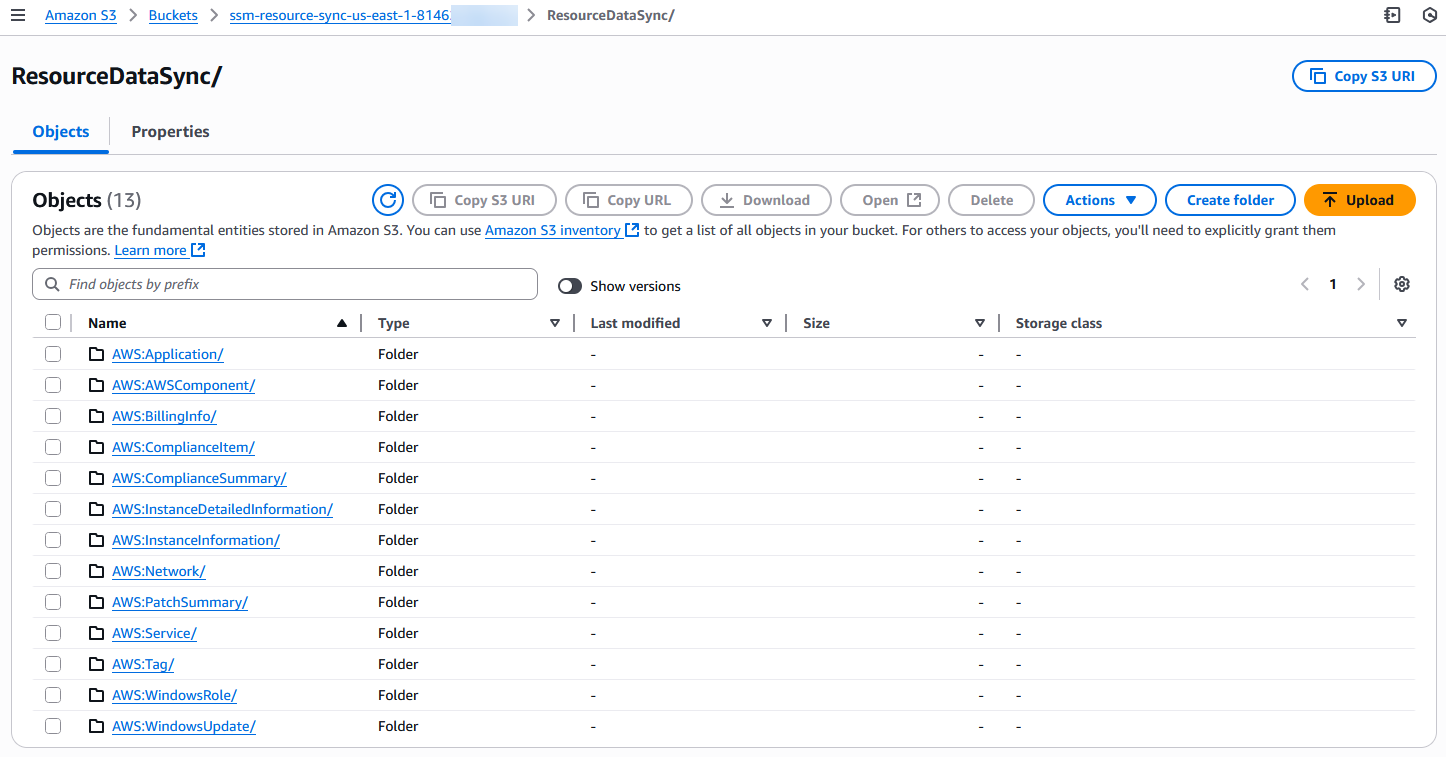
Within each of the data type prefixes, there will be a prefix for each account that is using resource data sync with this S3 bucket. This is followed by a prefix for each Region that is reporting inventory, and then a prefix for the resource type, which will generally be ManagedInstanceInventory. Then within that prefix, there will be a JSON file for each instance that reports Inventory data.
Verify access to QuickSight analysis
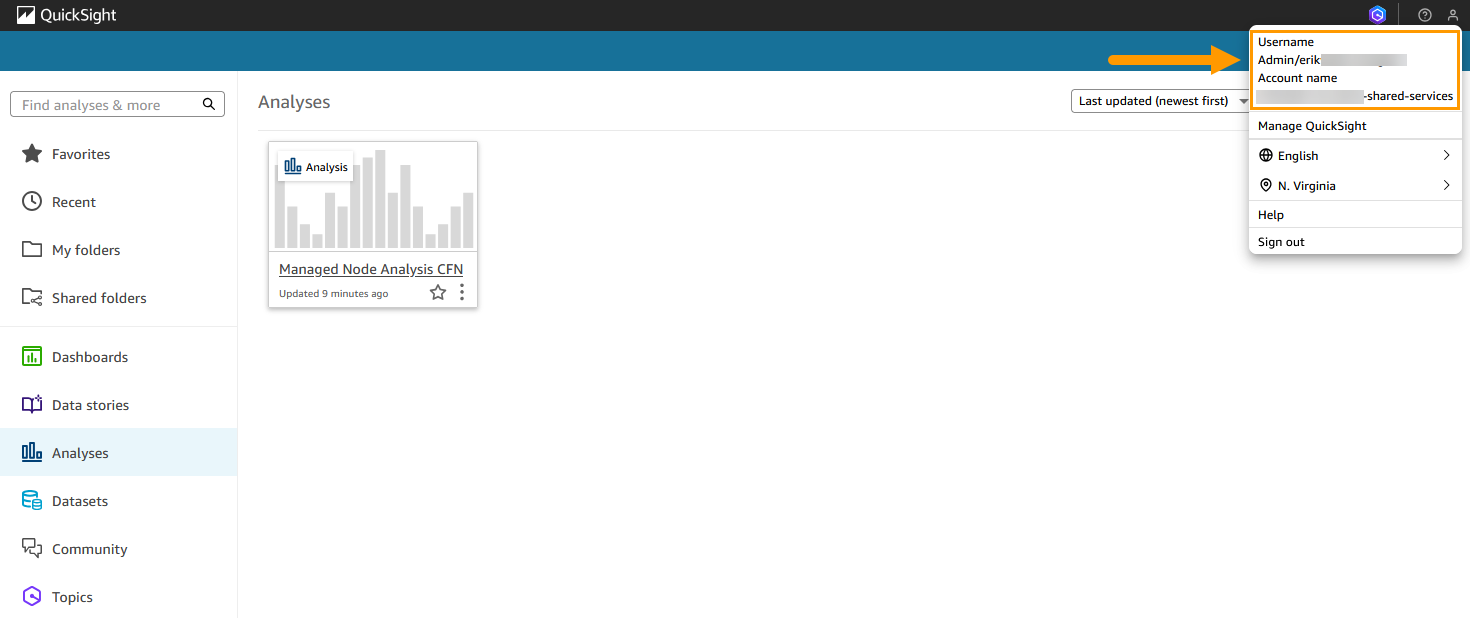
Verify you have access to the QuickSight Analysis dashboard created by CloudFormation by navigating to the QuickSight console.
If you do not see the analysis named Managed Node Analysis CFN, ensure you are logged into QuickSight as the same user you specified in the CloudFormation parameter QuickSightUser. You can verify the user you are logged into QuickSight with by selecting your profile in the upper-right corner.
Query patch compliance
Review the Glue crawler
Now that resource data sync has synchronized Systems Manager data to the S3 bucket, we can use a Glue crawler to create tables from the JSON files. The Glue crawler is configured to run once a day at 00:00 UTC. You can either wait for the Glue crawler to run or you can manually run the crawler and generate tables to query in Athena.
- Open the AWS Glue console and in the navigation pane, choose Crawlers under the Data Catalog header.
- Select the SSM-GlueCrawler and choose Run.
The Crawler should run for approximately 2-4 minutes before stopping. Once the Crawler has returned to the Ready state, verify that tables were added to the resulting database by choosing Tables in the navigation pane.
Query using Athena
- Log in to the central reporting AWS account where you deployed the KMS, S3, Glue, and Athena resources.
- Open the Amazon Athena console and in the navigation pane, choose Query editor.
- In the upper-right corner, for Workgroup, choose patch-workgroup.
- For Workgroup patch-workgroup settings, choose Acknowledge.
- Choose the Saved queries tab to see the sample queries.
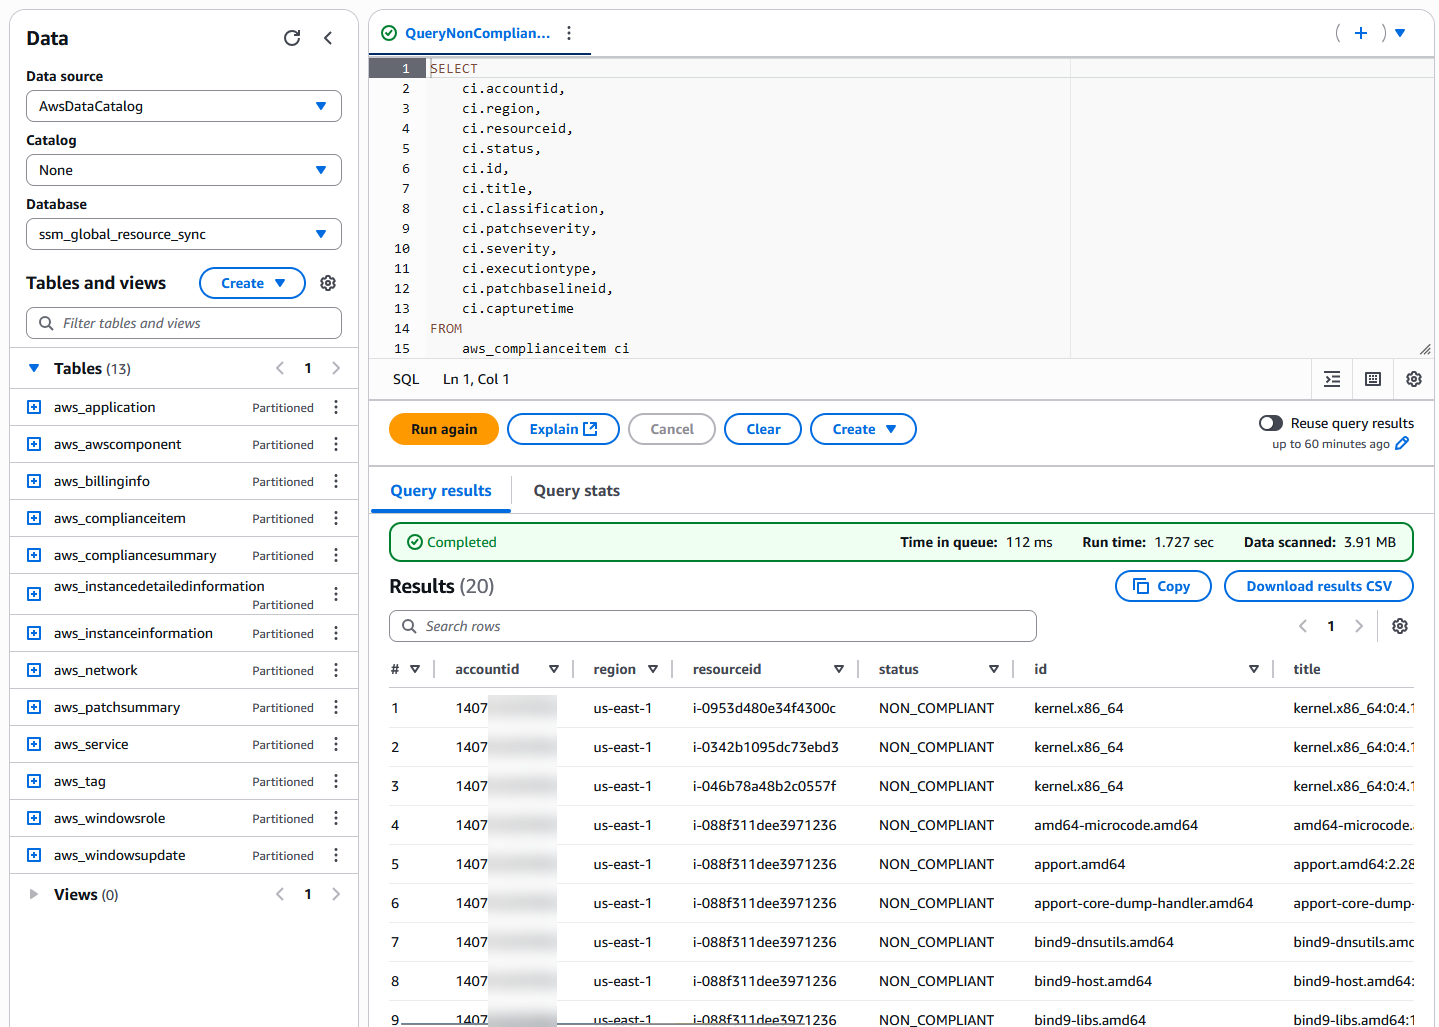
- Select a saved query, such as QueryNonCompliantPatch, and choose Run.
- Validate query results are returned for managed nodes that are missing updates and are non-compliant.
In order to use the Saved queries named QuerySSMAgentVersion and QueryInstanceApplications, you must enable Systems Manager Inventory. You can quickly enable Systems Manager Inventory when onboarding to the Systems Manager unified console.
Additional Athena sample queries
Group updates for non-compliant managed nodes
The following example Athena query groups non-compliant updates by managed node.
- Query
- Results
-- Query to aggregate non-compliant patch compliance items by resource (limited to 20 results)
SELECT
    ci.resourceid,
    ci.status,
    ci.patchstate,
    LISTAGG(DISTINCT ci.id, ', ') WITHIN GROUP (ORDER BY ci.id) AS ids
FROM
    aws_complianceitem ci
WHERE
    ci.compliancetype = 'Patch'
    AND ci.status = 'NON_COMPLIANT'
GROUP BY
    ci.resourceid,
    ci.status,
    ci.patchstate
ORDER BY
    ci.resourceid
LIMIT 20;

Filter out non-active managed nodes
Resource data syncs send inventory and patch compliance metadata to S3 buckets. When a managed EC2 instance is stopped or terminated, the AWS:InstanceInformation metadata is updated to reflect the new state. For hybrid managed nodes, this status is updated based on the connectivity state of SSM agent. These values are indicated in the InstanceStatus key which can have the following values:
Active- SSM agent (on the EC2 or hybrid managed node) is actively running and communicating with AWS Systems Manager.Stopped- The EC2 instance is in aStoppedstate.Terminated- The EC2 instance has been terminated (deleted).ConnectionLost- SSM agent on the hybrid managed node is not able to communicate with AWS Systems Manager.
Resource data syncs do not remove JSON files from the specified S3 bucket. To automatically clean-up managed node metadata JSON files for terminated EC2 instances or deregistered hybrid managed nodes, you can use S3 lifecycle policies to automatically delete objects. For example, you may implement a S3 bucket policy that expires stale objects that have not been updated for 60 days. The sample CloudFormation template in the section, Sample CloudFormation template for organization resource data sync, includes a commented-out LifecycleConfiguration starting at line 154.
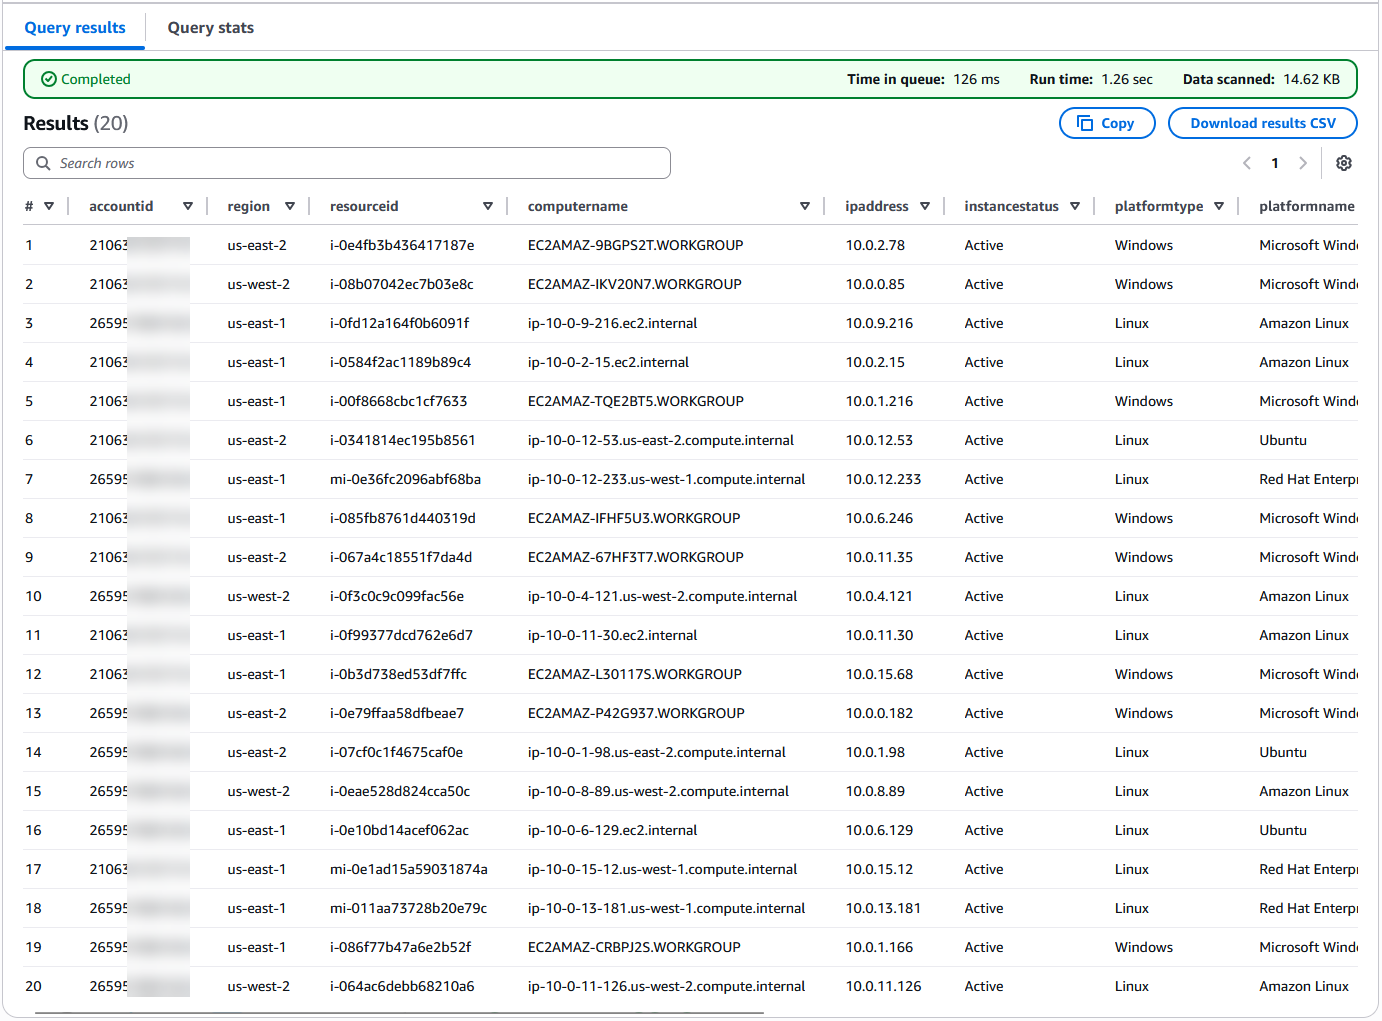
You can use InstanceStatus to filter out stopped or terminated instances or hybrid managed nodes in a connection lost state in your Athena queries. For example, the following query returns AWS:InstanceInformation metadata for only Active managed nodes.
- Query
- Results
-- Query to return only Active managed nodes
SELECT
    ii.accountid,
    ii.region,
    ii.resourceid,
    ii.computername,
    ii.ipaddress,
    ii.instancestatus,
    ii.platformtype,
    ii.platformname,
    ii.platformversion,
    ii.agenttype,
    ii.agentversion,
    ii.capturetime
FROM
    aws_instanceinformation ii
WHERE
    ii.instancestatus = 'Active'
LIMIT 20;
Visualize patch compliance using QuickSight
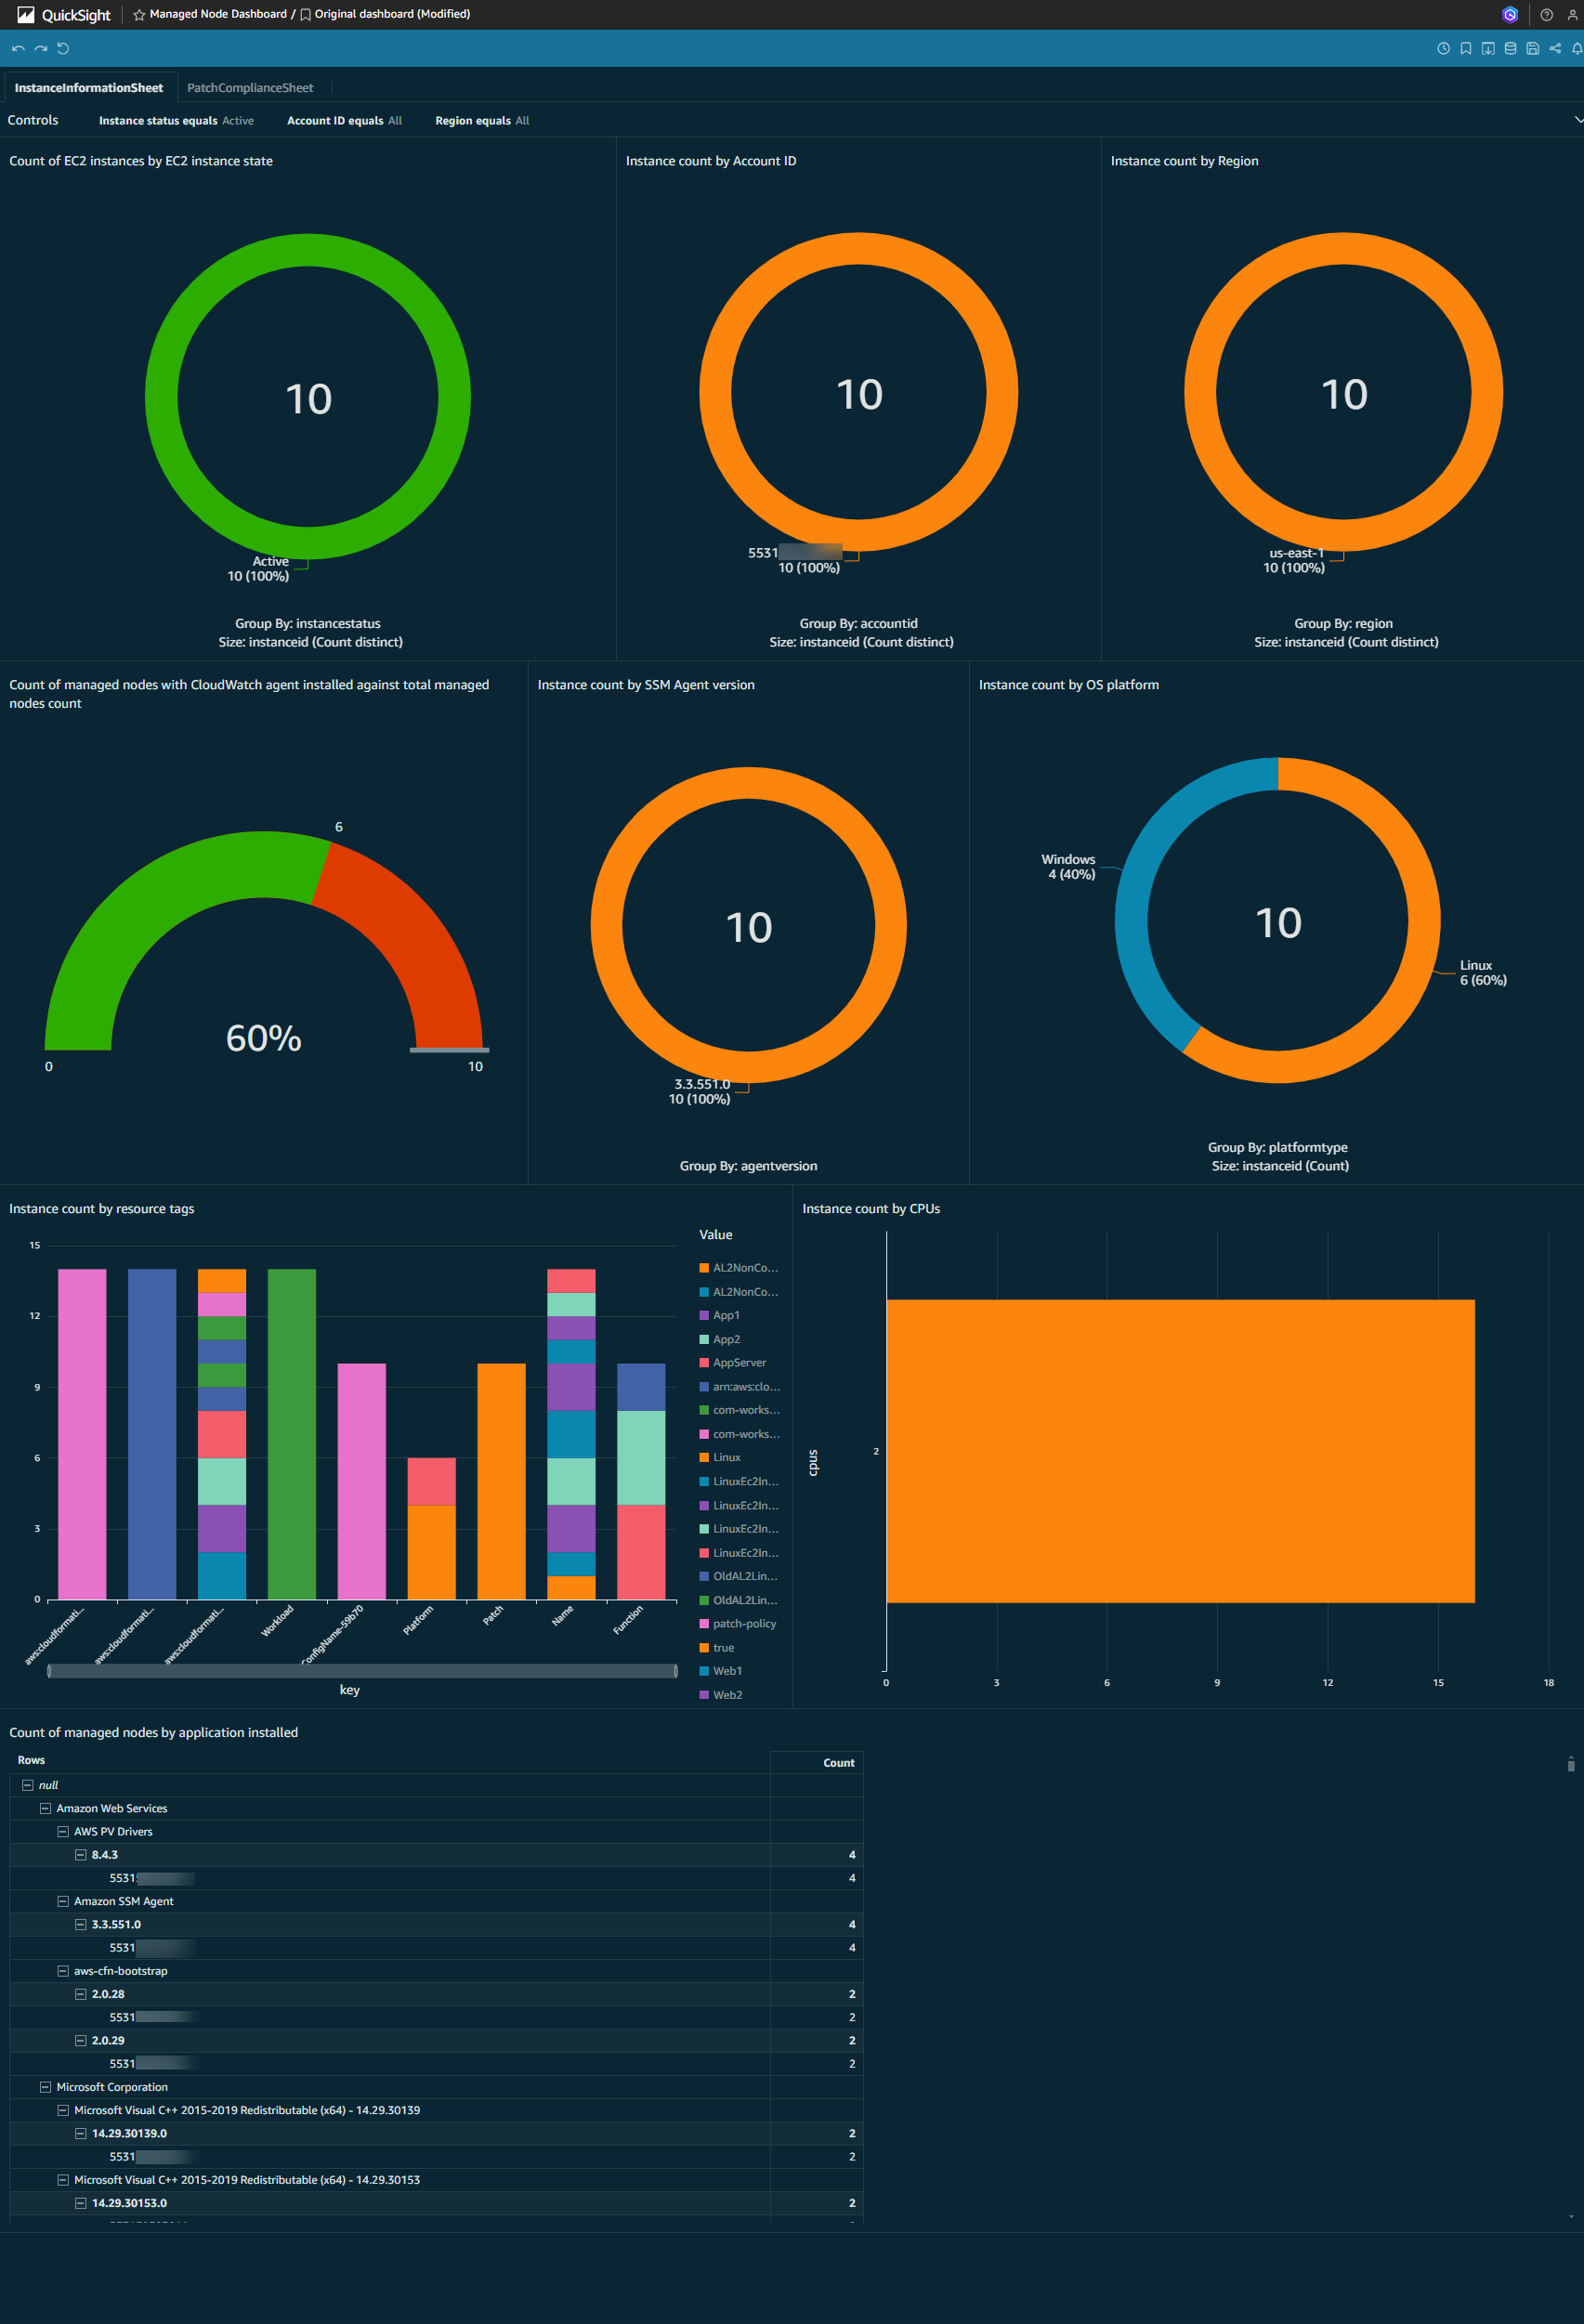
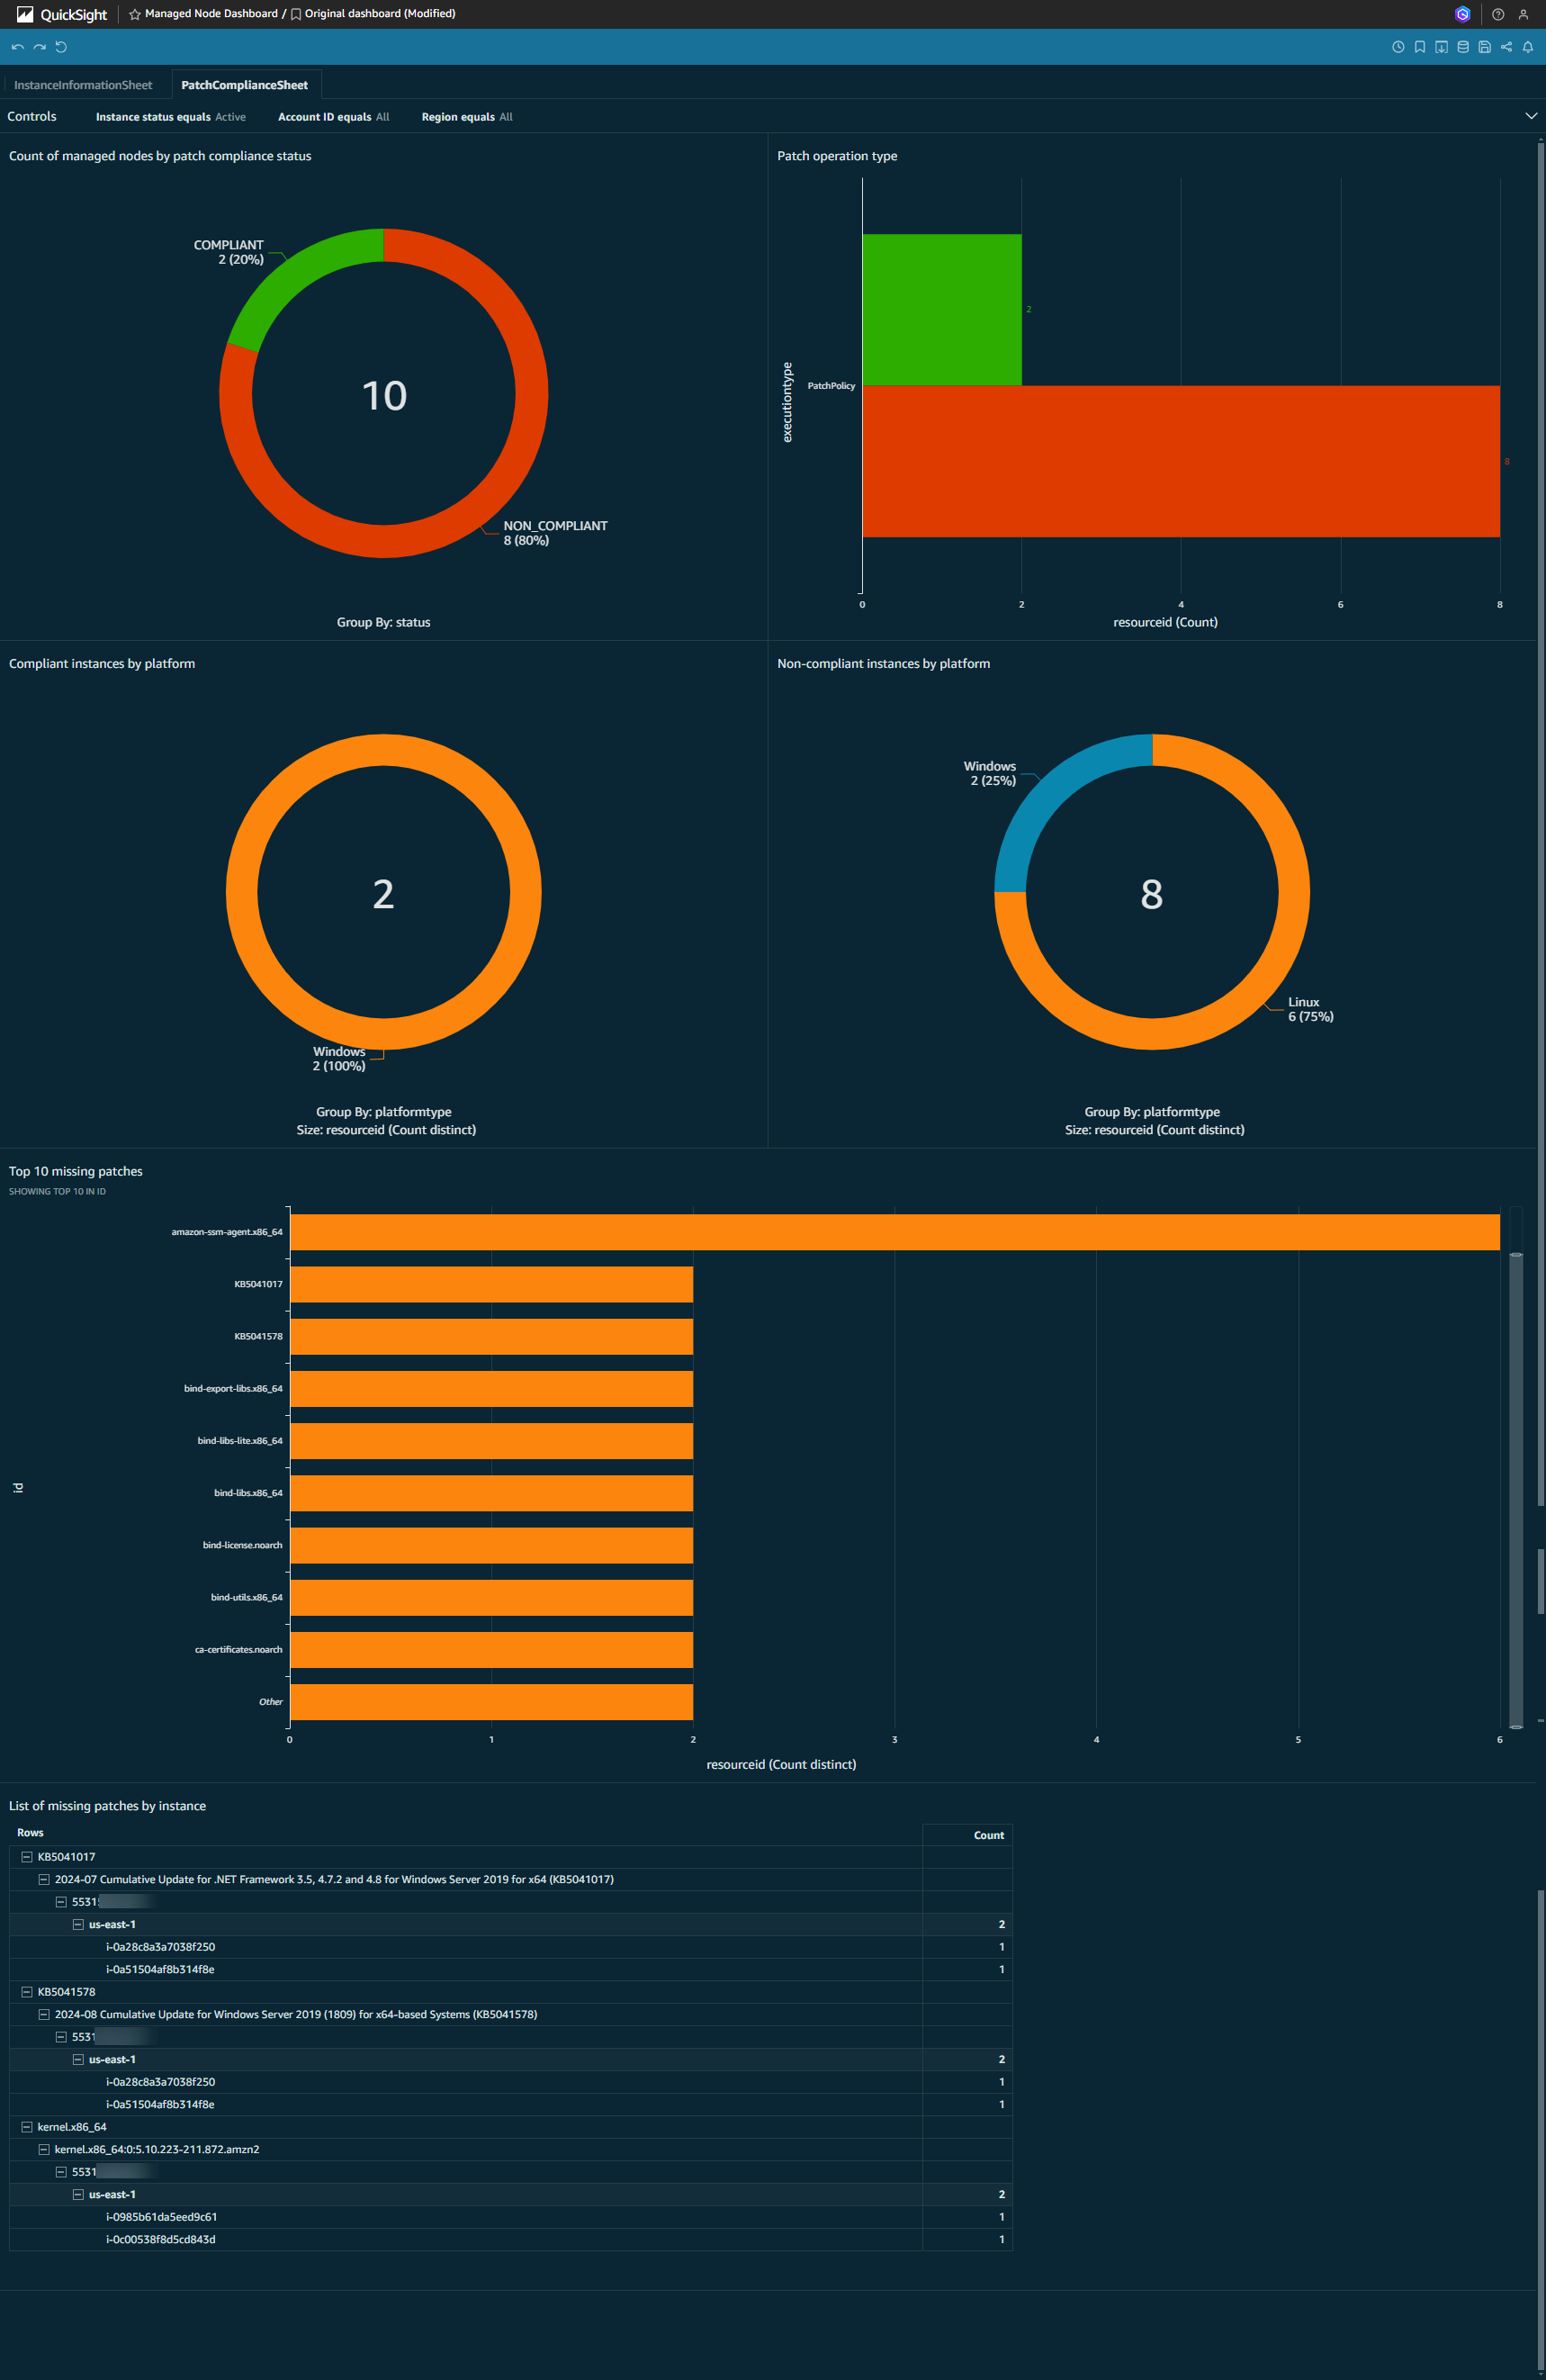
The CloudFormation stack deployed in Deploy a CloudFormation stack for QuickSight in the central reporting account, created QuickSight datasets and an empty analysis dashboard so you can begin visualizing patch compliance and inventory metadata.
To create QuickSight visuals, follow the procedures in the two topics listed below:
- Part 1: Create QuickSight visuals based on metadata for managed nodes
- Part 2: Create AWS QuickSight Visuals for information on Patch Compliance
By following the two topics above, you can create a QuickSight dashboard with two sheets that look similar to this:
- Instance information
- Patch compliance
Clean-up deployed resources
The sample CloudFormation templates in this recipe delete the contents of the S3 buckets upon deleting the CloudFormation stack for the central reporting account.
To clean-up the sample resources created in Phase 2: Member account configuration, you must first delete the stack instances in your StackSet and then delete the StackSet.
To clean-up the sample resources created in Phase 1: Central account setup, perform the following steps:
- Delete the resources in the stack,
quicksight, deployed in the section Deploy a CloudFormation stack for QuickSight in the central reporting account. - Delete the resources in the stack,
patch-reporting, deployed in the section Deploy a CloudFormation stack for Athena in the central reporting account.
For information on how to delete CloudFormation stacks, see Delete a stack from the CloudFormation console.
Next steps
Below you will find a series of related AWS blogs which can be used as a reference to improve your patch operations and reporting mechanisms.
- Automate Systems Manager patching reports via email and Slack notifications in an AWS Organization
- In this blog post, we’ll explore how to automate the creation and delivery of patching reports, streamlining the process of tracking patching operations. By leveraging AWS services such as AWS Lambda, Amazon EventBridge, AWS Step Functions, and Amazon DynamoDB, you can consolidate Systems Manager Patch Manager execution details from multiple accounts, generate comprehensive reports, and distribute them via email and Slack notifications, empowering your team with the insights needed to maintain a secure and compliant infrastructure.
- Troubleshooting AWS Systems Manager patching made easy with Amazon Bedrock’s automated recommendations
- In this post, we’ll explore how Amazon Bedrock can simplify the troubleshooting process for Systems Manager patching failures. Bedrock’s automated analysis and recommendation capabilities can help you quickly identify the root causes of patching problems and implement the right solutions, saving you valuable time and effort.
- Visualize AWS Systems Manager Patch Manager information using Amazon QuickSight
- In this blog post, learn how to build an Amazon QuickSight dashboard to visualize critical patch and inventory information to speed up MTTR. Also, you can use filters to search for a specific AWS Account, specific AWS Region, Amazon Elastic Compute Cloud (Amazon EC2) name, or check installed/missed packages.
- Automate vulnerability management and remediation in AWS using Amazon Inspector and AWS Systems Manager – Part 1
- In Part 1 of this series, you’ll learn how to remediate Inspector findings for a specific vulnerability affecting multiple EC2 instances. In Part 2, you'll learn how to directly invoke the Systems Manager Automation runbook to remediate all Amazon Inspector findings for EC2 instances using resource tags and Amazon Inspector finding severity.
Technical terminology glossary
| Term | Definition |
|---|---|
| AWS Glue Crawler | A service that automatically discovers and catalogs metadata from data sources, creating tables in the AWS Glue Data Catalog. |
| AWS Organizations | A service for centrally managing and governing multiple AWS accounts as a single organization. |
| Custom Resource | A CloudFormation resource type that enables you to write custom provisioning logic in templates. |
| Delegated Administrator | An AWS account that has been granted permissions to administer certain AWS services on behalf of an AWS organization. |
| Managed Node | Any server (EC2 instance or VM on-premises or in other clouds) that is configured for management by AWS Systems Manager. Requires the SSM Agent to be installed and properly configured. |
| Patch Baseline | A set of rules that define which patches should be installed on your managed nodes, including approval rules for different severity levels. |
| Patch Compliance | The state of a managed node regarding required patches. A node is compliant when all required patches are installed according to the associated patch baseline. |
| Patch Group | A tag-based grouping mechanism that associates managed nodes with specific patch baselines. |
| Resource Data Sync | A Systems Manager feature that automatically aggregates inventory data from managed nodes to a central S3 bucket, enabling consolidated reporting. |
| Service-Managed Permissions | A StackSet permission model that uses AWS Organizations to deploy stack instances to accounts in your organization. |
| SSM Agent | AWS software installed on managed nodes that enables Systems Manager to update, manage, and configure these resources. |
| StackSet | A CloudFormation feature that lets you create, update, or delete stacks across multiple accounts and regions with a single operation. |