AWS CloudShell
To begin, ensure you login to your AWS account with permissions to create and modify resources in IAM, EC2, EBS, VPC, S3, KMS, and Secrets Manager.
From the AWS Management Console, open the AWS CloudShell, a web-based shell environment. If unfamiliar, review the 2-minute YouTube video for an overview and check out CloudShell with VPC environment that we'll use to test nodes API from internal IP address space.
Once ready, you can execute the commands to deploy and test blueprints in the CloudShell.
AWS Cloud 9 IS NO LONGER USED (the instructions below will be removed soon, use AWS CloudShell instead)
AWS Cloud9 Setup
Most steps in this repository will need to be performed from a Linux command prompt. An especially convenient way of doing this is to use AWS Cloud9, a cloud-based Integrated Development Environment (IDE). Cloud9 allows you to edit source files and execute commands from an easy-to-use web interface. It comes pre-configured with many of the tools needed for software development, and because it runs in the AWS Cloud, it can be an especially easy way to access other cloud services. One other handy feature is that your Cloud9 instances automatically stop running after a configurable period of inactivity, which helps reduce costs.
Create a Cloud9 environment
Navigate to the AWS Cloud9 service in your Management Console, then select Create environment. Choose any name you want. For environment type, select New EC2 instance. For instance type, select Additional instance type and choose t3.medium. For platform, select Amazon Linux 2023. Leave all other settings at their default, then select Create.
Create IAM Role for Cloud9 instance with AWS CLI
If you have AWS Comand Line Interface installed and configured on your local machine, perform the following steps in your local machine. Alternatively, in some regions, you can use AWS CloudShell.
Create an instance profile called Cloud9-Developer-Access
- Create role policy definition file
cat > ec2-trust-policy.json <<EOF
{
"Version": "2012-10-17",
    "Statement": [
        {
        "Effect": "Allow",
        "Principal": {
        "Service": "ec2.amazonaws.com"
        },
        "Action": "sts:AssumeRole"
        }
    ]
}
EOF
- Create new IAM role called "Cloud9-Developer-Access" and assign the new role policy
aws iam create-role \
--role-name Cloud9-Developer-Access \
--assume-role-policy-document file://ec2-trust-policy.json
- Attach AWS Managed policy with AdministratorAccess to the new role
aws iam attach-role-policy \
    --role-name Cloud9-Developer-Access \
    --policy-arn arn:aws:iam::aws:policy/AdministratorAccess
- Create EC2 instance profile
aws iam create-instance-profile --instance-profile-name Cloud9-Developer-Access
- Add the new role to the instance profile
aws iam add-role-to-instance-profile \
    --instance-profile-name Cloud9-Developer-Access \
    --role-name Cloud9-Developer-Access
Modify Cloud9 IAM role
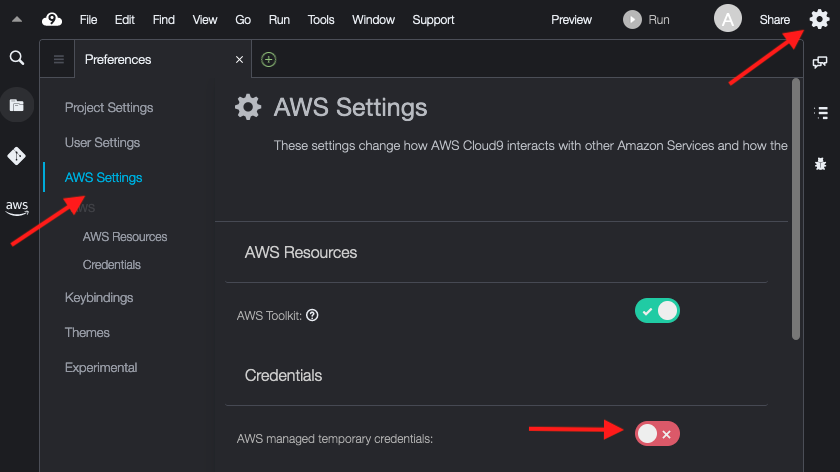
In order to perform some operations for this workshop, it is necessary to assign an IAM machine role to your Cloud9 environment. In order for this role to take effect, it is necessary to disable Cloud9's normal management of your credentials. To do this, click the settings gear icon in the top-right corner of your Cloud9 environment. Scroll down and open the section for AWS Settings. Disable AWS managed temporary credentials. Close the preferences pane.
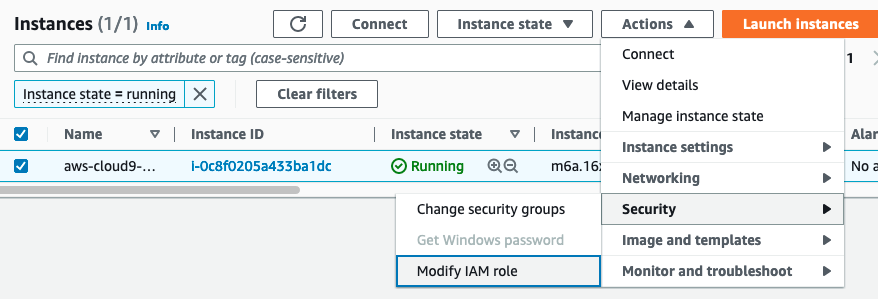
Now attach the machine role you created previously to your Cloud9 environment. To do this, go to the EC2 service in the AWS Management Console and select Instances on the lefthand sidebar. Check the box next to your Cloud9 instance, then select Actions > Security > Modify IAM role
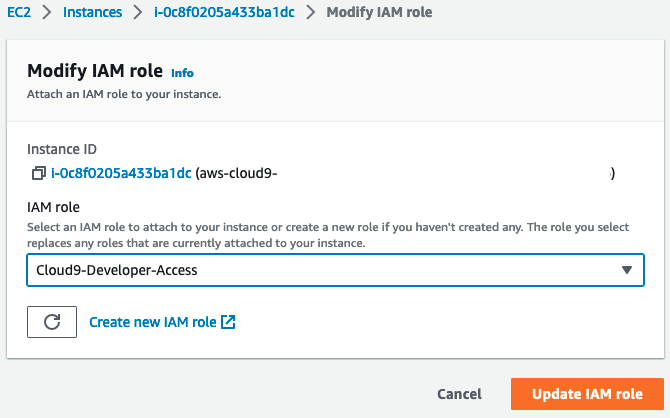
Select the IAM role you created previously and then Update IAM role.
Bootstrapping CDK
Perform the following steps in your Cloud9 instance
After arranging your environment windows, you'll want to install and update some utilities in your environment and set your default AWS region. If you are working in another region, substitute it for us-east-1 in the commands below:
sudo pip install awscli --upgrade
sudo yum install -y jq
aws configure set default.region us-east-1
Install NodeJS v18 and set as the default version
nvm install 18
nvm use 18
nvm alias default 18
The AWS CDK includes the CDK Toolkit (also called the CLI), a command line tool for working with your AWS CDK apps and stacks. Install the CDK toolkit
npm install -g aws-cdk
cdk --version
Install Session Manager plugin for AWS CLI
curl "https://s3.amazonaws.com/session-manager-downloads/plugin/latest/linux_64bit/session-manager-plugin.rpm" -o "session-manager-plugin.rpm"
sudo yum install -y session-manager-plugin.rpm
Deploying stacks with the AWS CDK requires dedicated Amazon S3 buckets and other containers to be available to AWS CloudFormation during deployment. Creating these is called bootstrapping. To bootstrap, issue:
cdk bootstrap aws://<INSERT_YOUR_AWS_ACCOUNT_NUMBER>/<INSERT_YOUR_AWS_REGION>
Clearing up and deleting AWS Cloud9
-
Delete Cloud9 instance
Navigate to the AWS Cloud9 service in your Management Console, then select the environment you have created. On the top right, click Delete button and follow the instructions.
-
Delete the instance profile and IAM role
aws iam delete-instance-profile --instance-profile-name Cloud9-Developer-Access
aws iam delete-role --role-name Cloud9-Developer-Access