Building an enterprise agentic AI platform on Amazon Bedrock AgentCore
A hands-on AWS workshop for building an enterprise-style landing-zone pattern for agentic AI workloads on Amazon Bedrock and Amazon Bedrock AgentCore. You assemble governed model access, tool and agent registries, security controls, and observability — the foundation enterprises need to move agents from proof-of-concept to production — using AWS-native services alongside proven open-source components (LiteLLM, MCP Gateway & Registry, Strands Agents, and FAST).
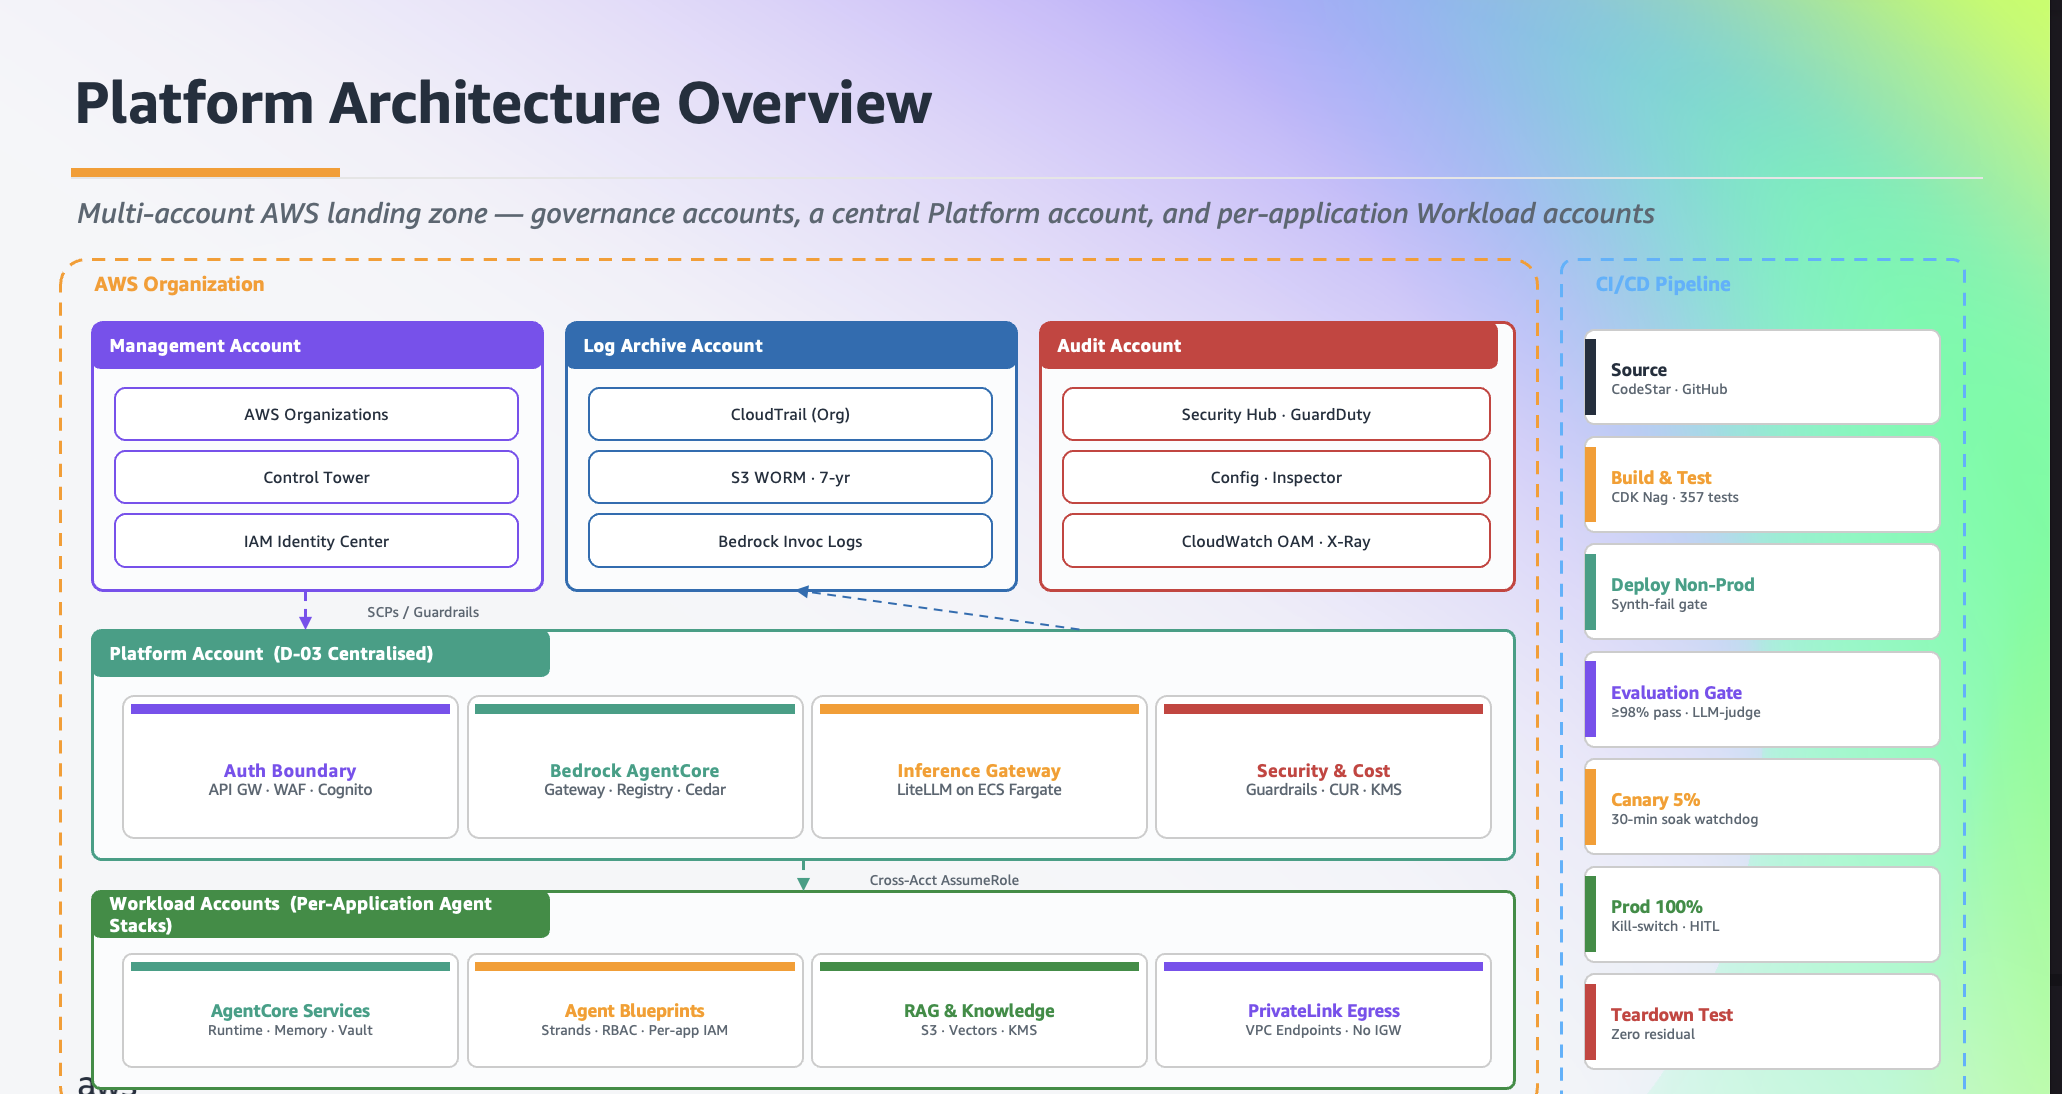
Why this workshop
Enterprises are moving beyond chatbots and proof-of-concept agents, but the jump to production takes more than a better model — it takes a platform: governed, cost-attributed model access; a registry to discover and reuse tools and agents; security guardrails and authorization; and observability across the whole fleet.
Amazon Bedrock AgentCore provides the managed runtime, memory, gateway, identity, and observability you would otherwise build yourself. This workshop shows how to compose AgentCore with an LLM Gateway (governed model access), an MCP Gateway & Registry (tool and agent discovery), and Strands Agents (the agents themselves) into a coherent enterprise foundation — then deploy a real agent on top of it.
What you'll build
The workshop follows two complementary personas — the platform engineer who provides governed LLM and tool infrastructure (Modules 2, 3a, 3b), and the AI/ML engineer who builds agents on top of it (Module 4):
- Module 1 — The Vision: why enterprises need a platform approach to agentic AI, not just individual agents (all tracks).
- Module 2 — LLM Gateway: deploy LiteLLM Proxy on ECS Fargate for governed, cost-attributed access to Amazon Bedrock models.
- Module 3a — MCP Registry + Tools Gateway: register tools in the MCP Gateway & Registry, then layer an AgentCore Tools Gateway on top for JWT auth, audit, and guardrails.
- Module 3b — AgentCore Registry & Gateway: AWS-native tool governance with Amazon Bedrock AgentCore, Cedar-based authorization, and EventBridge-driven approval workflows.
- Module 4 — Build Your Agent: deploy a full-stack travel agent using FAST (Fullstack AgentCore Solution Template) on Amazon Bedrock AgentCore, wired to the platform via either the MCP path or the AgentCore path.
Choose your track
| Track | Best for | You do | Duration |
|---|---|---|---|
| 1 — Fast Path | AI/ML engineers who want to build an agent | Jump straight to Module 4 — platform is pre-deployed | ~1.5–2 hrs |
| 2 — Build the Platform | Platform engineers | Modules 1 → 2 → 3a → 3b (stops before the agent) | ~2–3 hrs |
| 3 — Full Journey | Solutions architects, tech leads | Modules 1 → 2 → 3a → 3b → 4 end-to-end | ~3–4 hrs |
All tracks share Module 1, which ends with a track selector so you can pick the right path.
Who it's for
A 300-level workshop for Platform Engineers, AI/ML Engineers, and Solutions Architects. It is not an introduction to AWS or AI/ML — you should already have:
- Basic familiarity with core AWS services (IAM, Lambda, CloudFormation, ECS Fargate, API Gateway, Cognito, CloudWatch).
- Comfort with the command line and the AWS CLI.
- Familiarity with Amazon Bedrock and how LLMs use tools (function/tool calling).
Each module opens with a short verification block so you can confirm the expected tools are installed before you begin.
Running the workshop
You can run this two ways. Both deploy the same five CloudFormation stacks (from
contentspec.yaml) and land you in the same browser-based Code Editor IDE, so every module
works identically.
- At an AWS event — Workshop Studio auto-provisions a pre-configured account; participants use
the scoped
WSParticipantRole. Nothing to deploy yourself. - Self-paced — run it in your own AWS account with one deploy script.
Prerequisites (self-paced)
- AWS CLI v2 — configured for an account you own (install (opens in new tab)).
yq(opens in new tab) — the deploy script readscontentspec.yamlwith it.- Git and a modern browser (Chrome/Firefox/Edge).
- Region — deploy into a validated region:
us-west-2(default),us-east-1, oreu-west-1. The workshop has been built and tested against the Bedrock model and AgentCore availability in these regions; the deploy adapts model IDs and resources to your region automatically and a preflight check confirms the required capabilities before any stack is created. Model access must be granted per region. (Other regions are not supported — the Amazon Bedrock AgentCore Registry control plane is not yet generally available everywhere, which breaks Modules 3b and 4.) - Permissions — attach the scoped deploy policies (explicit actions only, each regional
statement restricted to the validated regions) in
static/cfn/self-service-deploy-policy-{1..4}.json(opens in new tab) — split across four files to stay under IAM's per-policy size limit. (AdministratorAccessalso works if you'd rather not manage four policies.) We recommend a dedicated account you can tear down when finished.
⚠️ Cost notice. Provisioning creates real, billable AWS resources (Amazon DocumentDB, Aurora PostgreSQL, ECS Fargate, NAT Gateways, Application Load Balancers, CloudFront, Lambda, and Amazon Bedrock model invocations) in your chosen region. Tear everything down with
./deploy-cfn.sh destroywhen you finish to stop charges.
Quick start (self-paced)
git clone https://github.com/aws-samples/sample-ai-agent-factory.git
cd sample-ai-agent-factory/workshop-building-agentic-ai-platform

# Set a supported region (default us-west-2; see Prerequisites above)
aws configure set region us-west-2   # or us-east-1, eu-west-1

# Deploy all 5 stacks (LLM Gateway, MCP Registry, Tools Gateway, AgentCore, Code Editor IDE)
./scripts/self-service-deploy.sh        # ~30-45 min; prints the IDE URL + password at the end

# Verify the environment is healthy (use the region you deployed into)
./scripts/self-test.sh -r "$(aws configure get region)"   # expect: 5 passed, 0 failed
Open the printed IDE URL, sign in with the generated IdePassword, and follow the workshop guide
starting at Module 1. The full self-paced walkthrough lives in
content/introduction/getting-started/self-service.en.md.
Running the modules — CLI or notebook
The deploy above only stands up the infrastructure. The hands-on work happens inside the
browser Code Editor IDE (the URL the deploy printed), not on your laptop — that IDE comes
with Python, JupyterLab, Node.js, the AWS CDK, pre-configured AWS credentials, and the workshop
source code pre-installed under /workshop.
Most module sections offer two equivalent paths — pick whichever you prefer; you do not need to do both, they reach the same result:
| Path | How to run it | Where the steps live |
|---|---|---|
| CLI walkthrough | Open a terminal in the IDE (Terminal → New Terminal, Ctrl+`). Copy each command block from the workshop page and paste it into that terminal, in order. The shell already sits in /workshop with credentials and the right region. | The fenced bash blocks on each module page (the workshop guide). |
| Notebook walkthrough | In the IDE file explorer, open the notebook named on the page (under /workshop/source/<module>/notebooks/), select the workshop kernel (or workshop-fast for Module 4b), and run cells top-to-bottom (Shift+Enter, or Run All). | The .ipynb files referenced by each page. |
A few rules of thumb:
- Run everything in the IDE terminal/notebooks, not your local machine. The only commands you
run locally are the three lifecycle ones above:
self-service-deploy.sh,self-test.sh, anddeploy-cfn.sh destroy. - Run steps in order within a module — later blocks/cells reuse environment variables (and, in Module 3b, an assumed IAM persona) set by earlier ones. If you switch between the CLI and the notebook path mid-module, re-run that module's setup steps so the state is consistent.
- Module ordering follows your track (see the track table above). Track 1 jumps to Module 4 against the pre-deployed platform; Tracks 2/3 go Module 2 → 3a → 3b (→ 4).
- Each page calls out when a step's outcome is an expected error (the governance "negative
tests" in Module 3b deliberately show
AccessDenied) — those are teaching moments, not failures.
The five stacks deploy in contentspec.yaml order — LLM Gateway → MCP Registry → Tools Gateway
→ AgentCore → Code Editor — and tear down in reverse (with a GuardDuty VPC-endpoint pre-cleanup
that otherwise blocks VPC deletion).
Delete Everything
# When finished, tear everything down to stop charges
./deploy-cfn.sh destroy
Repository structure
workshop-building-agentic-ai-platform/   # inside the aws-samples/sample-ai-agent-factory repository
├── content/                      # Workshop markdown (Workshop Studio builds from here)
│   ├── index.en.md               # Landing page
│   ├── introduction/             # Intro + getting-started (aws-event + self-service paths)
│   ├── module-1/                 # The Vision (all tracks)
│   ├── module-2/                 # LLM Gateway (tracks 2, 3)
│   ├── module-3a/                # MCP Registry + Tools Gateway (tracks 2, 3)
│   ├── module-3b/                # AgentCore Registry & Gateway (tracks 2, 3)
│   ├── module-4/                 # FAST agent — dual-path (MCP or AgentCore) (tracks 1, 3)
│   ├── summary/
│   └── cleanup/
├── source/                       # Module source code (pre-staged into /workshop in the IDE)
│   ├── module-2-llm-gateway/     # LLM Gateway scripts + notebooks
│   ├── module-3a-mcp-registry/   # MCP Registry scripts + notebooks
│   ├── module-3b-agentcore/      # AgentCore Registry + Gateway + Cedar notebooks
│   ├── module-4a-tools-gateway/  # Tools Gateway Lambdas + CDK
│   └── module-4b-fast/           # FAST agent notebooks (connects to the gateways)
├── static/
│   ├── cfn/
│   │   ├── llm-gateway/           # Stack 1 — LiteLLM Proxy on ECS (Module 2)
│   │   ├── registry/              # Stack 2 — MCP Gateway & Registry nested stacks (Module 3a)
│   │   ├── tools-gateway/         # Stack 3 — AgentCore Tools Gateway (Module 3a upper layer)
│   │   ├── agentcore/             # Stack 4 — AgentCore Registry & Gateway (Module 3b)
│   │   ├── code-editor.yaml       # Stack 5 — browser VS Code IDE on EC2 (all tracks)
│   │   ├── workshop-iam-policy-core.json     # ParticipantRole policy (bedrock, agentcore, secrets)
│   │   ├── workshop-iam-policy-infra.json    # ParticipantRole policy (ECS, EFS, ELB, etc.)
│   │   ├── workshop-iam-policy-network.json  # ParticipantRole policy (VPC/EC2 networking)
│   │   ├── self-service-deploy-policy-{1..4}.json  # Scoped deploy policies, restricted to validated regions (self-hosted)
│   │   └── self-service-scp.json  # Optional OU-level region-fence SCP (self-hosted hardening)
│   └── img/                       # Workshop images
├── scripts/
│   ├── self-service-deploy.sh     # Self-paced deploy wrapper (preflight + delegate to deploy-cfn.sh)
│   └── self-test.sh               # Post-deploy health check (5 stacks + endpoints)
├── deploy-cfn.sh                  # Deploy/destroy/cleanup engine for all stacks in contentspec.yaml
└── contentspec.yaml               # Workshop Studio config — drives stack deployment order
Contributing
Contributions are welcome — bug reports, corrections, content improvements, and new features. See CONTRIBUTING.md (opens in new tab) for the full guidelines and our Code of Conduct (opens in new tab).
Content lives in /content/ (Workshop Studio markdown), source code in /source/, and
infrastructure in /static/cfn/. Work on a short-lived branch and open a pull request:
git checkout -b feature/{scope-of-change}
# edit content / source / static, then:
git add . && git commit -m "feat: {brief description}"
git push -u origin feature/{scope-of-change}
Content guidelines
- Index files:
index.en.md(loads at folder root); named pages:{name}.en.md. - Callouts use Workshop Studio directives —
::alert[…]{type="info|warning|error"}— not Hugo{{% notice %}}shortcodes. - Markdown →
/content/, images →/static/img/, CloudFormation →/static/cfn/. - Run
cfn-linton any changed template and the module unit tests (pytest) before pushing.
Security
If you discover a potential security issue, please follow the AWS vulnerability reporting process described in CONTRIBUTING.md (opens in new tab) — do not open a public GitHub issue.
License
Licensed under MIT-0. See LICENSE (opens in new tab). Third-party components retain their own licenses — see THIRD_PARTY_LICENSES.md (opens in new tab).