Deploy Option
Configuration Method
GenU allows you to change settings in parameter.ts or through AWS CDK context.
Since you can define settings for multiple environments, it is recommended to use parameter.ts when building a new environment. For backward compatibility, parameters are retrieved in the order of context > parameter.ts.
When using Context: While CDK context can be specified with '-c', this won't trigger frontend builds since no code changes are made. For this asset, it's recommended to change all settings in cdk.json.
How to change parameter.ts values
Change values in packages/cdk/parameter.ts to configure settings.
// parameter.ts
const envs: Record<string, Partial<StackInput>> = {
  dev: {
    ragEnabled: false,
    // Customize other parameters as needed
  },
  staging: {
    ragEnabled: false,
    // Customize other parameters as needed
  },
  prod: {
    ragEnabled: true,
    // Customize other parameters as needed
  },
};
If the environment specified by env in CDK context is defined in parameter.ts, the values in parameter.ts take precedence. If the specified env environment is not defined in parameter.ts, the environment is created with context values.
You can specify env in the context of packages/cdk/cdk.json or switch env with -c.
// cdk.json
{
  "context": {
    "env": "dev"
  }
}
# Deploy with the env specified in cdk.json context.env
npm run cdk:deploy

# Deploy with environment set to prod
npm run cdk:deploy -- -c env=prod
When developing locally, specify env as follows:
# Develop locally using the backend specified by cdk.json context.env
npm run web:devw

# Develop locally using the dev2 environment backend
npm run web:devw --env=dev2
How to change cdk.json values
Change values under the context in packages/cdk/cdk.json to configure settings. For example, setting "ragEnabled": true enables the RAG chat use case. After setting context values, redeploy with the following command to apply the settings:
npm run cdk:deploy
Use Case Configuration
Enabling RAG Chat (Amazon Kendra) Use Case
Set ragEnabled to true. (Default is false)
You can also set kendraIndexLanguage to prefered language, which may improve search performance.
Edit parameter.ts
// parameter.ts
const envs: Record<string, Partial<StackInput>> = {
  dev: {
    ragEnabled: true,
    kendraIndexLanguage: 'en',
  },
};
// cdk.json
{
  "context": {
    "ragEnabled": true,
    "kendraIndexLanguage": "en"
  }
}
After making changes, redeploy with npm run cdk:deploy to apply the changes. Data stored in /packages/cdk/rag-docs/docs will be automatically uploaded to the S3 bucket for Kendra data source. (Note that files starting with logs will not be synchronized.)
Note
By default, the Amazon Bedrock User Guide (Japanese) and Amazon Nova User Guide (English) are stored in /packages/cdk/rag-docs/docs as sample data.
Next, perform Kendra Data source Sync with the following steps:
- Open the Amazon Kendra console
- Click on generative-ai-use-cases-index
- Click on Data sources
- Click on "s3-data-source"
- Click on Sync now
When the Status / Summary in Sync run history shows Completed, the process is finished. Files stored in S3 are synchronized and can be searched through Kendra.
Using an Existing Amazon Kendra Index
When using an existing Kendra Index, note that ragEnabled still needs to be true.
Specify the Index ARN in kendraIndexArn. If you are using an S3 data source with the existing Kendra Index, specify the bucket name in kendraDataSourceBucketName.
Edit parameter.ts
// parameter.ts
const envs: Record<string, Partial<StackInput>> = {
  dev: {
    kendraIndexArn: '<Kendra Index ARN>',
    kendraDataSourceBucketName: '<Kendra S3 Data Source Bucket Name>',
  },
};
// cdk.json
{
  "context": {
    "kendraIndexArn": "<Kendra Index ARN>",
    "kendraDataSourceBucketName": "<Kendra S3 Data Source Bucket Name>"
  }
}
After making changes, redeploy with npm run cdk:deploy to apply the changes.
The <Kendra Index ARN> has the following format:
arn:aws:kendra:<Region>:<AWS Account ID>:index/<Index ID>
For example:
arn:aws:kendra:ap-northeast-1:333333333333:index/77777777-3333-4444-aaaa-111111111111
Enabling RAG Chat (Knowledge Base) Use Case
Set ragKnowledgeBaseEnabled to true. (Default is false)
If you have an existing Knowledge Base, set ragKnowledgeBaseId to the knowledge base ID. (If null, an OpenSearch Serverless knowledge base will be created)
Edit parameter.ts
// parameter.ts
const envs: Record<string, Partial<StackInput>> = {
  dev: {
    ragKnowledgeBaseEnabled: true,
    ragKnowledgeBaseId: 'XXXXXXXXXX',
    ragKnowledgeBaseStandbyReplicas: false,
    ragKnowledgeBaseAdvancedParsing: false,
    ragKnowledgeBaseAdvancedParsingModelId:
      'anthropic.claude-3-sonnet-20240229-v1:0',
    embeddingModelId: 'amazon.titan-embed-text-v2:0',
  },
};
// cdk.json
{
  "context": {
    "ragKnowledgeBaseEnabled": true,
    "ragKnowledgeBaseId": "XXXXXXXXXX",
    "ragKnowledgeBaseStandbyReplicas": false,
    "ragKnowledgeBaseAdvancedParsing": false,
    "ragKnowledgeBaseAdvancedParsingModelId": "anthropic.claude-3-sonnet-20240229-v1:0",
    "embeddingModelId": "amazon.titan-embed-text-v2:0",
    "rerankingModelId": "amazon.rerank-v1:0",
    "queryDecompositionEnabled": true
  }
}
ragKnowledgeBaseStandbyReplicas relates to the redundancy of automatically created OpenSearch Serverless:
false: Suitable for development and testing purposes. Runs in a single AZ, reducing OCU costs by half.true: Suitable for production environments. Runs across multiple AZs, enabling high availability.
embeddingModelId is the model used for embedding. Currently, the following models are supported:
"amazon.titan-embed-text-v1"
"amazon.titan-embed-text-v2:0"
"cohere.embed-multilingual-v3"
"cohere.embed-english-v3"
rerankingModelId is the model used for reranking. Currently, the following models are supported: (Default is null)
"amazon.rerank-v1:0"
"cohere.rerank-v3-5:0"
queryDecompositionEnabled enables query decomposition. (Default is false)
After making changes, redeploy with npm run cdk:deploy to apply the changes. The Knowledge Base will be deployed in the region specified by modelRegion. Please note the following:
- At least one model from the
modelRegionregion must be defined inmodelIds. - The
embeddingModelIdmodel must be enabled in Bedrock in themodelRegionregion. - The
rerankingModelIdmodel must be enabled in Bedrock in themodelRegionregion. - AWS CDK Bootstrap must be completed in the
modelRegionregion before runningnpm run cdk:deploy.
# Example bootstrap command (if modelRegion is us-east-1)
npx -w packages/cdk cdk bootstrap --region us-east-1
During deployment, data stored in /packages/cdk/rag-docs/docs will be automatically uploaded to the S3 bucket for Knowledge Base data source. (Note that files starting with logs will not be synchronized.)
Note
By default, the Amazon Bedrock User Guide (Japanese) and Amazon Nova User Guide (English) are stored in /packages/cdk/rag-docs/docs as sample data.
After deployment is complete, follow these steps to sync the Knowledge Base Data source:
- Open the Knowledge Base console
- Click on generative-ai-use-cases-jp
- Select s3-data-source and click Sync
- Select web-crawler-data-source and click Sync
When the Status of each data source becomes Available, the process is complete. Files stored in S3 and web pages fetched by the Web Crawler have been ingested and can be searched through the Knowledge Base.
Note
After enabling RAG Chat (Knowledge Base), if you want to disable it again, set ragKnowledgeBaseEnabled: false and redeploy. This will disable RAG Chat (Knowledge Base), but the RagKnowledgeBaseStack itself will remain. To completely remove it, open the management console and delete the RagKnowledgeBaseStack stack from CloudFormation in the modelRegion.
Enabling Advanced Parsing
You can enable the Advanced Parsing feature. Advanced Parsing is a feature that analyzes and extracts information from unstructured data such as tables and graphs in files. By adding data extracted from tables and graphs in addition to text in files, it can improve RAG accuracy.
ragKnowledgeBaseAdvancedParsing: Set totrueto enable Advanced ParsingragKnowledgeBaseAdvancedParsingModelId: Specify the model ID used for extracting information- Supported models (as of 2024/08)
anthropic.claude-3-sonnet-20240229-v1:0anthropic.claude-3-haiku-20240307-v1:0
Edit parameter.ts
// parameter.ts
const envs: Record<string, Partial<StackInput>> = {
  dev: {
    ragKnowledgeBaseEnabled: true,
    ragKnowledgeBaseId: 'XXXXXXXXXX',
    ragKnowledgeBaseStandbyReplicas: false,
    ragKnowledgeBaseAdvancedParsing: true,
    ragKnowledgeBaseAdvancedParsingModelId:
      'anthropic.claude-3-sonnet-20240229-v1:0',
    embeddingModelId: 'amazon.titan-embed-text-v2:0',
  },
};
// cdk.json
{
  "context": {
    "ragKnowledgeBaseEnabled": true,
    "ragKnowledgeBaseId": "XXXXXXXXXX",
    "ragKnowledgeBaseStandbyReplicas": false,
    "ragKnowledgeBaseAdvancedParsing": true,
    "ragKnowledgeBaseAdvancedParsingModelId": "anthropic.claude-3-sonnet-20240229-v1:0",
    "embeddingModelId": "amazon.titan-embed-text-v2:0"
  }
}
Changing Chunking Strategy
In rag-knowledge-base-stack.ts, there's a section to specify chunkingConfiguration. Uncomment it and refer to the CDK documentation or CloudFormation documentation to change to any desired chunking strategy.
For example, to change to semantic chunking, uncomment and specify as follows:
// packages/cdk/lib/rag-knowledge-base-stack.ts
// Semantic chunking
chunkingConfiguration: {
  chunkingStrategy: 'SEMANTIC',
  semanticChunkingConfiguration: {
    maxTokens: 300,
    bufferSize: 0,
    breakpointPercentileThreshold: 95,
  },
},
Then, refer to the chapter Recreating Knowledge Base or OpenSearch Service to apply changes to apply the changes.
Recreating Knowledge Base or OpenSearch Service to apply changes
For Knowledge Base chunking strategy or the following OpenSearch Service parameters, changes will not be reflected if you run npm run cdk:deploy after making changes:
embeddingModelIdragKnowledgeBaseStandbyReplicasragKnowledgeBaseAdvancedParsingragKnowledgeBaseAdvancedParsingModelId
To apply changes, follow these steps to delete and recreate the existing Knowledge Base-related resources:
- Set
ragKnowledgeBaseEnabledto false and deploy - Open CloudFormation (note the region), click on RagKnowledgeBaseStack
- Click Delete in the upper right to delete RagKnowledgeBaseStack
This will delete S3 buckets and RAG files, temporarily making RAG chat unavailable - Make changes to parameters or chunking strategy
- After RagKnowledgeBaseStack deletion is complete, redeploy with
npm run cdk:deploy
With the deletion of RagKnowledgeBaseStack, the S3 bucket for RAG chat and the RAG files stored in it will be deleted. If you have uploaded RAG files to the S3 bucket, back them up and upload them again after redeployment. Also, follow the previously mentioned steps to sync the Data sources (s3-data-source, web-crawler-data-source) again.
How to check OpenSearch Service Index in the management console
By default, when you open the Indexes tab of OpenSearch Service from the management console, you'll see an error message: User does not have permissions for the requested resource.
This is because the Data access policy doesn't allow the IAM user logged into the management console.
Follow these steps to manually add the necessary permissions:
- Open OpenSearch Service (note the region), click on generative-ai-use-cases-jp
- Click on the Associated policy named generative-ai-use-cases-jp at the bottom of the page
- Click Edit in the upper right
- Click Add principals in the Select principals section in the middle of the page, and add the IAM User/Role etc. (the permissions you're logged into the management console with)
- Save
After saving, wait a moment and try accessing again.
Metadata Filter Configuration
Filter settings can be configured in packages/common/src/custom/rag-knowledge-base.ts. Customize as needed.
dynamicFilters: Dynamically creates and applies filters on the application side. (Example: Creating and applying filters based on user attributes such as department) Currently only supports Claude Sonnet 3.5. (Throttling may occur due to quotas) You can also map Cognito Groups or SAML IdP Groups to Attributes for use. (See SAML Integration with Microsoft Entra ID for details)implicitFilters: If specified, the LLM creates and applies filters for the specified metadata based on the user's question. (Example: Filtering by year mentioned in the user's question to search only data from that year) If an empty array, no filters are applied.hiddenStaticExplicitFilters: Applies filters at the application level. (Example: Excluding data classified as secret)userDefinedExplicitFilters: Defines filters displayed in the application UI.
Enabling Agent Chat Use Case
In the Agent Chat use case, you can:
- Use Code Interpreter for data visualization, code execution, and data analysis
- Execute actions using Agents for Amazon Bedrock
- Reference vector databases from Knowledge Bases for Amazon Bedrock
Agents are created in the region specified by modelRegion. The agentEnabled: true option mentioned below is for creating Code Interpreter agents and search agents. When adding manually created Agents, agentEnabled: true is not required.
Deploying Code Interpreter Agent
You can perform data visualization, code execution, data analysis, etc. using Code Interpreter.
The Code Interpreter agent is deployed when you enable Agent.
Set agentEnabled to true. (Default is false)
Edit parameter.ts
// parameter.ts
const envs: Record<string, Partial<StackInput>> = {
  dev: {
    agentEnabled: true,
  },
};
// cdk.json
{
  "context": {
    "agentEnabled": true
  }
}
Customizing Agent Foundation Model
You can customize the foundation model used by Code Interpreter and Search Agent. By default, global.anthropic.claude-sonnet-4-6 is used.
agentFoundationModel: Specify the model to use for agents. Only models supported by Bedrock Agent are available.
Edit parameter.ts
// parameter.ts
const envs: Record<string, Partial<StackInput>> = {
  dev: {
    agentFoundationModel: 'global.anthropic.claude-sonnet-4-6',
  },
};
// cdk.json
{
  "context": {
    "agentFoundationModel": "global.anthropic.claude-sonnet-4-6"
  }
}
Deploying Search Agent
Creates an Agent that connects to APIs to reference the latest information for responses. You can customize the Agent to add other actions and create multiple Agents to switch between.
The default search agents available are [Data for AI in Brave Search API] (https://brave.com/search/api/) or [Tavily's Tavily Search API] (https://docs.tavily.com/documentation/api-reference/endpoint/search). It is also possible to customise the API so that it can be used with other APIs. Please note that Brave Search API requires credit card setup, even for free plans.
Note
When you enable the Agent Chat use case, it only sends data to external APIs in the Agent Chat use case. (By default, Brave Search API or Tavily Search) Other use cases can continue to be used entirely within AWS. Please check your internal policies and API terms of service before enabling.
Set agentEnabled and searchAgentEnabled to true (default is false), and then set the required fields.
searchEngine: Specify the search engine to use. You can useBraveorTavily.searchApiKey: Specify the API key of the search engine.
Edit parameter.ts
// parameter.ts
const envs: Record<string, Partial<StackInput>> = {
  dev: {
    agentEnabled: true,
    searchAgentEnabled: true,
    searchEngine: 'Brave' or 'Tavily',
    searchApiKey: '<Search Engine API Key>',
  },
};
// cdk.json
{
  "context": {
    "agentEnabled": true,
    "searchAgentEnabled": true,
    "searchEngine": "Brave" or "Tavily",
    "searchApiKey": "<Search Engine API Key>"
  }
}
After making changes, redeploy with npm run cdk:deploy to apply the changes. This will deploy the default search engine Agent.
Note
If you want to disable the search agent after enabling it, set searchAgentEnabled: false and redeploy. This will disable the search agent, but the WebSearchAgentStack itself will remain. To completely remove it, open the management console and delete the WebSearchAgentStack stack from CloudFormation in the modelRegion.
Adding Manually Created Agents
If you want to register manually created Agents other than the default Agents, add additional Agents to agents. Note that Agents should be created in the modelRegion.
[!NOTE] >
agentEnabled: trueis an option to create Code Interpreter agents and search agents, so it is not required when adding manually created Agents.
Edit parameter.ts
// parameter.ts
const envs: Record<string, Partial<StackInput>> = {
  dev: {
    agents: [
      {
        displayName: 'MyCustomAgent',
        agentId: 'XXXXXXXXX',
        aliasId: 'YYYYYYYY',
      },
    ],
  },
};
// cdk.json
{
  "context": {
    "agents": [
      {
        "displayName": "MyCustomAgent",
        "agentId": "XXXXXXXXX",
        "aliasId": "YYYYYYYY"
      }
    ]
  }
}
You can also modify packages/cdk/lib/construct/agent.ts to define new Agents. If you use Agents defined in CDK, set agentEnabled: true.
Deploying Knowledge Bases for Amazon Bedrock Agent
You can also manually create and register agents that integrate with Knowledge Bases for Amazon Bedrock.
First, create a knowledge base from the knowledge base AWS console by referring to the Knowledge Bases for Amazon Bedrock documentation. Create it in the same region as modelRegion.
Next, manually create an Agent from the agent AWS console. Keep the settings mostly default, and enter a prompt referring to the example below for the Agent prompt. Don't set any action groups and proceed, register the knowledge base created in the previous step, and enter a prompt referring to the example below.
Agent prompt example: You are an assistant that responds to instructions. Search for information according to instructions and respond appropriately based on the content. Do not answer about things not mentioned in the information. You can search multiple times.
Knowledge Base prompt example: Search by keywords and get information. You can use it for tasks such as research, asking about X, or summarizing. Guess search keywords from the conversation. Search results may include low-relevance content, so only refer to highly relevant content when answering. You can execute multiple times.
Create an Alias from the created Agent, copy the agentId and aliasId, and add them in the following format. Set the displayName to the name you want to display in the UI. Also, set agentEnabled to true.
Edit parameter.ts
// parameter.ts
const envs: Record<string, Partial<StackInput>> = {
  dev: {
    agentEnabled: true,
    agents: [
      {
        displayName: 'Knowledge Base',
        agentId: 'XXXXXXXXX',
        aliasId: 'YYYYYYYY',
      },
    ],
  },
};
// cdk.json
{
  "context": {
    "agentEnabled": true,
    "agents": [
      {
        "displayName": "Knowledge Base",
        "agentId": "XXXXXXXXX",
        "aliasId": "YYYYYYYY"
      }
    ]
  }
}
Displaying Agents Inline
By default, Agents can be selected from within the "Agent Chat" use case. By enabling the inline display option, the "Agent Chat" use case will no longer be displayed, and all available Agents will be displayed like other use cases. Set inlineAgents to true when you have valid Agents.
Edit parameter.ts
// parameter.ts
const envs: Record<string, Partial<StackInput>> = {
  dev: {
    inlineAgents: true,
  },
};
// cdk.json
{
  "context": {
    "inlineAgents": true
  }
}
Enabling Research Agent Use Case
The Research Agent provides advanced research capabilities using web search and AWS documentation search.
Prerequisites
- Brave Search API Key (Required): Obtain from AWS Marketplace
- Tavily API Key (Optional): For additional search capabilities
Tip
For instructions on obtaining the Brave Search API key, see the Research Agent Deployment Guide.
Configuration Example in parameter.ts
const envs: Record<string, Partial<StackInput>> = {
  dev: {
    researchAgentEnabled: true,
    researchAgentBraveApiKey: 'YOUR_BRAVE_API_KEY',
    researchAgentTavilyApiKey: '', // Optional
  },
};
Configuration Example in cdk.json
{
  "context": {
    "researchAgentEnabled": true,
    "researchAgentBraveApiKey": "YOUR_BRAVE_API_KEY",
    "researchAgentTavilyApiKey": ""
  }
}
For detailed instructions, see the Research Agent Deployment Guide.
Enabling MCP Chat Use Case
Warning
The MCP Chat use case has been deprecated. Please use the AgentCore use case for MCP utilization. The MCP chat use case is scheduled for complete removal in v6.
MCP (Model Context Protocol) is a protocol that connects LLM models with external data and tools.
In GenU, we provide chat use cases that execute MCP-compliant tools using Strands Agents.
To enable MCP chat use cases, the docker command must be executable.
Edit parameter.ts
const envs: Record<string, Partial<StackInput>> = {
  dev: {
    mcpEnabled: true,
  },
};
// cdk.json
{
  "context": {
    "mcpEnabled": true
  }
}
The MCP servers to be used are defined in packages/cdk/mcp-api/mcp.json. If you want to add tools other than those defined by default, please modify mcp.json.
However, there are currently the following constraints on the MCP server and its configuration:
- The MCP server runs on AWS Lambda, so file writing is not possible. (Writing to
/tmpis possible, but you cannot retrieve the files.) - The MCP server must be executable with
uvxornpx. - The MCP client can only use stdio.
- Currently, multimodal requests are not supported.
- A mechanism to dynamically obtain API Keys and set them as environment variables has not yet been implemented.
- A mechanism for users to select which MCP server to use has not yet been implemented. (Currently, all tools defined in mcp.json are used.)
- In mcp.json, you can configure
command,args, andenv. Here's a specific example:
{
  "mcpServers": {
    "SERVER_NAME": {
      "command": "uvx",
      "args": ["SERVER_ARG"]
      "env": {
        "YOUR_API_KEY": "xxx"
      }
    }
  }
}
Enabling Flow Chat Use Case
In the Flow Chat use case, you can call created Flows.
Add or edit the flows array.
Manually create Flows from the Amazon Bedrock Flows AWS console. Then create an Alias and add the created Flow's flowId, aliasId, and flowName. In description, write an explanation to prompt user input. This explanation will be displayed in the Flow chat text box. Here's an example:
Edit parameter.ts
// parameter.ts
const envs: Record<string, Partial<StackInput>> = {
  dev: {
    flows: [
      {
        flowId: 'XXXXXXXXXX',
        aliasId: 'YYYYYYYYYY',
        flowName: 'WhatIsItFlow',
        description:
          'This flow searches the web for any keyword and returns an explanation. Please enter text',
      },
    ],
  },
};
// cdk.json
{
  "context": {
    "flows": [
      {
        "flowId": "XXXXXXXXXX",
        "aliasId": "YYYYYYYYYY",
        "flowName": "WhatIsItFlow",
        "description": "This flow searches the web for any keyword and returns an explanation. Please enter text"
      },
      {
        "flowId": "ZZZZZZZZZZ",
        "aliasId": "OOOOOOOOOO",
        "flowName": "RecipeFlow",
        "description": "Creates a recipe based on the given JSON.\nPlease enter like {\"dish\": \"curry rice\", \"people\": 3}."
      },
      {
        "flowId": "PPPPPPPPPP",
        "aliasId": "QQQQQQQQQQQ",
        "flowName": "TravelPlanFlow",
        "description": "Creates a travel plan based on the given array.\nPlease enter like [{\"place\": \"Tokyo\", \"day\": 3}, {\"place\": \"Osaka\", \"day\": 2}]."
      }
    ]
  }
}
Enabling AgentCore Use Case
This is a use case for integrating with agents created in AgentCore. (Experimental: Breaking changes may be made without notice)
Enabling createGenericAgentCoreRuntime will deploy the default AgentCore Runtime.
By default, it is deployed to modelRegion, but you can override it by specifying agentCoreRegion.
The default agents available in AgentCore can use MCP servers defined in generic/mcp.json.
The MCP servers defined by default are AWS-related MCP servers and MCP servers related to current time.
For more details, please refer to this documentation.
To add MCP servers, add them to the aforementioned generic/mcp.json.
You can use externally created AgentCore Runtimes with agentCoreExternalRuntimes.
Each entry supports the following fields:
name(required): Identifier for the runtime. AgentCore Runtime names only allow alphanumeric characters and underscores.arn(required): ARN of the AgentCore Runtime.display_name(optional): Display name shown in the UI. Useful when you want to show a more descriptive name (including non-ASCII characters such as Japanese) without changing the underlyingname.description(required): Description of the agent. Shown on the agent list page and at the top of the chat page so users can understand the role of each agent at a glance.
When accessing services outside AWS from AgentCore Runtime, use AgentCore Gateway.
By specifying the Gateway ARN in agentCoreGatewayArns, an IAM policy following the principle of least privilege will be configured.
After configuration, use mcp-proxy-for-aws in the MCP settings to specify the endpoint.
For details, refer to the mcp-proxy-for-aws documentation.
To enable the AgentCore use case, the docker command must be executable.
Warning
On Linux machines using x86_64 CPUs (Intel, AMD, etc.), execute the following command before deploying:
docker run --privileged --rm tonistiigi/binfmt --install arm64
If you do not execute the above command, the following error will occur. During the deployment process, ARM-based container images used by AgentCore Runtime are built. When building ARM container images on x86_64 CPUs, errors occur due to differences in CPU architecture.
ERROR: failed to solve: process "/bin/sh -c apt-get update -y && apt-get install curl nodejs npm graphviz -y" did not complete successfully: exit code: 255
AgentCoreStack: fail: docker build --tag cdkasset-64ba68f71e3d29f5b84d8e8d062e841cb600c436bb68a540d6fce32fded36c08 --platform linux/arm64 . exited with error code 1: #0 building with "default" instance using docker driver
Executing this command makes temporary configuration changes to the host's Linux Kernel. By registering QEMU custom handlers in Binary Format Miscellaneous (binfmt_misc), ARM container images can be built. The configuration reverts after a reboot, so re-execution is required when deploying again.
Edit parameter.ts
// parameter.ts
const envs: Record<string, Partial<StackInput>> = {
  dev: {
    createGenericAgentCoreRuntime: true,
    agentCoreRegion: 'us-west-2',
    agentCoreGatewayArns: [
      'arn:aws:bedrock-agentcore:us-west-2:<account>:gateway/<gateway-id>',
    ],
    agentCoreExternalRuntimes: [
      {
        name: 'AgentCore1',
        display_name: 'Customer Support Agent',
        description: 'An agent that responds to customer inquiries.',
        arn: 'arn:aws:bedrock-agentcore:us-west-2:<account>:runtime/agent-core1-xxxxxxxx',
      },
    ],
  },
};
// cdk.json

{
  "context": {
    "createGenericAgentCoreRuntime": true,
    "agentCoreRegion": "us-west-2",
    "agentCoreGatewayArns": [
      "arn:aws:bedrock-agentcore:us-west-2:<account>:gateway/<gateway-id>"
    ],
    "agentCoreExternalRuntimes": [
      {
        "name": "AgentCore1",
        "display_name": "Customer Support Agent",
        "description": "An agent that responds to customer inquiries.",
        "arn": "arn:aws:bedrock-agentcore:us-west-2:<account>:runtime/agent-core1-xxxxxxxx"
      }
    ]
  }
}
Note
After enabling AgentCore use case settings, if you want to disable them again, you can disable the AgentCore use case by setting createGenericAgentCoreRuntime: false and redeploying, but the AgentCoreStack itself will remain. You can completely remove it by opening the Management Console and deleting the AgentCoreStack stack from CloudFormation in the agentCoreRegion.
AgentCore Runtime Network Configuration
AgentCore Runtime can operate in the following network modes:
PUBLIC(default): Operates on public networkPRIVATE: Operates on private network within VPC
Network settings apply to both Generic Runtime and AgentBuilder Runtime.
Use cases for VPC mode:
- When AgentCore Runtime needs to access internal systems or private databases
- For example, when you want to communicate directly with other AWS services (RDS, ElastiCache, etc.) within the VPC
When using VPC mode, configure the following parameters:
agentCoreVpcId: VPC ID to useagentCoreSubnetIds: List of subnet IDs to use
Note
When both agentCoreVpcId and agentCoreSubnetIds are configured, AgentCore Runtime will be deployed in private network mode. If both are left unset (null), it will be deployed in public network mode.
Important
Availability Zone (AZ) Support: AgentCore Runtime has limited supported AZs per region. Subnets must be placed within supported AZs. For details, please refer to the AWS official documentation.
Internet Access: AgentCore Runtime requires internet access for MCP server installation. If connecting to private subnets, configure routes to NAT Gateway.
Edit parameter.ts
// parameter.ts
const envs: Record<string, Partial<StackInput>> = {
  dev: {
    createGenericAgentCoreRuntime: true,
    agentCoreVpcId: 'vpc-xxxxxxxxx',
    agentCoreSubnetIds: ['subnet-xxxxxxxxx', 'subnet-yyyyyyyyy'],
  },
};
// cdk.json
{
  "context": {
    "createGenericAgentCoreRuntime": true,
    "agentCoreVpcId": "vpc-xxxxxxxxx",
    "agentCoreSubnetIds": ["subnet-xxxxxxxxx", "subnet-yyyyyyyyy"]
  }
}
Warning
When using VPC mode, security groups are not automatically deleted when AgentCore Runtime is deleted due to changes such as from PRIVATE to PUBLIC. This is because AWS-managed ENIs created by AgentCore Runtime reference the security groups, making them undeletable by CloudFormation. After deleting AgentCore Runtime, wait for the managed ENIs to be automatically deleted, then manually delete the security groups. The security group IDs that need to be deleted are displayed in the CloudFormation outputs. Note: if the initial deployment fails (e.g., unsupported AZ), the security group may also remain and need to be cleaned up manually.
Enabling AgentBuilder Use Case
This is a use case where users can freely create Agents for each use case by configuring system prompts and arbitrary MCPs. (Experimental: Breaking changes may be made without notice)
Similar to the AgentCore use case, administrators pre-register MCPs in agent-builder/mcp.json. Users can selectively use their preferred MCPs from those registered by administrators.
Enabling agentBuilderEnabled will deploy the AgentCore Runtime for Agent Builder.
By default, it is deployed to modelRegion, but you can override it by specifying agentCoreRegion.
When accessing services outside AWS, use AgentCore Gateway.
By specifying the Gateway ARN in agentCoreGatewayArns, an IAM policy following the principle of least privilege will be configured.
After configuration, use mcp-proxy-for-aws in the MCP settings to specify the endpoint.
For details, refer to the mcp-proxy-for-aws documentation.
Edit parameter.ts
// parameter.ts
const envs: Record<string, Partial<StackInput>> = {
  dev: {
    agentBuilderEnabled: true,
    agentCoreRegion: 'us-west-2',
    agentCoreGatewayArns: [
      'arn:aws:bedrock-agentcore:us-west-2:<account>:gateway/<gateway-id>',
    ],
  },
};
// cdk.json

{
  "context": {
    "agentBuilderEnabled": true,
    "agentCoreRegion": "us-west-2",
    "agentCoreGatewayArns": [
      "arn:aws:bedrock-agentcore:us-west-2:<account>:gateway/<gateway-id>"
    ]
  }
}
Enabling Voice Chat Use Case
Note
The response speed of voice chat is greatly affected by the application's region (the region where GenerativeAiUseCasesStack is deployed). If there is a delay in response, please check if the user is physically located close to the application's region.
This is enabled when you define one or more models in speechToSpeechModelIds.
For speechToSpeechModelIds, please refer to Changing Amazon Bedrock Models.
For default values, please refer to packages/cdk/lib/stack-input.ts.
Enabling Image Generation Use Case
This is enabled when you define one or more models in imageGenerationModelIds.
For imageGenerationModelIds, please refer to Changing Amazon Bedrock Models.
For default values, please refer to packages/cdk/lib/stack-input.ts.
Enabling Video Generation Use Case
This is enabled when you define one or more models in videoGenerationModelIds.
For videoGenerationModelIds, please refer to Changing Amazon Bedrock Models.
For default values, please refer to packages/cdk/lib/stack-input.ts.
Enabling Video Analysis Use Case
In the video analysis use case, you input video image frames and text to have the LLM analyze the image content. There is no direct option to enable the video analysis use case, but a multimodal model must be enabled in the parameters.
As of 2025/03, the multimodal models are:
"anthropic.claude-3-5-sonnet-20241022-v2:0",
"anthropic.claude-3-5-sonnet-20240620-v1:0",
"anthropic.claude-3-opus-20240229-v1:0",
"anthropic.claude-3-sonnet-20240229-v1:0",
"anthropic.claude-3-haiku-20240307-v1:0",
"global.anthropic.claude-opus-4-8",
"global.anthropic.claude-opus-4-7",
"global.anthropic.claude-opus-4-6-v1",
"global.anthropic.claude-sonnet-4-6",
"global.anthropic.claude-opus-4-5-20251101-v1:0",
"global.anthropic.claude-sonnet-4-5-20250929-v1:0",
"global.anthropic.claude-haiku-4-5-20251001-v1:0",
"global.anthropic.claude-sonnet-4-20250514-v1:0",
"us.anthropic.claude-opus-4-8",
"us.anthropic.claude-opus-4-7",
"us.anthropic.claude-opus-4-6-v1",
"us.anthropic.claude-sonnet-4-6",
"us.anthropic.claude-sonnet-4-5-20250929-v1:0",
"us.anthropic.claude-haiku-4-5-20251001-v1:0"
"us.anthropic.claude-opus-4-1-20250805-v1:0",
"us.anthropic.claude-opus-4-20250514-v1:0",
"us.anthropic.claude-sonnet-4-20250514-v1:0",
"us.anthropic.claude-3-7-sonnet-20250219-v1:0",
"us.anthropic.claude-3-5-sonnet-20240620-v1:0",
"us.anthropic.claude-3-opus-20240229-v1:0",
"us.anthropic.claude-3-sonnet-20240229-v1:0",
"us.anthropic.claude-3-haiku-20240307-v1:0",
"eu.anthropic.claude-opus-4-8",
"eu.anthropic.claude-opus-4-7",
"eu.anthropic.claude-opus-4-6-v1",
"eu.anthropic.claude-sonnet-4-6",
"eu.anthropic.claude-sonnet-4-5-20250929-v1:0",
"eu.anthropic.claude-haiku-4-5-20251001-v1:0"
"eu.anthropic.claude-sonnet-4-20250514-v1:0",
"eu.anthropic.claude-3-7-sonnet-20250219-v1:0",
"eu.anthropic.claude-3-5-sonnet-20240620-v1:0",
"eu.anthropic.claude-3-sonnet-20240229-v1:0",
"eu.anthropic.claude-3-haiku-20240307-v1:0",
"apac.anthropic.claude-sonnet-4-20250514-v1:0",
"apac.anthropic.claude-3-7-sonnet-20250219-v1:0",
"apac.anthropic.claude-3-haiku-20240307-v1:0",
"apac.anthropic.claude-3-sonnet-20240229-v1:0",
"apac.anthropic.claude-3-5-sonnet-20240620-v1:0",
"apac.anthropic.claude-3-5-sonnet-20241022-v2:0",
"jp.anthropic.claude-opus-4-8",
"jp.anthropic.claude-opus-4-7",
"jp.anthropic.claude-sonnet-4-5-20250929-v1:0",
"jp.anthropic.claude-haiku-4-5-20251001-v1:0",
"qwen.qwen3-vl-235b-a22b",
"us.meta.llama4-maverick-17b-instruct-v1:0",
"us.meta.llama4-scout-17b-instruct-v1:0",
"us.meta.llama3-2-90b-instruct-v1:0",
"us.meta.llama3-2-11b-instruct-v1:0",
"mistral.magistral-small-2509",
"us.mistral.pixtral-large-2502-v1:0",
"eu.mistral.pixtral-large-2502-v1:0",
"amazon.nova-pro-v1:0",
"amazon.nova-lite-v1:0",
"us.amazon.nova-premier-v1:0",
"us.amazon.nova-pro-v1:0",
"us.amazon.nova-lite-v1:0",
"us.amazon.nova-2-lite-v1:0",
"eu.amazon.nova-pro-v1:0",
"eu.amazon.nova-lite-v1:0",
"apac.amazon.nova-pro-v1:0",
"apac.amazon.nova-lite-v1:0",
"jp.amazon.nova-2-lite-v1:0",
"global.amazon.nova-2-lite-v1:0",
"google.gemma-3-4b-it",
"google.gemma-3-12b-it",
"google.gemma-3-27b-it",
"nvidia.nemotron-nano-12b-v2",
At least one of these must be defined in modelIds.
For details, refer to Changing Amazon Bedrock Models.
Edit parameter.ts
// parameter.ts
const envs: Record<string, Partial<StackInput>> = {
  dev: {
    modelIds: ['anthropic.claude-3-sonnet-20240229-v1:0'],
  },
};
// cdk.json
{
  "context": {
    "modelIds": ["anthropic.claude-3-sonnet-20240229-v1:0"]
  }
}
Enabling Prompt Optimization Tool
The prompt optimization tool converts input prompts into an optimal form for the specified model. There is no direct option to enable the prompt optimization tool, but the parameter settings must meet the following two conditions:
modelRegion: A region where Amazon Bedrock Prompt optimization is supportedmodelIds: At least one model supported by Amazon Bedrock Prompt optimization is specified
For Prompt optimization support status, please refer to this link.
Hiding Specific Use Cases
You can hide use cases with the following options. If not specified or set to false, the use case will be displayed.
Edit parameter.ts
// parameter.ts
const envs: Record<string, Partial<StackInput>> = {
  dev: {
    hiddenUseCases: {
      generate: true, // Hide text generation
      summarize: true, // Hide summarization
      writer: true, // Hide writing
      translate: true, // Hide translation
      webContent: true, // Hide Web content extraction
      image: true, // Hide image generation
      video: true, // Hide video generation
      videoAnalyzer: true, // Hide video analysis
      diagram: true, // Hide diagram generation
      meetingMinutes: true, // Hide meeting minutes generation
      voiceChat: true, // Hide voice chat
    },
  },
};
// cdk.json
{
  "context": {
    "hiddenUseCases": {
      "generate": true,
      "summarize": true,
      "writer": true,
      "translate": true,
      "webContent": true,
      "image": true,
      "video": true,
      "videoAnalyzer": true,
      "diagram": true,
      "meetingMinutes": true,
      "voiceChat": true
    }
  }
}
Use Case Builder Configuration
The Use Case Builder is enabled by default and can be accessed from the "Builder Mode" option displayed on the screen after deployment. To disable the Use Case Builder, specify false for the parameter useCaseBuilderEnabled. (Default is true)
Edit parameter.ts
// parameter.ts
const envs: Record<string, Partial<StackInput>> = {
  dev: {
    useCaseBuilderEnabled: false,
  },
};
// cdk.json
{
  "context": {
    "useCaseBuilderEnabled": false
  }
}
Change Amazon Bedrock Models
Specify the model region and models in parameter.ts or cdk.json using modelRegion, modelIds, imageGenerationModelIds, videoGenerationModelIds, and speechToSpeechModelIds. For modelIds, imageGenerationModelIds, videoGenerationModelIds, and speechToSpeechModelIds, specify a list of models you want to use from those available in the specified region. AWS documentation provides a list of models and model support by region.
The solution also supports cross-region inference models. Cross-region inference models are represented as {global|us|eu|apac|jp|au}.{model-provider}.{model-name} and must match the {global|us|eu|apac|jp|au} prefix with the region specified in modelRegion.
(Example) If modelRegion is us-east-1, us.anthropic.claude-3-5-sonnet-20240620-v1:0 is OK, but eu.anthropic.claude-3-5-sonnet-20240620-v1:0 is not.
This solution supports the following text generation models:
"anthropic.claude-3-5-sonnet-20241022-v2:0",
"anthropic.claude-3-5-haiku-20241022-v1:0",
"anthropic.claude-3-5-sonnet-20240620-v1:0",
"anthropic.claude-3-opus-20240229-v1:0",
"anthropic.claude-3-sonnet-20240229-v1:0",
"anthropic.claude-3-haiku-20240307-v1:0",
"global.anthropic.claude-opus-4-8",
"global.anthropic.claude-opus-4-7",
"global.anthropic.claude-opus-4-6-v1",
"global.anthropic.claude-sonnet-4-6",
"global.anthropic.claude-opus-4-5-20251101-v1:0",
"global.anthropic.claude-sonnet-4-5-20250929-v1:0",
"global.anthropic.claude-sonnet-4-20250514-v1:0",
"us.anthropic.claude-opus-4-8",
"us.anthropic.claude-opus-4-7",
"us.anthropic.claude-opus-4-6-v1",
"us.anthropic.claude-sonnet-4-6",
"us.anthropic.claude-opus-4-1-20250805-v1:0",
"us.anthropic.claude-opus-4-20250514-v1:0",
"us.anthropic.claude-sonnet-4-20250514-v1:0",
"us.anthropic.claude-3-7-sonnet-20250219-v1:0",
"us.anthropic.claude-3-5-sonnet-20241022-v2:0",
"us.anthropic.claude-3-5-haiku-20241022-v1:0",
"us.anthropic.claude-3-5-sonnet-20240620-v1:0",
"us.anthropic.claude-3-opus-20240229-v1:0",
"us.anthropic.claude-3-sonnet-20240229-v1:0",
"us.anthropic.claude-3-haiku-20240307-v1:0",
"au.anthropic.claude-opus-4-6-v1",
"au.anthropic.claude-sonnet-4-6",
"eu.anthropic.claude-opus-4-8",
"eu.anthropic.claude-opus-4-7",
"eu.anthropic.claude-opus-4-6-v1",
"eu.anthropic.claude-sonnet-4-6",
"eu.anthropic.claude-sonnet-4-20250514-v1:0",
"eu.anthropic.claude-3-7-sonnet-20250219-v1:0",
"eu.anthropic.claude-3-5-sonnet-20240620-v1:0",
"eu.anthropic.claude-3-sonnet-20240229-v1:0",
"eu.anthropic.claude-3-haiku-20240307-v1:0",
"jp.anthropic.claude-opus-4-8",
"jp.anthropic.claude-opus-4-7",
"apac.anthropic.claude-sonnet-4-20250514-v1:0",
"apac.anthropic.claude-3-7-sonnet-20250219-v1:0",
"apac.anthropic.claude-3-haiku-20240307-v1:0",
"apac.anthropic.claude-3-sonnet-20240229-v1:0",
"apac.anthropic.claude-3-5-sonnet-20240620-v1:0",
"apac.anthropic.claude-3-5-sonnet-20241022-v2:0",
"deepseek.v3-v1:0",
"us.deepseek.r1-v1:0",
"qwen.qwen3-235b-a22b-2507-v1:0",
"qwen.qwen3-32b-v1:0",
"qwen.qwen3-coder-480b-a35b-v1:0",
"qwen.qwen3-coder-30b-a3b-v1:0",
"qwen.qwen3-next-80b-a3b",
"qwen.qwen3-vl-235b-a22b",
"us.writer.palmyra-x5-v1:0",
"us.writer.palmyra-x4-v1:0",
"amazon.titan-text-premier-v1:0",
"us.meta.llama4-maverick-17b-instruct-v1:0",
"us.meta.llama4-scout-17b-instruct-v1:0",
"us.meta.llama3-3-70b-instruct-v1:0",
"us.meta.llama3-2-90b-instruct-v1:0",
"us.meta.llama3-2-11b-instruct-v1:0",
"us.meta.llama3-2-3b-instruct-v1:0",
"us.meta.llama3-2-1b-instruct-v1:0",
"meta.llama3-1-405b-instruct-v1:0",
"meta.llama3-1-70b-instruct-v1:0",
"meta.llama3-1-8b-instruct-v1:0",
"meta.llama3-70b-instruct-v1:0",
"meta.llama3-8b-instruct-v1:0",
"cohere.command-r-plus-v1:0",
"cohere.command-r-v1:0",
"mistral.mistral-large-2407-v1:0",
"mistral.mistral-large-2402-v1:0",
"mistral.mistral-small-2402-v1:0",
"us.mistral.pixtral-large-2502-v1:0",
"eu.mistral.pixtral-large-2502-v1:0",
"mistral.mixtral-8x7b-instruct-v0:1",
"mistral.mistral-7b-instruct-v0:2",
"mistral.mistral-large-3-675b-instruct",
"mistral.ministral-3-3b-instruct",
"mistral.ministral-3-8b-instruct",
"mistral.ministral-3-14b-instruct",
"mistral.magistral-small-2509",
"amazon.nova-pro-v1:0",
"amazon.nova-lite-v1:0",
"amazon.nova-micro-v1:0",
"us.amazon.nova-premier-v1:0",
"us.amazon.nova-pro-v1:0",
"us.amazon.nova-lite-v1:0",
"us.amazon.nova-micro-v1:0",
"us.amazon.nova-2-lite-v1:0",
"eu.amazon.nova-pro-v1:0",
"eu.amazon.nova-lite-v1:0",
"eu.amazon.nova-micro-v1:0",
"apac.amazon.nova-pro-v1:0",
"apac.amazon.nova-lite-v1:0",
"apac.amazon.nova-micro-v1:0",
"jp.amazon.nova-2-lite-v1:0",
"global.amazon.nova-2-lite-v1:0",
"openai.gpt-oss-120b-1:0",
"openai.gpt-oss-20b-1:0",
"google.gemma-3-4b-it",
"google.gemma-3-12b-it",
"google.gemma-3-27b-it",
"minimax.minimax-m2",
"moonshot.kimi-k2-thinking",
"nvidia.nemotron-nano-9b-v2",
"nvidia.nemotron-nano-12b-v2",
This solution supports the following speech-to-speech models:
amazon.nova-sonic-v1:0
This solution supports the following image generation models:
"amazon.nova-canvas-v1:0",
"amazon.titan-image-generator-v2:0",
"amazon.titan-image-generator-v1",
"stability.sd3-5-large-v1:0",
"stability.stable-image-core-v1:1",
"stability.stable-image-ultra-v1:1",
"stability.stable-diffusion-xl-v1",
This solution supports the following video generation models:
"amazon.nova-reel-v1:0",
"amazon.nova-reel-v1:1",
"luma.ray-v2:0"
Please verify that the models you specify are enabled in the specified region.
Using Models from Multiple Regions Simultaneously
By default, GenU uses models from the modelRegion. If you want to use the latest models that are only available in certain regions, you can specify {modelId: '<model name>', region: '<region code>'} in modelIds, imageGenerationModelIds, videoGenerationModelIds, or speechToSpeechModelIds to call that specific model from the specified region.
Note
When using both the monitoring dashboard and models from multiple regions, the default dashboard settings will not display prompt logs for models outside the primary region (modelRegion).
To view prompt logs from all regions in a single dashboard, you need these additional configurations:
- Manually enable "Model invocation logging" in the Amazon Bedrock settings for each region
- Add widgets to the CloudWatch dashboard to aggregate logs from each region
Example: Using Tokyo region as primary while also using the latest models from Northern Virginia and Oregon regions
Edit parameter.ts
// parameter.ts
const envs: Record<string, Partial<StackInput>> = {
  dev: {
    modelRegion: 'ap-northeast-1',
    modelIds: [
      {
        modelId: 'us.anthropic.claude-3-7-sonnet-20250219-v1:0',
        region: 'us-east-1',
      },
      'apac.anthropic.claude-3-5-sonnet-20241022-v2:0',
      'anthropic.claude-3-5-sonnet-20240620-v1:0',
      {
        modelId: 'us.anthropic.claude-3-5-haiku-20241022-v1:0',
        region: 'us-east-1',
      },
      'apac.amazon.nova-pro-v1:0',
      'apac.amazon.nova-lite-v1:0',
      'apac.amazon.nova-micro-v1:0',
      { modelId: 'us.deepseek.r1-v1:0', region: 'us-east-1' },
      { modelId: 'us.writer.palmyra-x5-v1:0', region: 'us-west-2' },
      {
        modelId: 'us.meta.llama4-maverick-17b-instruct-v1:0',
        region: 'us-east-1',
      },
      {
        modelId: 'us.meta.llama4-scout-17b-instruct-v1:0',
        region: 'us-east-1',
      },
      { modelId: 'us.mistral.pixtral-large-2502-v1:0', region: 'us-east-1' },
    ],
    imageGenerationModelIds: [
      'amazon.nova-canvas-v1:0',
      { modelId: 'stability.sd3-5-large-v1:0', region: 'us-west-2' },
      { modelId: 'stability.stable-image-core-v1:1', region: 'us-west-2' },
      { modelId: 'stability.stable-image-ultra-v1:1', region: 'us-west-2' },
    ],
    videoGenerationModelIds: [
      'amazon.nova-reel-v1:0',
      { modelId: 'luma.ray-v2:0', region: 'us-west-2' },
    ],
    speechToSpeechModelIds: [
      { modelId: 'amazon.nova-sonic-v1:0', region: 'us-east-1' },
    ],
  },
};
{
  "context": {
    "modelRegion": "ap-northeast-1",
    "modelIds": [
      {
        "modelId": "us.anthropic.claude-3-7-sonnet-20250219-v1:0",
        "region": "us-east-1"
      },
      "apac.anthropic.claude-3-5-sonnet-20241022-v2:0",
      "anthropic.claude-3-5-sonnet-20240620-v1:0",
      {
        "modelId": "us.anthropic.claude-3-5-haiku-20241022-v1:0",
        "region": "us-east-1"
      },
      "apac.amazon.nova-pro-v1:0",
      "apac.amazon.nova-lite-v1:0",
      "apac.amazon.nova-micro-v1:0",
      {
        "modelId": "us.deepseek.r1-v1:0",
        "region": "us-east-1"
      },
      {
        "modelId": "us.writer.palmyra-x5-v1:0",
        "region": "us-west-2"
      },
      {
        "modelId": "us.meta.llama4-maverick-17b-instruct-v1:0",
        "region": "us-east-1"
      },
      {
        "modelId": "us.meta.llama4-scout-17b-instruct-v1:0",
        "region": "us-east-1"
      },
      {
        "modelId": "us.mistral.pixtral-large-2502-v1:0",
        "region": "us-east-1"
      }
    ],
    "imageGenerationModelIds": [
      "amazon.nova-canvas-v1:0",
      {
        "modelId": "stability.sd3-5-large-v1:0",
        "region": "us-west-2"
      },
      {
        "modelId": "stability.stable-image-core-v1:1",
        "region": "us-west-2"
      },
      {
        "modelId": "stability.stable-image-ultra-v1:1",
        "region": "us-west-2"
      }
    ],
    "videoGenerationModelIds": [
      "amazon.nova-reel-v1:0",
      {
        "modelId": "luma.ray-v2:0",
        "region": "us-west-2"
      }
    ]
    "speechToSpeechModelIds": [
      {
        "modelId": "amazon.nova-sonic-v1:0",
        "region": "us-east-1"
      }
    ]
  }
}
Example: Using Amazon Bedrock Models in us-east-1 (Virginia)
Edit parameter.ts
// parameter.ts
const envs: Record<string, Partial<StackInput>> = {
  dev: {
    modelRegion: 'us-east-1',
    modelIds: [
      'anthropic.claude-3-5-sonnet-20240620-v1:0',
      'anthropic.claude-3-sonnet-20240229-v1:0',
      'anthropic.claude-3-haiku-20240307-v1:0',
      'amazon.nova-pro-v1:0',
      'amazon.nova-lite-v1:0',
      'amazon.nova-micro-v1:0',
      'amazon.titan-text-premier-v1:0',
      'meta.llama3-70b-instruct-v1:0',
      'meta.llama3-8b-instruct-v1:0',
      'cohere.command-r-plus-v1:0',
      'cohere.command-r-v1:0',
      'us.mistral.pixtral-large-2502-v1:0',
      'mistral.mistral-large-2402-v1:0',
    ],
    imageGenerationModelIds: [
      'amazon.nova-canvas-v1:0',
      'amazon.titan-image-generator-v2:0',
      'amazon.titan-image-generator-v1',
      'stability.stable-diffusion-xl-v1',
    ],
    videoGenerationModelIds: ['amazon.nova-reel-v1:1'],
    speechToSpeechModelIds: ['amazon.nova-sonic-v1:0'],
  },
};
// cdk.json
{
  "context": {
    "modelRegion": "us-east-1",
    "modelIds": [
      "anthropic.claude-3-5-sonnet-20240620-v1:0",
      "anthropic.claude-3-sonnet-20240229-v1:0",
      "anthropic.claude-3-haiku-20240307-v1:0",
      "amazon.nova-pro-v1:0",
      "amazon.nova-lite-v1:0",
      "amazon.nova-micro-v1:0",
      "amazon.titan-text-premier-v1:0",
      "meta.llama3-70b-instruct-v1:0",
      "meta.llama3-8b-instruct-v1:0",
      "cohere.command-r-plus-v1:0",
      "cohere.command-r-v1:0",
      "mistral.mistral-large-2402-v1:0"
    ],
    "imageGenerationModelIds": [
      "amazon.nova-canvas-v1:0",
      "amazon.titan-image-generator-v2:0",
      "amazon.titan-image-generator-v1",
      "stability.stable-diffusion-xl-v1"
    ],
    "videoGenerationModelIds": ["amazon.nova-reel-v1:1"],
    "speechToSpeechModelIds": ["amazon.nova-sonic-v1:0"]
  }
}
Example: Using Amazon Bedrock Models in us-west-2 (Oregon)
Edit parameter.ts
// parameter.ts
const envs: Record<string, Partial<StackInput>> = {
  dev: {
    modelRegion: 'us-west-2',
    modelIds: [
      'anthropic.claude-3-5-sonnet-20241022-v2:0',
      'anthropic.claude-3-5-haiku-20241022-v1:0',
      'anthropic.claude-3-5-sonnet-20240620-v1:0',
      'anthropic.claude-3-opus-20240229-v1:0',
      'anthropic.claude-3-sonnet-20240229-v1:0',
      'anthropic.claude-3-haiku-20240307-v1:0',
      'meta.llama3-1-70b-instruct-v1:0',
      'meta.llama3-1-8b-instruct-v1:0',
      'cohere.command-r-plus-v1:0',
      'cohere.command-r-v1:0',
      'mistral.mistral-large-2407-v1:0',
    ],
    imageGenerationModelIds: [
      'amazon.titan-image-generator-v2:0',
      'amazon.titan-image-generator-v1',
      'stability.sd3-5-large-v1:0',
      'stability.stable-image-core-v1:1',
      'stability.stable-image-ultra-v1:1',
      'stability.stable-diffusion-xl-v1',
    ],
  },
};
// cdk.json
{
  "context": {
    "modelRegion": "us-west-2",
    "modelIds": [
      "anthropic.claude-3-5-sonnet-20241022-v2:0",
      "anthropic.claude-3-5-haiku-20241022-v1:0",
      "anthropic.claude-3-5-sonnet-20240620-v1:0",
      "anthropic.claude-3-opus-20240229-v1:0",
      "anthropic.claude-3-sonnet-20240229-v1:0",
      "anthropic.claude-3-haiku-20240307-v1:0",
      "meta.llama3-1-70b-instruct-v1:0",
      "meta.llama3-1-8b-instruct-v1:0",
      "cohere.command-r-plus-v1:0",
      "cohere.command-r-v1:0",
      "mistral.mistral-large-2407-v1:0"
    ],
    "imageGenerationModelIds": [
      "amazon.titan-image-generator-v2:0",
      "amazon.titan-image-generator-v1",
      "stability.sd3-5-large-v1:0"
      "stability.stable-image-core-v1:1",
      "stability.stable-image-ultra-v1:1",
      "stability.stable-diffusion-xl-v1",
    ],
  }
}
Example: Using cross-region inference models from us (Northern Virginia or Oregon) Amazon Bedrock
Edit parameter.ts
// parameter.ts
const envs: Record<string, Partial<StackInput>> = {
  dev: {
    modelRegion: 'us-west-2',
    modelIds: [
      "us.anthropic.claude-3-7-sonnet-20250219-v1:0",
      "us.anthropic.claude-3-5-haiku-20241022-v1:0",
      "us.anthropic.claude-3-haiku-20240307-v1:0",
      "us.deepseek.r1-v1:0",
      "us.writer.palmyra-x5-v1:0",
      "us.writer.palmyra-x4-v1:0",
      "us.meta.llama4-maverick-17b-instruct-v1:0",
      "us.meta.llama4-scout-17b-instruct-v1:0",
      "us.meta.llama3-2-11b-instruct-v1:0",
      "us.meta.llama3-2-3b-instruct-v1:0",
      "us.meta.llama3-2-1b-instruct-v1:0",
      "us.amazon.nova-premier-v1:0",
      "us.amazon.nova-pro-v1:0",
      "us.amazon.nova-lite-v1:0",
      "us.amazon.nova-micro-v1:0",
      "cohere.command-r-plus-v1:0",
      "cohere.command-r-v1:0",
      "mistral.mistral-large-2407-v1:0",
    ],
    imageGenerationModelIds: [
      "amazon.titan-image-generator-v2:0",
      "amazon.titan-image-generator-v1",
      "stability.sd3-5-large-v1:0"
      "stability.stable-image-core-v1:1",
      "stability.stable-image-ultra-v1:1",
      "stability.stable-diffusion-xl-v1",
    ],
  },
};
// cdk.json
{
  "context": {
    "modelRegion": "us-west-2",
    "modelIds": [
      "us.anthropic.claude-3-7-sonnet-20250219-v1:0",
      "us.anthropic.claude-3-5-haiku-20241022-v1:0",
      "us.anthropic.claude-3-haiku-20240307-v1:0",
      "us.deepseek.r1-v1:0",
      "us.writer.palmyra-x5-v1:0",
      "us.writer.palmyra-x4-v1:0",
      "us.meta.llama4-maverick-17b-instruct-v1:0",
      "us.meta.llama4-scout-17b-instruct-v1:0",
      "us.meta.llama3-2-11b-instruct-v1:0",
      "us.meta.llama3-2-3b-instruct-v1:0",
      "us.meta.llama3-2-1b-instruct-v1:0",
      "us.amazon.nova-premier-v1:0",
      "us.amazon.nova-pro-v1:0",
      "us.amazon.nova-lite-v1:0",
      "us.amazon.nova-micro-v1:0",
      "cohere.command-r-plus-v1:0",
      "cohere.command-r-v1:0",
      "mistral.mistral-large-2407-v1:0"
    ],
    "imageGenerationModelIds": [
      "amazon.titan-image-generator-v2:0",
      "amazon.titan-image-generator-v1",
      "stability.sd3-5-large-v1:0"
      "stability.stable-image-core-v1:1",
      "stability.stable-image-ultra-v1:1",
      "stability.stable-diffusion-xl-v1",
    ],
  }
}
Example: Using Amazon Bedrock Models in ap-northeast-1 (Tokyo)
Edit parameter.ts
// parameter.ts
const envs: Record<string, StackInput> = {
  dev: {
    modelRegion: 'ap-northeast-1',
    modelIds: [
      'anthropic.claude-3-5-sonnet-20240620-v1:0',
      'anthropic.claude-3-haiku-20240307-v1:0',
    ],
    imageGenerationModelIds: ['amazon.nova-canvas-v1:0'],
    videoGenerationModelIds: ['amazon.nova-reel-v1:0'],
  },
};
// cdk.json
{
  "context": {
    "modelRegion": "ap-northeast-1",
    "modelIds": [
      "anthropic.claude-3-5-sonnet-20240620-v1:0",
      "anthropic.claude-3-haiku-20240307-v1:0"
    ],
    "imageGenerationModelIds": ["amazon.nova-canvas-v1:0"],
    "videoGenerationModelIds": ["amazon.nova-reel-v1:0"]
  }
}
When you want to use Amazon SageMaker custom models
It is possible to use large language models deployed to Amazon SageMaker endpoints. It supports SageMaker Endpoints using Text Generation Inference (TGI) Hugging Face LLM inference containers. Since it uses TGI's Message API, TGI must be version 1.4.0 or later, and the model must support Chat Template (chat_template defined in tokenizer.config). Currently, only text models are supported.
There are currently two ways to deploy models using TGI containers to SageMaker endpoints.
Deploy pre-prepared models by AWS with SageMaker JumpStart
SageMaker JumpStart provides OSS large language models packaged for one-click deployment. You can open a model from the JumpStart screen in SageMaker Studio and deploy it by clicking the "Deploy" button.
Deploy with a few lines of code using SageMaker SDK
Through the partnership between AWS and Hugging Face, you can deploy models by simply specifying the ID of models published on Hugging Face with the SageMaker SDK.
From a published Hugging Face model page, select Deploy > Amazon SageMaker to display the code for deploying the model. You can deploy the model by copying and executing this code. (Depending on the model, you may need to change parameters such as instance size or SM_NUM_GPUS. If deployment fails, you can check the logs from CloudWatch Logs)
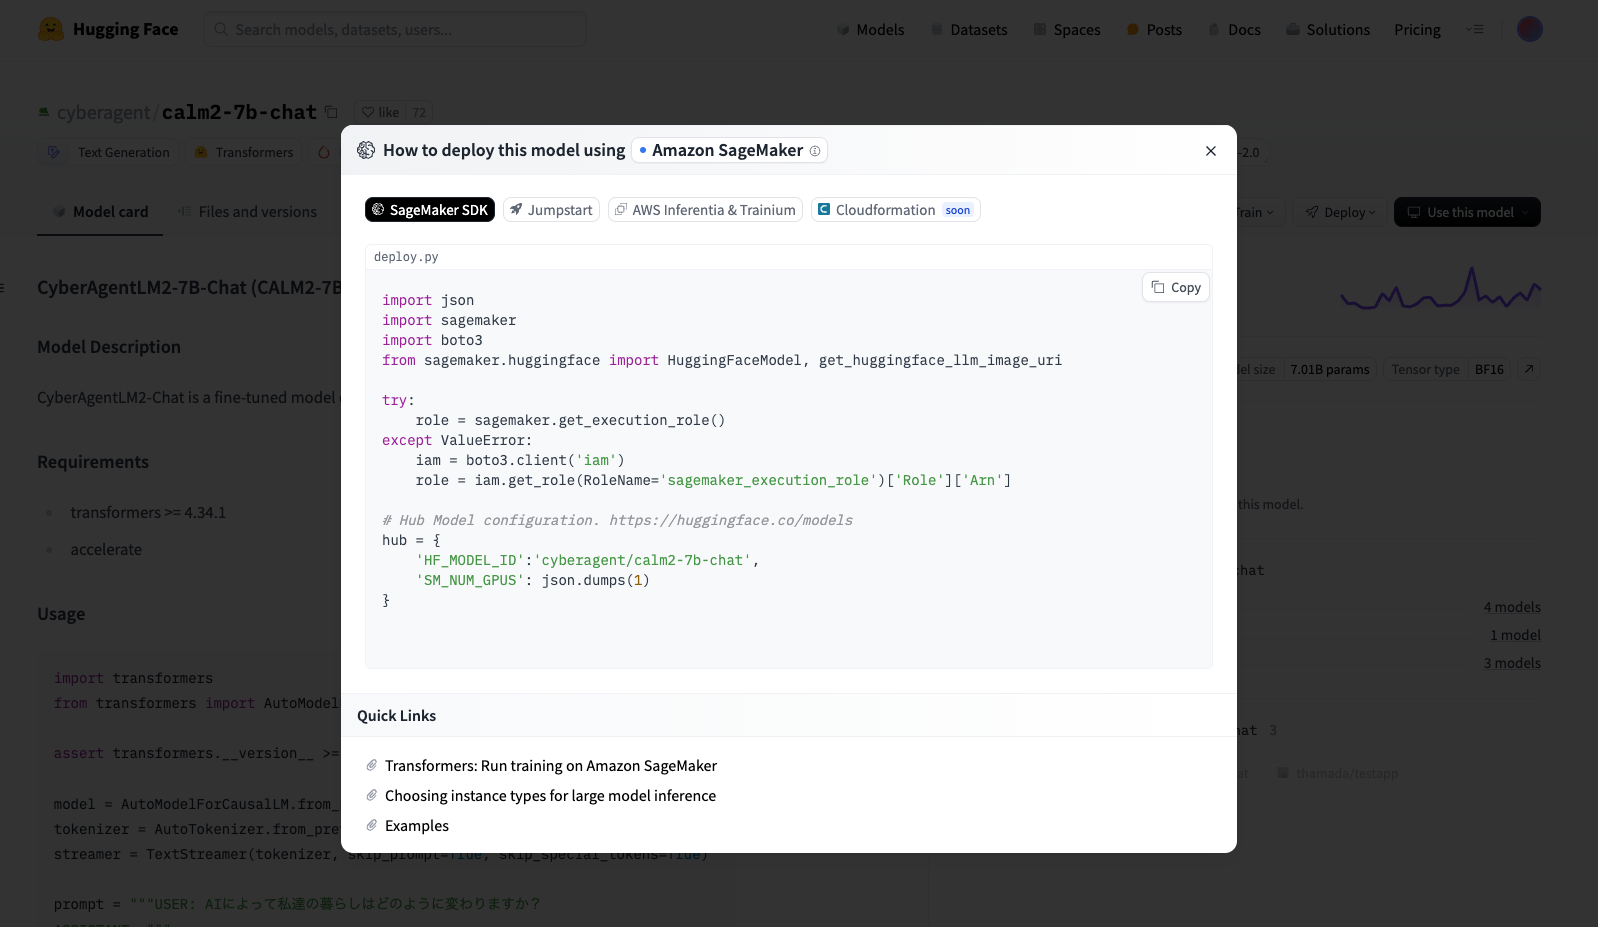
Configuring GenU to Call Deployed Models
To use deployed SageMaker endpoints with the target solution, specify them as follows:
endpointNames is a list of SageMaker endpoint names. Optionally you can specify region for each endpoint.
// parameter.ts
const envs: Record<string, Partial<StackInput>> = {
  dev: {
    modelRegion: 'us-east-1',
    endpointNames: [
      '<SageMaker Endpoint Name>',
      {
        modelIds: '<SageMaker Endpoint Name>',
        region: '<SageMaker Endpoint Region>',
      },
    ],
  },
};
// cdk.json
{
  "context": {
    "modelRegion": "<SageMaker Endpoint Region>",
    "endpointNames": [
      "<SageMaker Endpoint Name>",
      {
        "modelIds": "<SageMaker Endpoint Name>",
        "region": "<SageMaker Endpoint Region>"
      }
    ]
  }
}
Branding Customization
You can customize the logo and title displayed on the landing page by creating a branding configuration file.
Configuration
- Create
packages/cdk/branding.jsonwith your custom settings:
{
  "logoPath": "your-logo.svg",
  "title": "Your Custom Title"
}
- Place your custom SVG logo file in
packages/web/src/assets/:
packages/web/src/assets/your-logo.svg
Parameters
logoPath(optional): Filename of the SVG logo inpackages/web/src/assets/title(optional): Custom title text to display
Notes
- If
branding.jsondoesn't exist, default AWS logo and title are used - Only SVG format is supported for custom logos
- The logo will be displayed at 80x80 pixels (size-20 class)
Security-Related Settings
Disable Self-Signup
Set selfSignUpEnabled to false. (Default is true)
Edit parameter.ts
// parameter.ts
const envs: Record<string, Partial<StackInput>> = {
  dev: {
    selfSignUpEnabled: false,
  },
};
// cdk.json
{
  "context": {
    "selfSignUpEnabled": false
  }
}
Restrict Email Domains for Sign-up
Specify a list of allowed domains in allowedSignUpEmailDomains (default is null).
Specify values as a list of strings, and do not include "@" in each string. Users can sign up if their email domain matches any of the allowed domains. Specifying null means no restrictions, allowing all domains. Specifying [] prohibits all domains, preventing any email address from registering.
When configured, users with non-allowed domains will receive an error when trying to "Create Account" on the web signup screen, preventing them from signing up for GenU. Also, attempting to "Create User" from the Cognito service screen in the AWS Management Console will result in an error.
This does not affect users already created in Cognito. It only applies to new users attempting to sign up or be created.
Configuration Examples
- Example to allow sign-up only with email addresses with the
amazon.comdomain
Edit parameter.ts
// parameter.ts
const envs: Record<string, Partial<StackInput>> = {
  dev: {
    allowedSignUpEmailDomains: ['amazon.com'],
  },
};
// cdk.json
{
  "context": {
    "allowedSignUpEmailDomains": ["amazon.com"] // Change from null to specify allowed domains to enable
  }
}
- Example to allow sign-up with email addresses with either
amazon.comoramazon.jpdomains
Edit parameter.ts
// parameter.ts
const envs: Record<string, Partial<StackInput>> = {
  dev: {
    allowedSignUpEmailDomains: ['amazon.com', 'amazon.jp'],
  },
};
// cdk.json
{
  "context": {
    "allowedSignUpEmailDomains": ["amazon.com", "amazon.jp"] // Change from null to specify allowed domains to enable
  }
}
Enable AWS WAF Restrictions
IP Address Restrictions
To restrict web app access by IP address, you can enable AWS WAF IP address restrictions. You can specify allowed IPv4 CIDRs in an array with allowedIpV4AddressRanges and allowed IPv6 CIDRs in an array with allowedIpV6AddressRanges.
Edit parameter.ts
// parameter.ts
const envs: Record<string, Partial<StackInput>> = {
  dev: {
    allowedIpV4AddressRanges: ['192.168.0.0/24'],
    allowedIpV6AddressRanges: ['2001:0db8::/32'],
  },
};
// cdk.json
{
  "context": {
    "allowedIpV4AddressRanges": ["192.168.0.0/24"], // Change from null to specify allowed CIDR list to enable
    "allowedIpV6AddressRanges": ["2001:0db8::/32"] // Change from null to specify allowed CIDR list to enable
  }
}
Geographic Restrictions
To restrict web app access by country of origin, you can enable AWS WAF geographic restrictions. You can specify allowed countries as an array of Country Codes with allowedCountryCodes.
For Country Codes, please refer to ISO 3166-2 from Wikipedia.
If "IP Address Restrictions" are also configured, only access from "source IP addresses included in the allowed IP addresses AND from allowed countries" will be permitted.
Edit parameter.ts
// parameter.ts
const envs: Record<string, Partial<StackInput>> = {
  dev: {
    allowedCountryCodes: ['JP'],
  },
};
// cdk.json
{
  "context": {
    "allowedCountryCodes": ["JP"] // Change from null to specify allowed country list to enable
  }
}
When you specify any of allowedIpV4AddressRanges, allowedIpV6AddressRanges, or allowedCountryCodes and run npm run cdk:deploy again, a WAF stack will be deployed in us-east-1 (AWS WAF V2 currently only supports us-east-1 when used with CloudFront). If you have never used CDK in us-east-1 before, run the following command to bootstrap before deployment:
npx -w packages/cdk cdk bootstrap --region us-east-1
SAML Authentication
You can integrate with SAML authentication features provided by IdPs such as Google Workspace or Microsoft Entra ID (formerly Azure Active Directory). Here are detailed integration procedures:
Edit parameter.ts
// parameter.ts
const envs: Record<string, Partial<StackInput>> = {
  dev: {
    samlAuthEnabled: true,
    samlCognitoDomainName:
      'your-preferred-name.auth.ap-northeast-1.amazoncognito.com',
    samlCognitoFederatedIdentityProviderName: 'EntraID',
  },
};
// cdk.json
{
  "context": {
    "samlAuthEnabled": true,
    "samlCognitoDomainName": "your-preferred-name.auth.ap-northeast-1.amazoncognito.com",
    "samlCognitoFederatedIdentityProviderName": "EntraID"
  }
}
- samlAuthEnabled: Setting to
trueswitches to a SAML-specific authentication screen. The conventional authentication using Cognito user pools will no longer be available. - samlCognitoDomainName: Specify the Cognito Domain name to be set in Cognito's App integration.
- samlCognitoFederatedIdentityProviderName: Specify the Identity Provider name to be set in Cognito's Sign-in experience.
Guardrails
When using the Converse API (i.e., generative AI models that produce text output), guardrails can be applied. To configure this, change guardrailEnabled to true and redeploy.
Edit parameter.ts
// parameter.ts
const envs: Record<string, Partial<StackInput>> = {
  dev: {
    guardrailEnabled: true,
  },
};
// cdk.json
{
  "context": {
    "guardrailEnabled": true
  }
}
The default guardrail applies sensitive information filters that have proven effective in Japanese conversations. We've also confirmed that custom word filters and regular expressions for sensitive information filters work, so modify packages/cdk/lib/construct/guardrail.ts as needed. For details, refer to Guardrails for Amazon Bedrock and CfnGuardrail.
Note
If you want to disable guardrails after enabling them, set guardrailEnabled: false and redeploy. This will disable guardrails when calling generative AI, but the guardrail itself will remain. You can completely remove it by opening the management console and deleting the GuardrailStack stack from CloudFormation in the modelRegion. Having the guardrail remain doesn't incur costs, but it's best to delete unused resources.
Cost-Related Settings
Set Schedule for Automatic Creation and Deletion of Kendra Index
Configure settings to automatically create and delete the Kendra index created by GenerativeAiUseCasesDashboardStack on a predetermined schedule. This helps reduce usage fees that accrue based on Kendra index uptime. After creating a Kendra index, it automatically synchronizes with the S3 data source created by default in this repository.
This feature is only effective when ragEnabled is true AND kendraIndexArn is null (i.e., it doesn't work with externally created Kendra indexes).
Configure as shown in the example below:
- Setting
kendraIndexScheduleEnabledtotrueenables schedule settings; setting it tofalsedisables scheduling from that deployment forward. - Specify creation and deletion start times in Cron format using
kendraIndexScheduleCreateCronandkendraIndexScheduleDeleteCron. - For Cron format details, refer to this documentation. However, to comply with EventBridge specifications, specify times in UTC. Currently, only minute, hour, month, and weekDay can be specified. These items must be specified, and other items will be ignored even if specified.
- Setting to
nullmeans creation/deletion won't be executed. You can set just one tonull(configure only one) or both tonull(execute nothing).
The example below configures index creation to start at 8:00 AM JST Monday-Friday and deletion to start at 8:00 PM JST Monday-Friday.
Edit parameter.ts
// parameter.ts
const envs: Record<string, Partial<StackInput>> = {
  dev: {
    kendraIndexScheduleEnabled: true,
    kendraIndexScheduleCreateCron: {
      minute: '0',
      hour: '23',
      month: '*',
      weekDay: 'SUN-THU',
    },
    kendraIndexScheduleDeleteCron: {
      minute: '0',
      hour: '11',
      month: '*',
      weekDay: 'MON-FRI',
    },
  },
};
// cdk.json
{
  "context": {
    "kendraIndexScheduleEnabled": true,
    "kendraIndexScheduleCreateCron": {
      "minute": "0",
      "hour": "23",
      "month": "*",
      "weekDay": "SUN-THU"
    },
    "kendraIndexScheduleDeleteCron": {
      "minute": "0",
      "hour": "11",
      "month": "*",
      "weekDay": "MON-FRI"
    }
  }
}
Even when the Kendra index is deleted, the RAG feature remains on. RAG-related menus continue to be displayed in the web application (GenU). When executing RAG chat, an error occurs because the index doesn't exist, and an error message indicating "Please check the index creation/deletion schedule" will be displayed.
EventBridge rules are used for scheduling, and Step Functions for process control. You can stop scheduling by manually disabling the EventBridge rule. You can also manually execute the Step Functions state machine to create or delete the index.
Note
- After index recreation, only the default S3 data source is added.
- If you added other data sources after index creation, they will be deleted when the index is deleted, and won't be recreated when the index is recreated; you'll need to add them again.
- If you added data sources within this repository's CDK, the data sources will be created but not synchronized. To synchronize CDK-added data sources, either manually synchronize them or modify the code to add them as targets for the Step Functions state machine.
- It takes time from starting Kendra index creation until it becomes available. Specifically, index creation and data source synchronization take time. Therefore, if you have a specific time when you want to start using RAG chat, set the startup time earlier than that. Since this varies depending on resource availability, data source type, and document size/number, check the actual time required if you need precise uptime settings.
- As a rough guideline, index creation takes about 30 minutes, and synchronizing an S3 data source with a few hundred text files takes about 10 minutes (these are just estimates). (Based on this, you would set it 40 minutes earlier.)
- Be especially careful when using external services as data sources, as required time can vary significantly. Also be mindful of API call limits.
- This doesn't guarantee that the index will be stopped outside the set times; it simply executes startup/shutdown on schedule. Be careful with deployment and scheduling timing.
- For example, if you deploy a setting to delete at 8:00 PM at 9:00 PM, it won't be deleted at that point, but will start deletion at 8:00 PM the next day.
- When creating a stack (executing cdk:deploy when GenerativeAiUseCasesStack doesn't exist), if
ragEnabledistrue, a Kendra index is created. Even if schedule times are set, the index is created. The index remains created until the next deletion schedule time. - Currently, there's no feature to notify of startup/shutdown errors.
- Each time the index is recreated, the IndexId and DataSourceId change. If other services reference these, you'll need to adapt to these changes.
How to Set Tags
GenU supports tags for cost management and other purposes. By default, the key name of the tag is set to GenU, but you can use a custom tag key by specifying tagKey. Here are examples of how to set them:
Setting in cdk.json:
// cdk.json
  ...
  "context": {
    "tagKey": "MyProject",  // Custom tag key (optional, default is "GenU")
    "tagValue": "dev",
    ...
Setting in parameter.ts:
    ...
    tagKey: "MyProject",   // Custom tag key (optional, default is "GenU")
    tagValue: "dev",
    ...
However, tags cannot be used with some resources:
- Cross-region inference model calls
- Voice chat model calls
When managing costs using tags, you need to enable “Cost allocation tags” by following these steps.
- Open the “Billing and Cost Management” console.
- Open “Cost Allocation Tags” in the left menu.
- Activate the tag with the tag key “GenU” from “User-defined cost allocation tags.”
Enabling Monitoring Dashboard
Create a dashboard that aggregates input/output token counts and recent prompts. This dashboard is not built into GenU but is an Amazon CloudWatch dashboard. Amazon CloudWatch dashboards can be viewed from the management console. To view the dashboard, you need to create an IAM user with permissions to log into the management console and view dashboards.
Set dashboard to true. (Default is false)
Edit parameter.ts
// parameter.ts
const envs: Record<string, Partial<StackInput>> = {
  dev: {
    dashboard: true,
  },
};
// cdk.json
{
  "context": {
    "dashboard": true
  }
}
After changing, redeploy with npm run cdk:deploy to apply the changes. A stack named GenerativeAiUseCasesDashboardStack will be deployed in the region specified by modelRegion. The output values will be used in the next steps.
Next, configure Amazon Bedrock log output. Open Amazon Bedrock Settings and enable Model invocation logging. For Select the logging destinations, choose CloudWatch Logs only. (You can also choose Both S3 and CloudWatch Logs if you want to output to S3 as well.) For Log group name, specify the GenerativeAiUseCasesDashboardStack.BedrockLogGroup that was output during npm run cdk:deploy. (Example: GenerativeAiUseCasesDashboardStack-LogGroupAAAAAAAA-BBBBBBBBBBBB) Create a new Service role with any name. Note that Model invocation logging settings should be configured in the region specified as modelRegion.
After configuration, open the GenerativeAiUseCasesDashboardStack.DashboardUrl that was output during npm run cdk:deploy.
Note
If you want to disable the monitoring dashboard after enabling it, set dashboard: false and redeploy. This will disable the monitoring dashboard, but the GenerativeAiUseCasesDashboardStack itself will remain. To completely remove it, open the management console and delete the GenerativeAiUseCasesDashboardStack stack from CloudFormation in the modelRegion.
Using a Custom Domain
You can use a custom domain for your website URL. A public hosted zone must already be created in Route53 in the same AWS account. For public hosted zones, please refer to: Working with public hosted zones - Amazon Route 53
If you don't have a public hosted zone in the same AWS account, you can also manually add DNS records for AWS ACM SSL certificate validation or use email validation. To use these methods, refer to the CDK documentation for customization: aws-cdk-lib.aws_certificatemanager module · AWS CDK
Set the following values:
hostName... The hostname for your website. An A record will be created by CDK; you don't need to create it in advancedomainName... The domain name of the pre-created public hosted zonehostedZoneId... The ID of the pre-created public hosted zone
Edit parameter.ts
// parameter.ts
const envs: Record<string, Partial<StackInput>> = {
  dev: {
    hostName: 'genai',
    domainName: 'example.com',
    hostedZoneId: 'XXXXXXXXXXXXXXXXXXXX',
  },
};
// cdk.json
{
  "context": {
    "hostName": "genai",
    "domainName": "example.com",
    "hostedZoneId": "XXXXXXXXXXXXXXXXXXXX"
  }
}
Using Bedrock from a Different AWS Account
Note
Flow Chat use case and Prompt Optimization Tool do not support using a different AWS account and may result in errors during execution.
You can use Bedrock from a different AWS account. As a prerequisite, the initial deployment of GenU must be completed.
To use Bedrock from a different AWS account, you need to create one IAM role in that account. You can name the IAM role anything, but you must specify the following IAM role names (that were created during GenU deployment) in the Principal of the IAM role created in the different account:
GenerativeAiUseCasesStack-APIPredictTitleServiceGenerativeAiUseCasesStack-APIPredictServiceGenerativeAiUseCasesStack-APIPredictStreamServiceGenerativeAiUseCasesStack-APIGenerateImageServiceGenerativeAiUseCasesStack-APIGenerateVideoServiceGenerativeAiUseCasesStack-APIListVideoJobsServiceGenerativeAiUseCasesStack-SpeechToSpeechTaskServiceGenerativeAiUseCasesStack-RagKnowledgeBaseRetrieve(Only when using Knowledge Base)GenerativeAiUseCasesStack-APIGetFileDownloadSigned(Only when using Knowledge Base)
For details on how to specify Principals, refer to: AWS JSON Policy Elements: Principal
Principal configuration example (set in the different account)
{
  "Version": "2012-10-17",
  "Statement": [
    {
      "Effect": "Allow",
      "Principal": {
        "AWS": [
          "arn:aws:iam::111111111111:role/GenerativeAiUseCasesStack-APIPredictTitleServiceXXX-XXXXXXXXXXXX",
          "arn:aws:iam::111111111111:role/GenerativeAiUseCasesStack-APIPredictServiceXXXXXXXX-XXXXXXXXXXXX",
          "arn:aws:iam::111111111111:role/GenerativeAiUseCasesStack-APIPredictStreamServiceXX-XXXXXXXXXXXX",
          "arn:aws:iam::111111111111:role/GenerativeAiUseCasesStack-APIGenerateImageServiceXX-XXXXXXXXXXXX",
          "arn:aws:iam::111111111111:role/GenerativeAiUseCasesStack-APIGenerateVideoServiceXX-XXXXXXXXXXXX",
          "arn:aws:iam::111111111111:role/GenerativeAiUseCasesStack-APIListVideoJobsServiceXX-XXXXXXXXXXXX",
          "arn:aws:iam::111111111111:role/GenerativeAiUseCasesStack-SpeechToSpeechTaskService-XXXXXXXXXXXX",
          "arn:aws:iam::111111111111:role/GenerativeAiUseCasesStack-RagKnowledgeBaseRetrieveX-XXXXXXXXXXXX",
          "arn:aws:iam::111111111111:role/GenerativeAiUseCasesStack-APIGetFileDownloadSignedU-XXXXXXXXXXXX"
        ]
      },
      "Action": "sts:AssumeRole"
    }
  ]
}
Policy configuration example (set in the different account)
{
  "Version": "2012-10-17",
  "Statement": [
    {
      "Sid": "AllowBedrockInvokeModel",
      "Effect": "Allow",
      "Action": [
        "bedrock:Invoke*",
        "bedrock:Rerank",
        "bedrock:GetInferenceProfile",
        "bedrock:GetAsyncInvoke",
        "bedrock:ListAsyncInvokes",
        "bedrock:GetAgent*",
        "bedrock:ListAgent*"
      ],
      "Resource": ["*"]
    },
    {
      "Sid": "AllowS3PutObjectToVideoTempBucket",
      "Effect": "Allow",
      "Action": ["s3:PutObject"],
      "Resource": ["arn:aws:s3:::<video-temp-bucket-name>/*"]
    },
    {
      "Sid": "AllowBedrockRetrieveFromKnowledgeBase",
      "Effect": "Allow",
      "Action": ["bedrock:RetrieveAndGenerate*", "bedrock:Retrieve*"],
      "Resource": [
        "arn:aws:bedrock:<region>:<account-id>:knowledge-base/<knowledge-base-id>"
      ]
    },
    {
      "Sid": "AllowS3GetPresignedUrl",
      "Effect": "Allow",
      "Action": ["s3:GetObject*"],
      "Resource": ["arn:aws:s3:::<knowledge-base-datasource-bucket-name>/*"]
    }
  ]
}
Set the following parameter:
crossAccountBedrockRoleArn... The ARN of the IAM role created in advance in the different account
When using Knowledge Base, you'll need to include these additional parameters:
ragKnowledgeBaseEnabled... Set totrueto enable Knowledge BaseragKnowledgeBaseId... Knowledge Base ID created in advance in the different account- Knowledge Base must exist in the
modelRegion
When using Agent Chat use case, you'll need to include these additional parameters:
agents... a list of Bedrock Agent configurations, which has following properties:displayName... Display name of the agentagentId... Agent ID created in advance in the different accountaliasId... Agent Alias ID created in advance in the different account
Edit parameter.ts
// parameter.ts
const envs: Record<string, Partial<StackInput>> = {
  dev: {
    crossAccountBedrockRoleArn:
      'arn:aws:iam::AccountID:role/PreCreatedRoleName',
    // Only when using Knowledge Base
    ragKnowledgeBaseEnabled: true,
    ragKnowledgeBaseId: 'YOUR_KNOWLEDGE_BASE_ID',
    // Only when using agents
    agents: [
      {
        displayName: 'YOUR AGENT NAME',
        agentId: 'YOUR_AGENT_ID',
        aliasId: 'YOUR_AGENT_ALIAS_ID',
      },
    ],
  },
};
// cdk.json
{
  "context": {
    "crossAccountBedrockRoleArn": "arn:aws:iam::AccountID:role/PreCreatedRoleName",
    // Only when using Knowledge Base
    "ragKnowledgeBaseEnabled": true,
    "ragKnowledgeBaseId": "YOUR_KNOWLEDGE_BASE_ID",
    // Only when using agents
    "agents": [
      {
        "displayName": "YOUR AGENT NAME",
        "agentId": "YOUR_AGENT_ID",
        "aliasId": "YOUR_AGENT_ALIAS_ID"
      }
    ]
  }
}
Run npm run cdk:deploy after changing the settings to apply the changes.
Deploying Multiple Environments in the Same Account
When deploying multiple environments in the same account, you need to deploy with different stack names.
Setting env will append it as a suffix to each stack name and deploy as a separate environment.
env is also used for environment determination in parameter.ts, and if the environment specified by env exists in parameter.ts, all parameters will be overwritten with the values from parameter.ts. If the environment specified by env doesn't exist in parameter.ts, the application will be deployed with the parameters from the context in cdk.json.
Set the following value:
env... Environment name (default: "" (empty string))
// cdk.json
{
  "context": {
    "env": "<environment name>"
  }
}
Alternatively, you can specify context in the command when deploying:
npm run cdk:deploy -- -c env=<environment name>
Configuration example
// cdk.json
{
  "context": {
    "env": "dev"
  }
}
Using GenU from a Closed Network Environment
To use GenU from a closed network environment, you need to deploy GenU in closed network mode. Please refer to here for instructions on how to deploy GenU in closed network mode.