Sample AWS Blockchain Node Runner app for Ethereum Nodes
| Contributed by |
|---|
| @aldredb, @frbrkoala, @wgr2017 |
Architecture Overview
This blueprint has two options for running nodes. You can set up a single JSON RPC node or multiple nodes in highly-available setup. The details are below.
Single RPC node setup
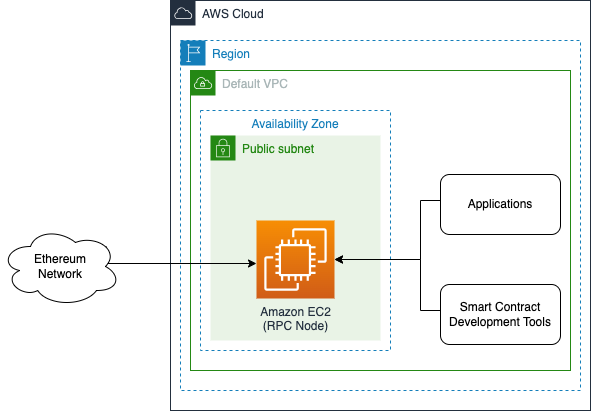
This setup is for small scale PoC or development environments. It deploys a single EC2 instance with both consensus and execution clients. The RPC port is exposed only to internal IP range of the VPC, while P2P ports allow external access to keep the clients synced.
Highly available setup
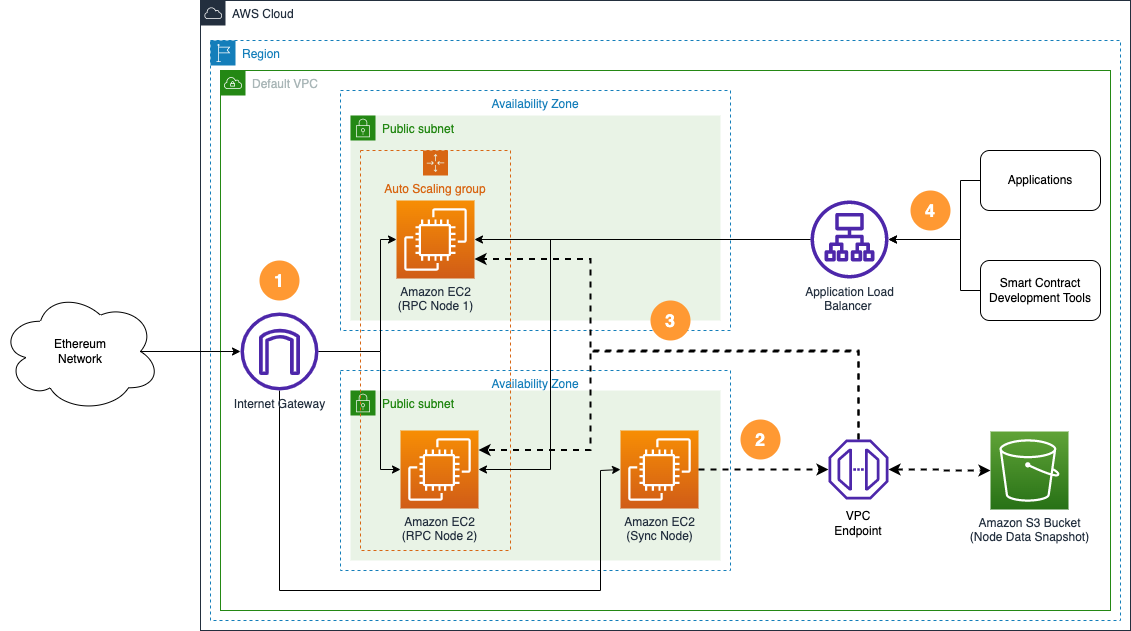
- An ongoing data synchronization process is configured with nodes in the Ethereum network with a sync node and RPC nodes.
- The sync node is used to create a copy of node's state data in Amazon S3 bucket.
- When new RPC nodes are provisioned, they copy state data from Amazon S3 bucket to speed up the initial sync process.
- Applications and smart contract development tools access highly available RPC nodes behind the Application Load Balancer.
Well-Architected
Review the for pros and cons of this solution.
Well-Architected Checklist
This is the Well-Architected checklist for Ethereum nodes implementation of the AWS Blockchain Node Runner app. This checklist takes into account questions from the AWS Well-Architected Framework which are relevant to this workload. Please feel free to add more checks from the framework if required for your workload.
| Pillar | Control | Question/Check | Remarks |
|---|---|---|---|
| Security | Network protection | Are there unnecessary open ports in security groups? | Please note that Erigon snap sync port remains open for non-erigon clients, i.e. Port 42069 (TCP/UDP). |
| Traffic inspection | AWS WAF could be implemented for traffic inspection. Additional charges will apply. | ||
| Compute protection | Reduce attack surface | This solution uses Amazon Linux 2 AMI. You may choose to run hardening scripts on it. | |
| Enable people to perform actions at a distance | This solution uses AWS Systems Manager for terminal session, not ssh ports. | ||
| Data protection at rest | Use encrypted Amazon Elastic Block Store (Amazon EBS) volumes | This solution uses encrypted Amazon EBS volumes. | |
| Use encrypted Amazon Simple Storage Service (Amazon S3) buckets | This solution uses Amazon S3 managed keys (SSE-S3) encryption. | ||
| Data protection in transit | Use TLS | The AWS Application Load balancer currently uses HTTP listener. Create HTTPS listener with self signed certificate if TLS is desired. | |
| Authorization and access control | Use instance profile with Amazon Elastic Compute Cloud (Amazon EC2) instances | This solution uses AWS Identity and Access Management (AWS IAM) role instead of IAM user. | |
| Following principle of least privilege access | In sync node, root user is not used (using special user "ethereum" instead"). | ||
| Application security | Security focused development practices | cdk-nag is being used with appropriate suppressions. | |
| Cost optimization | Service selection | Use cost effective resources | AWS Graviton-based Amazon EC2 instances are being used, which are cost effective compared to Intel/AMD instances. |
| Cost awareness | Estimate costs | One sync node with m7g.2xlarge for geth-lighthouse configuration (2048GB ssd) will cost around US$430 per month in the US East (N. Virginia) region. Additional charges will apply if you choose to deploy RPC nodes with load balancer. | |
| Reliability | Resiliency implementation | Withstand component failures | This solution uses AWS Application Load Balancer with RPC nodes for high availability. If sync node fails, Amazon S3 backup can be used to reinstate the nodes. |
| Data backup | How is data backed up? | Data is backed up to Amazon S3 using s5cmd tool. | |
| Resource monitoring | How are workload resources monitored? | Resources are being monitored using Amazon CloudWatch dashboards. Amazon CloudWatch custom metrics are being pushed via CloudWatch Agent. | |
| Performance efficiency | Compute selection | How is compute solution selected? | Compute solution is selected based on best price-performance, i.e. AWS Graviton-based Amazon EC2 instances. |
| Storage selection | How is storage solution selected? | Storage solution is selected based on best price-performance, i.e. gp3 Amazon EBS volumes with optimal IOPS and throughput. | |
| Architecture selection | How is the best performance architecture selected? | s5cmd tool has been chosen for Amazon S3 uploads/downloads because it gives better price-performance compared to Amazon EBS snapshots (including Fast Snapshot Restore, which can be expensive). | |
| Operational excellence | Workload health | How is health of workload determined? | Health of workload is determined via AWS Application Load Balancer Target Group Health Checks, on port 8545. |
| Sustainability | Hardware & services | Select most efficient hardware for your workload | This solution uses AWS Graviton-based Amazon EC2 instances which offer the best performance per watt of energy use in Amazon EC2. |
Solution Walkthrough
Open AWS CloudShell
To begin, ensure you login to your AWS account with permissions to create and modify resources in IAM, EC2, EBS, VPC, and S3.
From the AWS Management Console, open the AWS CloudShell, a web-based shell environment. If unfamiliar, review the 2-minute YouTube video for an overview and check out CloudShell with VPC environment that we'll use to test nodes API from internal IP address space.
Once ready, you can run the commands to deploy and test blueprints in the CloudShell.
Clone this repository and install dependencies
git clone https://github.com/aws-samples/aws-blockchain-node-runners.git
cd aws-blockchain-node-runners
npm install
Prepare AWS account to deploy nodes
-
Make sure you are in the root directory of the cloned repository
-
If you have deleted or don't have the default VPC, create default VPC
aws ec2 create-default-vpc
NOTE: You may see the following error if the default VPC already exists:
An error occurred (DefaultVpcAlreadyExists) when calling the CreateDefaultVpc operation: A Default VPC already exists for this account in this region.. That means you can just continue with the following steps.
NOTE: The default VPC must have at least two public subnets in different Availability Zones, and public subnet must set
Auto-assign public IPv4 addresstoYES
Configure your setup
Execution and Consensus Layer Client Options
With the Node Runners blueprints for Ethereum, you can deploy both single Ethereum nodes and multi-node high-availability configurations on AWS. Furthermore, Node Runners is designed to support client diversity, with configurations available for a variety of client combinations for the Execution Layer (EL) and Consensus Layer (CL).
Geth Lighthouse
Configure your Node Runners Ethereum - Geth Lighthouse
To specify the Ethereum client combination you wish to deploy, create your own copy of .env file and edit it using your preferred text editor. The contents of your file for a Geth / Lighthouse node deployment is as follows, which uses a sample config from the repository:
# Make sure you are in aws-blockchain-node-runners/lib/ethereum
cd lib/ethereum
pwd
cp ./sample-configs/.env-geth-lighthouse .env
nano .env
NOTE: You can find more examples inside the
sample-configsdirectory, which illustrate other Ethereum client combinations.
Erigon Lighthouse
Configure your Node Runners Ethereum - Erigon Lighthouse
To specify the Ethereum client combination you wish to deploy, create your own copy of .env file and edit it using your preferred text editor. The contents of your file for a Erigon / Lighthouse node deployment is as follows, which uses a sample config from the repository:
# Make sure you are in aws-blockchain-node-runners/lib/ethereum
cd lib/ethereum
pwd
cp ./sample-configs/.env-erigon-lighthouse .env
nano .env
NOTE: You can find more examples inside the
sample-configsdirectory, which illustrate other Ethereum client combinations.
Reth Lighthouse
Configure your Node Runners Ethereum - Reth Lighthouse
To specify the Ethereum client combination you wish to deploy, create your own copy of .env file and edit it using your preferred text editor. The contents of your file for a Reth / Lighthouse node deployment is as follows, which uses a sample config from the repository:
# Make sure you are in aws-blockchain-node-runners/lib/ethereum
cd lib/ethereum
pwd
cp ./sample-configs/.env-erigon-lighthouse .env
nano .env
NOTE: You can find more examples inside the
sample-configsdirectory, which illustrate other Ethereum client combinations.
Nethermind Teku
Configure your Node Runners Ethereum - Nethermind Teku
To specify the Ethereum client combination you wish to deploy, create your own copy of .env file and edit it using your preferred text editor. The contents of your file for a Nethermind / Teku node deployment is as follows, which uses a sample config from the repository:
# Make sure you are in aws-blockchain-node-runners/lib/ethereum
cd lib/ethereum
pwd
cp ./sample-configs/.env-nethermind-teku .env
nano .env
NOTE: You can find more examples inside the
sample-configsdirectory, which illustrate other Ethereum client combinations.
Besu Teku
Configure your Node Runners Ethereum - Besu Teku
To specify the Ethereum client combination you wish to deploy, create your own copy of .env file and edit it using your preferred text editor. The contents of your file for a Besu / Teku node deployment is as follows, which uses a sample config from the repository:
# Make sure you are in aws-blockchain-node-runners/lib/ethereum
cd lib/ethereum
pwd
cp ./sample-configs/.env-besu-teku .env
nano .env
NOTE: You can find more examples inside the
sample-configsdirectory, which illustrate other Ethereum client combinations.
Don’t see a client or client combination you would like supported? Open a GitHub issue or Pull Request, we encourage contribution to Node Runners!
- Deploy common components such as IAM role, and Amazon S3 bucket to store data snapshots
pwd
# Make sure you are in aws-blockchain-node-runners/lib/ethereum
npx cdk deploy eth-common
[OPTIONAL] (required only when ETH_SNAPSHOT_TYPE="s3") Deploy Sync Node
Sync node will sync with the network and periodically create data snapshots on S3 to speed up RPC nodes setup when ETH_SNAPSHOT_TYPE="s3". It has no effect if ETH_SNAPSHOT_TYPE="none".
- Deploy
eth-sync-nodestack
pwd
# Make sure you are in aws-blockchain-node-runners/lib/ethereum
npx cdk deploy eth-sync-node --json --outputs-file sync-node-deploy.json
-
After starting the node you need to wait for the inital syncronization process to finish. It may take from half a day to about 6-10 days depending on the client combination and the state of the network. You can use Amazon CloudWatch to track the progress. There is a script that publishes CloudWatch metrics every 5 minutes, where you can watch
sync distancefor consensus client andblocks behindfor execution client. When the node is fully synced those two metrics shold show 0. To see them:- Navigate to CloudWatch service (make sure you are in the region you have specified for
AWS_REGION) - Open
Dashboardsand selecteth-sync-node-<your-eth-client-combination>from the list of dashboards.
- Navigate to CloudWatch service (make sure you are in the region you have specified for
Once synchronization process is over, the script will automatically stop both clients and copy all the contents of the /data directory to your snapshot S3 bucket. That may take from 30 minutes to about 2 hours. During the process on the dashboard you will see lower CPU and RAM utilization but high data disc throughput and outbound network traffic. The script will automatically start the clients after the process is done.
Note: The snapshot backup process will automatically run ever day at midnight time of the time zone were the sync node runs. To change the schedule, modify
crontabof the root user on the node's EC2 instance.
Deploy Standalone RPC Node
NOTE: If
ETH_SNAPSHOT_TYPE="s3"make sure you deployed the Sync Node first.
- Deploy
eth-single-nodestack
pwd
# Make sure you are in aws-blockchain-node-runners/lib/ethereum
npx cdk deploy eth-single-node --json --outputs-file single-node-deploy.json
NOTE: The default VPC must have at least two public subnets in different Availability Zones, and public subnet must set
Auto-assign public IPv4 addresstoYES
-
If you haven't used
ETH_SNAPSHOT_TYPE="s3"with Sync Node, then your node will start syncing by itself. In that case, after starting the node you need to wait for the inital syncronization process to finish. It may take from half a day to about 6-10 days depending on the client combination and the state of the network. You can use Amazon CloudWatch to track the progress. There is a script that publishes CloudWatch metrics every 5 minutes, where you can watchsync distancefor consensus client andblocks behindfor execution client. When the node is fully synced those two metrics shold show 0. To see them:- Navigate to CloudWatch service (make sure you are in the region you have specified for
AWS_REGION) - Open
Dashboardsand selecteth-single-node-<your-eth-client-combination>from the list of dashboards.
- Navigate to CloudWatch service (make sure you are in the region you have specified for
-
Once the initial synchronization is done, you should be able to access the RPC API of that node from within the same VPC. The RPC port is not exposed to the Internet. Turn the following query against the private IP of the single RPC node you deployed:
INSTANCE_ID=$(cat single-node-deploy.json | jq -r '..|.node-instance-id? | select(. != null)')
NODE_INTERNAL_IP=$(aws ec2 describe-instances --instance-ids $INSTANCE_ID --query 'Reservations[*].Instances[*].PrivateIpAddress' --output text)
echo "NODE_INTERNAL_IP=$NODE_INTERNAL_IP"
Copy output from the last echo command with NODE_INTERNAL_IP=<internal_IP> and open CloudShell tab with VPC environment to access internal IP address space. Paste NODE_INTERNAL_IP=<internal_IP> into the new CloudShell tab. Then query the API:
# IMPORTANT: Run from CloudShell VPC environment tab
# We query token balance of Beacon deposit contract: https://etherscan.io/address/0x00000000219ab540356cbb839cbe05303d7705fa
curl http://$NODE_INTERNAL_IP:8545 -X POST -H "Content-Type: application/json" \
--data '{"method":"eth_getBalance","params":["0x00000000219ab540356cBB839Cbe05303d7705Fa", "latest"],"id":1,"jsonrpc":"2.0"}'
The result should be like this (the actual balance might change):
{"jsonrpc":"2.0","id":1,"result":"0xe791d050f91d9949d344d"}
Deploy Highly Available RPC Nodes
NOTE: If
ETH_SNAPSHOT_TYPE="s3"make sure you deployed the Sync Node first.
NOTE: The default VPC must have at least two public subnets in different Availability Zones, and public subnet must set
Auto-assign public IPv4 addresstoYES
- Deploy Sync Node
Use instructions from earlier: Deploy Sync Node
- Deploy
eth-rpc-nodesstack
pwd
# Make sure you are in aws-blockchain-node-runners/lib/ethereum
npx cdk deploy eth-rpc-nodes --json --outputs-file rpc-node-deploy.json
- Give the new RPC nodes about 30 minutes (up to 2 hours for Erigon) to initialize and then run the following query against the load balancer in front of your nods:
export ETH_RPC_ABL_URL=$(cat rpc-node-deploy.json | jq -r '..|.alburl? | select(. != null)')
echo ETH_RPC_ABL_URL=$ETH_RPC_ABL_URL
# IMPORTANT: Run from CloudShell VPC environment tab
# We query token balance of Beacon deposit contract: https://etherscan.io/address/0x00000000219ab540356cbb839cbe05303d7705fa
curl http://$ETH_RPC_ABL_URL:8545 -X POST -H "Content-Type: application/json" \
 --data '{"method":"eth_getBalance","params":["0x00000000219ab540356cBB839Cbe05303d7705Fa", "latest"],"id":1,"jsonrpc":"2.0"}'
The result should be like this (the actual balance might change):
{"jsonrpc":"2.0","id":1,"result":"0xe791d050f91d9949d344d"}
If the nodes are still starting and catching up with the chain, you will see the following response:
   <html>
   <head><title>503 Service Temporarily Unavailable</title></head>
   <body>
   <center><h1>503 Service Temporarily Unavailable</h1></center>
   </body>
NOTE: By default and for security reasons the load balancer is available only from within the default VPC in the region where it is deployed. It is not available from the Internet and is not open for external connections. Before opening it up please make sure you protect your RPC APIs.
Clearing up and undeploying everything
- Destroy RPC Nodes, Sync Nodes and Common components
# Setting the AWS account id and region in case local .env file is lost
 export AWS_ACCOUNT_ID=<your_target_AWS_account_id>
 export AWS_REGION=<your_target_AWS_region>

pwd
# Make sure you are in aws-blockchain-node-runners/lib/ethereum

# Destroy Single RPC Node
cdk destroy eth-single-node

# Destroy RPC Nodes
cdk destroy eth-rpc-nodes

# Destroy Sync Node
cdk destroy eth-sync-node

# You need to manually delete an s3 bucket with a name similar to 'eth-snapshots-$accountid-eth-nodes-common' on the console,firstly empty the bucket,secondly delete the bucket,and then execute
# Delete all common components like IAM role and Security Group
cdk destroy eth-common
FAQ
- How to check the logs of the clients running on my sync node?
NOTE: In this tutorial we chose not to use SSH and use Session Manager instead. That allows you to log all sessions in AWS CloudTrail to see who logged into the server and when. If you receive an error similar to
SessionManagerPlugin is not found, install Session Manager plugin for AWS CLI
pwd
# Make sure you are in aws-blockchain-node-runners/lib/ethereum

export INSTANCE_ID=$(cat sync-node-deploy.json | jq -r '..|.sync-node-instance-id? | select(. != null)')
echo "INSTANCE_ID=" $INSTANCE_ID
aws ssm start-session --target $INSTANCE_ID --region $AWS_REGION
sudo su ethereum
# Execution client logs:
docker logs --tail 50 execution -f
# Consensus client logs:
docker logs --tail 50 consensus -f
- How to check the logs from the EC2 user-data script?
pwd
# Make sure you are in aws-blockchain-node-runners/lib/ethereum

export INSTANCE_ID=$(cat sync-node-deploy.json | jq -r '..|.sync-node-instance-id? | select(. != null)')
echo "INSTANCE_ID=" $INSTANCE_ID
aws ssm start-session --target $INSTANCE_ID --region $AWS_REGION
sudo cat /var/log/cloud-init-output.log
- I'm running sync node with Ethereum and Prysm or Lighthouse and it gets stuck during syncing, what should I do?
Usually restart helps Erigon client to re-connect with other nodes and continue syncing. To restart do the following:
pwd
# Make sure you are in aws-blockchain-node-runners/lib/ethereum

export INSTANCE_ID=$(cat sync-node-deploy.json | jq -r '..|.sync-node-instance-id? | select(. != null)')
echo "INSTANCE_ID=" $INSTANCE_ID
aws ssm start-session --target $INSTANCE_ID --region $AWS_REGION
sudo su ethereum
/usr/local/bin/docker-compose -f /home/ethereum/docker-compose.yml down
/usr/local/bin/docker-compose -f /home/ethereum/docker-compose.yml up -d