Sample AWS Blockchain Node Runner app for Sui Full Node
| Contributed by |
|---|
| @yinalaws, @evertonfraga |
Architecture Overview
This blueprint has step by step guides to set up a single Sui Full Node.
Sui Full Node setup
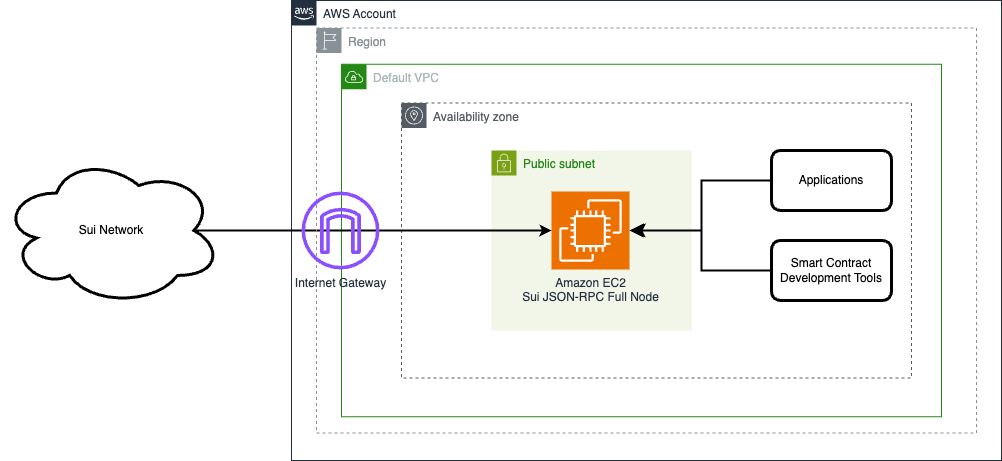
This setup is for PoC or development environments and it supports Devnet, Testnet and Mainnet. It deploys a single EC2 instance with Sui client. The RPC port is exposed only to internal IP range of the VPC, while P2P ports allow external access to keep the client synced.
Solution Walkthrough
Open AWS CloudShell
To begin, ensure you login to your AWS account with permissions to create and modify resources in IAM, EC2, EBS, VPC, S3, KMS, and Secrets Manager.
From the AWS Management Console, open the AWS CloudShell, a web-based shell environment. If unfamiliar, review the 2-minute YouTube video for an overview and check out CloudShell with VPC environment that we'll use to test nodes API from internal IP address space.
Once ready, you can run the commands to deploy and test blueprints in the CloudShell.
Clone this repository and install dependencies
git clone https://github.com/aws-samples/aws-blockchain-node-runners.git
cd aws-blockchain-node-runners
npm install
NOTE: In this tutorial we will set all major configuration through environment variables, but you also can modify parameters in
config/config.ts.
Prepare to deploy nodes
-
Make sure you are in the root directory of the cloned repository
-
If you have deleted or don't have the default VPC, create default VPC
aws ec2 create-default-vpc
NOTE: You may see the following error if the default VPC already exists:
An error occurred (DefaultVpcAlreadyExists) when calling the CreateDefaultVpc operation: A Default VPC already exists for this account in this region.. That means you can just continue with the following steps.
NOTE: The default VPC must have at least two public subnets in different Availability Zones, and public subnet must set
Auto-assign public IPv4 addresstoYES
- Configure your setup
Create your own copy of .env file and edit it:
# Make sure you are in aws-blockchain-node-runners/lib/Sui
cd lib/sui
pwd
cp ./sample-configs/.env-sample-full .env
nano .env
NOTE: You can find more examples inside the
sample-configsdirectory.
- Deploy common components such as IAM role, and Amazon S3 bucket to store data snapshots
pwd
# Make sure you are in aws-blockchain-node-runners/lib/sui
npx cdk deploy sui-common
Deploy Sui Full-Node
- Deploy Full Node
pwd
# Make sure you are in aws-blockchain-node-runners/lib/sui
npx cdk deploy sui-single-node --json --outputs-file single-node-deploy.json
NOTE: The default VPC must have at least two public subnets in different Availability Zones, and public subnet must set
Auto-assign public IPv4 addresstoYES.
The EC2 instance will deploy, initialize the node and start the first sync. In Cloudformation the instance will show as successful once the node is running. From that point it still takes a while until the node is synced to the blockchain. You can check the sync status with the REST call below in step 4. If the `curl cannot connect to the node on port 9000, then the node is still importing. Once that's done, the curl command works.
-
After starting the node you need to wait for the inital syncronization process to finish. It may take from an hour to half a day depending on the the state of the network. You can use Amazon CloudWatch to track the progress. To see them:
- Navigate to CloudWatch service (make sure you are in the region you have specified for
AWS_REGION) - Open
Dashboardsand selectsui-single-node-<network>from the list of dashboards.
- Navigate to CloudWatch service (make sure you are in the region you have specified for
-
Once the initial synchronization is done, you should be able to access the RPC API of that node from within the same VPC. The RPC port is not exposed to the Internet. Check if the JSON-RPC port is open and working — run the following command from a terminal:
INSTANCE_ID=$(cat single-node-deploy.json | jq -r '..|.node-instance-id? | select(. != null)')
NODE_INTERNAL_IP=$(aws ec2 describe-instances --instance-ids $INSTANCE_ID --query 'Reservations[*].Instances[*].PrivateIpAddress' --output text --region us-east-1)
echo "NODE_INTERNAL_IP=$NODE_INTERNAL_IP"
Copy output from the last echo command with NODE_INTERNAL_IP=<internal_IP> and open CloudShell tab with VPC environment to access internal IP address space. Paste NODE_INTERNAL_IP=<internal_IP> into the new CloudShell tab. Then query the API:
# IMPORTANT: Run from CloudShell VPC environment tab
# replace <your IP address> with your server IP address
curl --location --request POST $NODE_INTERNAL_IP:9000 \
--header 'Content-Type: application/json' \
--data-raw '{ "jsonrpc":"2.0", "method":"rpc.discover","id":1}'
The result should start like like this (the actual balance might change):
{"jsonrpc":"2.0","result":{"openrpc":"1.2.6","info":{"title":"Sui JSON-RPC","description":"Sui JSON-RPC API for interaction with Sui Full node. Make RPC calls using https://fullnode.NETWORK.sui.io:443, where NETWORK is the network you want to use (testnet, devnet, mainnet). By default, local networks use port 9000.","contact":{"name":"Mysten Labs","url":"https://mystenlabs.com","email":"build@mystenlabs.com"},"license":{"name":"Apache-2.0","url":"https://raw.githubusercontent.com/MystenLabs/sui/main/LICENSE"},"version":"1.28.2"}}}
Clearing up and undeploying everything
Destroy RPC Nodes, Sync Nodes and Common components
# Setting the AWS account id and region in case local .env file is lost
export AWS_ACCOUNT_ID=<your_target_AWS_account_id>
export AWS_REGION=<your_target_AWS_region>

pwd
# Make sure you are in aws-blockchain-node-runners/lib/Sui

 # Destroy Single Fullnode
cdk destroy sui-single-node


# You need to manually delete an s3 bucket with a name similar to 'sui-snapshots-$accountid-tz-nodes-common' on the console,firstly empty the bucket,secondly delete the bucket,and then execute
# Delete all common components like IAM role and Security Group
cdk destroy sui-common
FAQ
- How to check the logs from the EC2 user-data script?
NOTE: In this tutorial we chose not to use SSH and use Session Manager instead. That allows you to log all sessions in AWS CloudTrail to see who logged into the server and when. If you receive an error similar to
SessionManagerPlugin is not found, install Session Manager plugin for AWS CLI
pwd
# Make sure you are in aws-blockchain-node-runners/lib/Sui

export INSTANCE_ID=$(jq -r '.["sui-single-node-testnet"].nodeinstanceid' single-node-deploy.json)
echo "INSTANCE_ID=" $INSTANCE_ID
aws ssm start-session --target $INSTANCE_ID
sudo cat /var/log/cloud-init-output.log
- If SSH is disabled, how to login to fullnode instance?
NODE_INTERNAL_IP=$(aws ec2 describe-instances --instance-ids $INSTANCE_ID --query 'Reservations[*].Instances[*].PrivateIpAddress' --output text)
echo "NODE_INTERNAL_IP="$NODE_INTERNAL_IP
 pwd
# Make sure you are in aws-blockchain-node-runners/lib/Sui
aws ssm start-session --target $INSTANCE_ID
- Service Tools
#Check Sui version
sui -V
# Check node logs
sudo journalctl -fu suid -o cat
# Check node status
sudo service suid status
# Restart node
sudo systemctl restart suid
# Stop Node
sudo systemctl stop suid
# Start Node
sudo systemctl start suid
- Journalctl and Node Status throws errors:
Set up archival fallback to enable your node to fallback to an archive in case of lag, add this block to your fullnode.yaml file as described here. Restart Node Example:
state-archive-read-config:
  - object-store-config:
      object-store: "S3"
      # Use mysten-testnet-archives for testnet
      # Use mysten-mainnet-archives for mainnet
      bucket: "mysten-testnet-archives"
      # Use your AWS account access key id
      aws-access-key-id: ""
      # Use your AWS account secret access key
      aws-secret-access-key: ""
      aws-region: "us-west-2"
      object-store-connection-limit: 20
    # How many objects to read ahead when catching up
    concurrency: 5
    # Whether to prune local state based on latest checkpoint in archive.
    # This should stay false for most use cases
    use-for-pruning-watermark: false
- Restoring a Full node using snapshots: Restoring using RocksDB snapshots to restore from a RocksDB snapshot, follow these steps:
# Syntax:
sui-tool download-db-snapshot --latest \
--network <NETWORK> --snapshot-bucket <BUCKET-NAME> \
--snapshot-bucket-type <TYPE> --path <PATH-TO-NODE-DB> \
--num-parallel-downloads 25 \
--skip-indexes \
--no-sign-request

#Example:
sudo sui-tool download-db-snapshot --latest --network testnet --path /data/sui/db/live --num-parallel-downloads 50 --skip-indexes --no-sign-request
- Compare the number of checkpoints on your node and on chain
## replace <your IP address> with your server IP address
curl -q <your IP address>:9184/metrics 2>/dev/null | grep '^highest_synced_checkpoint'; echo
## replace <Network_ID> with devnet| testnet | mainnet
curl --location --request POST 'https://fullnode.<Network_ID>.sui.io:443/' --header 'Content-Type: application/json' --data-raw '{"jsonrpc":"2.0", "id":1,"method":"sui_getLatestCheckpointSequenceNumber"}'; echo
- Monitoring Sui node metrics over port TCP/9184
Enter your node's external IP at https://node.sui.zvalid.com/