Sample AWS Blockchain Node Runner app for XRP Ledger Nodes
| Contributed by |
|---|
| Pedro Aceves |
XRP Ledger node deployment on AWS. All nodes are configure as "Stock Servers"
Overview of Deployment Architectures for Single and HA setups
Single node setup
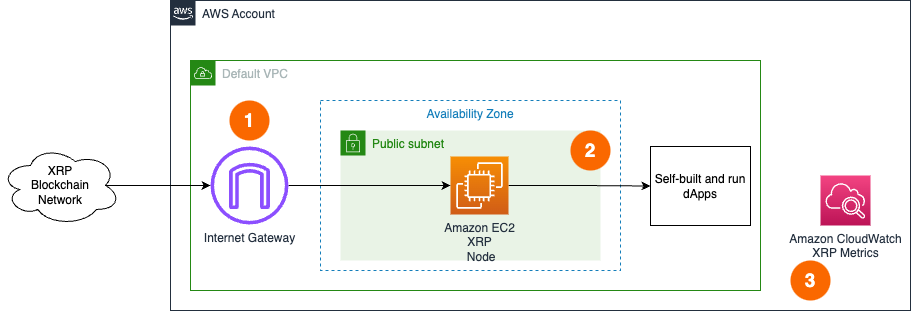
- A XRP Ledger node deployed in the Default VPC continuously synchronizes with the rest of nodes on the configured XRPL network through Internet Gateway.
- The XRP Ledger node is used by dApps or development tools internally from within the Default VPC. RPC API is not exposed to the Internet directly to protect nodes from unauthorized access.
- The XRP Ledger node sends various monitoring metrics for both EC2 and current XRP Ledger sequence to Amazon CloudWatch. It also updates the dashboard with correct storage device names to display respective metrics properly.
HA setup

- A set of XRP Ledger nodes are deployed within an Auto Scaling Group in the Default VPC continuously synchronizing with the rest of nodes on the configured XRPL network through Internet Gateway.
- The XRP Ledger nodes are accessed by dApps or development tools internally through Application Load Balancer. RPC API is not exposed to the Internet to protect nodes from unauthorized access.
- The XRP Ledger nodes send various monitoring metrics for EC2 to Amazon CloudWatch.
Well-Architected
Review pros and cons of this solution.
Well-Architected Checklist
This is the Well-Architected checklist for XRP Ledger nodes implementation of the AWS Blockchain Node Runner app. This checklist takes into account questions from the AWS Well-Architected Framework which are relevant to this workload. Please feel free to add more checks from the framework if required for your workload.
| Pillar | Control | Question/Check | Remarks |
|---|---|---|---|
| Security | Network protection | Are there unnecessary open ports in security groups? | Please note that rippled sync ports remain open for outbound connections; Port 2459 and 51235 (TCP/UDP). |
| Traffic inspection | AWS WAF could be implemented for traffic inspection. Additional charges will apply. | ||
| Compute protection | Reduce attack surface | This solution uses Amazon Linux 2 AMI. You may choose to run hardening scripts on it. | |
| Enable people to perform actions at a distance | This solution uses AWS Systems Manager for terminal session, not ssh ports. | ||
| Data protection at rest | Use encrypted Amazon Elastic Block Store (Amazon EBS) volumes | This solution uses encrypted Amazon EBS volumes. | |
| Use encrypted Amazon Simple Storage Service (Amazon S3) buckets | This solution uses Amazon S3 managed keys (SSE-S3) encryption. | ||
| Data protection in transit | Use TLS | The AWS Application Load balancer currently uses HTTP listener. Create HTTPS listener with self signed certificate if TLS is desired. | |
| Authorization and access control | Use instance profile with Amazon Elastic Compute Cloud (Amazon EC2) instances | This solution uses AWS Identity and Access Management (AWS IAM) role instead of IAM user. | |
| Following principle of least privilege access | Privileges are scoped down. | ||
| Application security | Security focused development practices | cdk-nag is being used with appropriate suppressions. | |
| Cost optimization | Service selection | Use cost effective resources | Cost efficient R7a instances are being used, which are ideal for high transaction and low latecy workloads. |
| Reliability | Resiliency implementation | Withstand component failures | This solution uses AWS Application Load Balancer with RPC nodes for high availability. |
| Resource monitoring | How are workload resources monitored? | Resources are being monitored using Amazon CloudWatch dashboards. Amazon CloudWatch custom metrics are being pushed via CloudWatch Agent. | |
| Performance efficiency | Compute selection | How is compute solution selected? | Compute solution is selected based on best price-performance. |
| Storage selection | How is storage solution selected? | Storage solution is selected based on best price-performance. | |
| Operational excellence | Workload health | How is health of workload determined? | Health of workload is determined via AWS Application Load Balancer Target Group Health Checks, on port 6005. |
| Sustainability | Hardware & services | Select most efficient hardware for your workload | Amazon EC2 R7a instances support the Sustainability Pillar of the AWS Well-Architected Framework by offering memory optimization that enables more efficient resource utilization, potentially reducing overall energy consumption and hardware requirements for data-intensive workloads. |
Setup Instructions
Open AWS CloudShell
To begin, ensure you login to your AWS account with permissions to create and modify resources in IAM, EC2, EBS, VPC, S3, and KMS.
From the AWS Management Console, open the AWS CloudShell, a web-based shell environment. If unfamiliar, review the 2-minute YouTube video for an overview and check out CloudShell with VPC environment that we'll use to test nodes API from internal IP address space.
Once ready, you can run the commands to deploy and test blueprints in the CloudShell.
Clone this repository and install dependencies
git clone https://github.com/aws-samples/aws-blockchain-node-runners.git
cd aws-blockchain-node-runners
npm install
Configure your setup
-
Make sure you are in the root directory of the cloned repository
-
If you have deleted or don't have the default VPC, create default VPC
aws ec2 create-default-vpc
NOTE: You may see the following error if the default VPC already exists:
An error occurred (DefaultVpcAlreadyExists) when calling the CreateDefaultVpc operation: A Default VPC already exists for this account in this region.. That means you can just continue with the following steps.
- Configure your setup
Create your own copy of .env file and edit it to update with your AWS Account ID and Region:
cd lib/xrp
cp ./sample-configs/.env-sample-testnet .env
nano .env
NOTE: You can find more examples inside
sample-configs
- Deploy common components such as IAM role:
npx cdk deploy XRP-common
Deploy a Single Node
- Deploy the node
npx cdk deploy XRP-single-node --json --outputs-file single-node-deploy.json
-
After starting the node you need to wait for the initial synchronization process to finish. You can use Amazon CloudWatch to track the progress. There is a script that publishes CloudWatch metrics every 5 minutes, where you can watch
XRP Sequencemetrics. When the node is fully synced the sequence should match that of the configured XRPL network (testnet, mainnet, etc). To see them:- Navigate to CloudWatch service (make sure you are in the region you have specified for
AWS_REGION) - Open
Dashboardsand select dashboard that starts withXRP-single-nodefrom the list of dashboards.
- Navigate to CloudWatch service (make sure you are in the region you have specified for
-
Once the initial synchronization is done, you should be able to access the RPC API of that node from within the same VPC. The RPC port is not exposed to the Internet. Run the following command to retrieve the private IP of the single RPC node you deployed:
export INSTANCE_ID=$(cat single-node-deploy.json | jq -r '.["XRP-single-node"].nodeinstanceid')
 NODE_INTERNAL_IP=$(aws ec2 describe-instances --instance-ids $INSTANCE_ID --query 'Reservations[*].Instances[*].PrivateIpAddress' --output text)
echo "NODE_INTERNAL_IP=$NODE_INTERNAL_IP"
Copy output from the last echo command with NODE_INTERNAL_IP=<internal_IP> and open CloudShell tab with VPC environment to access internal IP address space. Paste NODE_INTERNAL_IP=<internal_IP> into the new CloudShell tab.
Then query the RPC API to receive the latest block height:
# IMPORTANT: Run from CloudShell VPC environment tab
curl -X POST -H "Content-Type: application/json" http://$NODE_INTERNAL_IP:6005/ -d '{
 "method": "ledger_current",
 "params": [{}]
}'
You will get a response similar to this:
{"result":{"ledger_current_index":5147254,"status":"success"}}
Note: If the node is still syncing, you will receive the following response:
{"result":{"error":"noNetwork","error_code":17,"error_message":"Not synced to the network.","request":{"command":"ledger_current"},"status":"error"}}
Deploy HA Nodes
- Deploy multiple HA Nodes
pwd
# Make sure you are in aws-blockchain-node-runners/lib/xrp
npx cdk deploy XRP-ha-nodes --json --outputs-file ha-nodes-deploy.json
-
Give the new nodes time to initialize
-
To perform an RPC request to your load balancer, run the following command to retrieve the ALB URL:
export XRP_RPC_ALB_URL=$(cat ha-nodes-deploy.json | jq -r '..|.alburl? | select(. != null)')
echo XRP_RPC_ALB_URL=$XRP_RPC_ALB_URL
Copy output from the last echo command with XRP_RPC_ALB_URL=<alb_url> and open CloudShell tab with VPC environment to access internal IP address space. Paste XRP_RPC_ALB_URL=<alb_url> into the VPC CloudShell tab.
Then query the load balancer to retrieve the current block height:
curl -X POST -H "Content-Type: application/json" http://$XRP_RPC_ALB_URL:6005/ -d '{
  "method": "ledger_current",
  "params": [{}]
  }'
You will get a response similar to this:
{"result":{"ledger_current_index":5147300,"status":"success"}}
NOTE: By default and for security reasons the load balancer is available only from within the default VPC in the region where it is deployed. It is not available from the Internet and is not open for external connections. Before opening it up please make sure you protect your RPC APIs.
Cleaning up and undeploying everything
Destroy HA Nodes, Single Nodes and Common stacks
pwd
# Make sure you are in aws-blockchain-node-runners/lib/xrp

# Destroy HA Nodes
npx cdk destroy XRP-ha-nodes

# Destroy Single Node
npx cdk destroy XRP-single-node

# Delete all common components like IAM role and Security Group
npx cdk destroy XRP-common
FAQ
- How to check the logs from the EC2 user-data script?
pwd
# Make sure you are in aws-blockchain-node-runners/lib/xrp

export INSTANCE_ID=$(cat single-node-deploy.json | jq -r '.["XRP-single-node"].nodeinstanceid')
echo "INSTANCE_ID=" $INSTANCE_ID
aws ssm start-session --target $INSTANCE_ID --region $AWS_REGION
sudo cat /var/log/cloud-init-output.log
sudo cat /var/log/user-data.log
-
How can I change rippled (XRPL) configuration?
There are two places of configuration for the XRP Ledger nodes:a.
.envfile. Here is where you specify the XRPL network you want. This is the key for the config in part bHUB_NETWORK_ID="testnet"b.
lib/xrp/lib/assets/rippled/rippledconfig.pyfile. Here you can setup listeners and network configuration for the network specified in part "a"