AWS Quick Admin Buddy MCP
Setting up AWS Quick for an organization means creating an action connector or a knowledge base for each productivity app, then sharing each one with the right users. This Model Context Protocol (MCP) server does that setup from a chat. An administrator talks to the Quick Admin Onboarding Buddy skill, and the skill calls the server's tools to create, share, and delete those integrations in your AWS Quick account.
The server's tools create two kinds of AWS Quick integrations:
- Action connectors, with
CreateActionConnector - Knowledge bases, with
CreateKnowledgeBase
Each integration authenticates with a custom OAuth app, service-to-service
OAuth, or an API key, and the credentials come from an AWS Secrets Manager
secret that the administrator names. When a parameter is missing, the tools
say which one and return the secret's JSON contract. When a Create* call
fails, they return the API error so the administrator can fix it.
The extension tools track the client-side AWS Quick extensions, the Office add-ins and the browser extension. AWS Quick has no admin API for extensions, so the status is one the administrator attests to.
The server runs on Amazon Bedrock AgentCore Runtime behind an AgentCore Gateway that accepts only requests with a valid Amazon Cognito access token (OAuth 2.0 authorization code grant). It ships as a container image plus a single AWS CloudFormation template.
How it fits with the skill
This project is the backend of the official Quick Admin Onboarding Buddy skill
(catalog ID admin-onboarding-buddy), published in the
AWS Quick official skill catalog.
The skill reaches the server through the Admin Onboarding Buddy Endpoint MCP
action connector, and it can't change anything in AWS Quick unless this backend
is deployed.
The skill walks an AWS Quick administrator through onboarding. It starts with the productivity suite (Microsoft 365 or Google Workspace), then turns on action connectors and knowledge bases, shares them with users, and tracks extensions. The skill holds the conversation and the step-by-step guidance, and this backend makes the AWS Quick admin API calls.
The skill bundles a copy of
infrastructure/template.yaml
as assets/template.yaml, and this folder is the source for the container
image that the template deploys. To use the skill, deploy this backend, add it
to AWS Quick as an MCP action connector
(Step 3), and then install the skill
from the official catalog.
Architecture
The following diagram shows how a request from the skill reaches AWS Quick. The step labels in the diagram match the table after it.
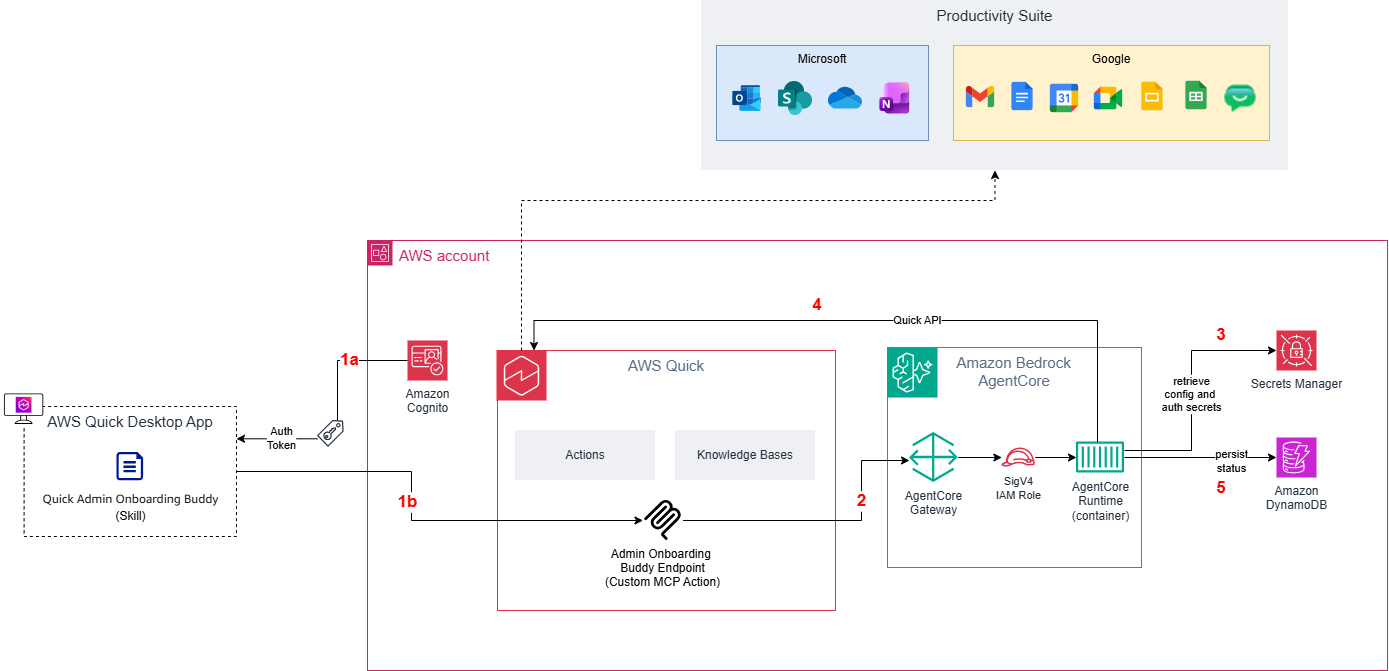
| Step | What happens |
|---|---|
| 1a | The administrator signs in through the Amazon Cognito hosted UI (OAuth 2.0 authorization code grant), and the Admin Onboarding Buddy Endpoint connector receives an access token. |
| 1b | The Quick Admin Onboarding Buddy skill, running in the AWS Quick desktop application, calls the backend's tools through the Admin Onboarding Buddy Endpoint, a custom MCP action connector in AWS Quick. The connector sends the access token with every call. |
| 2 | The AgentCore Gateway validates the token with its CUSTOM_JWT authorizer (the Cognito discovery URL and the allowed app client) and rejects requests without a valid token. It calls the AgentCore Runtime container with AWS Signature Version 4 (SigV4), using its own AWS Identity and Access Management (IAM) role. |
| 3 | The MCP server reads the integration's credentials from the AWS Secrets Manager secret that the administrator names. |
| 4 | The server calls the AWS Quick admin APIs as the <stack-name>-Agent-IAM-Identity role (the runtime role), which can call only the AWS Quick action-connector, knowledge-base, and data-source operations the server uses, in this account. These calls create, share, and delete action connectors and knowledge bases. AWS Quick then connects those integrations to the Microsoft 365 or Google Workspace productivity suite. |
| 5 | The server records each integration's status in the OnboardingState Amazon DynamoDB table, so the skill can resume and summarize the onboarding. |
The backend doesn't receive the end user's identity, so everyone who uses the connector acts on one shared tenant. See Authentication and authorization model for details.
What gets created
One CloudFormation stack (infrastructure/template.yaml) creates the following
resources. Every resource that supports tags carries the tag
Project=QuickAdminBuddy, so you can track the stack's costs.
- An AgentCore Runtime that hosts the MCP server container (stateless
streamable HTTP, port 8000,
linux/arm64). - An AgentCore Gateway and gateway target in front of the Runtime, with a
Cognito
CUSTOM_JWTinbound authorizer. - An Amazon Cognito user pool that allows only administrator-created users. It
comes with a resource server (
quick-admin-buddy/invokescope), a hosted-UI domain, and a confidential app client whose callback is the AWS Quick OAuth callback. Custom resources store the client secret and a generated sign-in user's credentials in Secrets Manager. - IAM roles: the runtime role for the server's outbound calls, the gateway execution role, and roles for the AWS Lambda functions behind the custom resources.
- The
OnboardingStateDynamoDB table, retained when you delete the stack. - An AWS Key Management Service (AWS KMS) customer managed key with rotation turned on, also retained after stack deletion. It encrypts the table, the stack's secrets, and the log groups.
- Amazon CloudWatch Logs log groups for the Runtime, Gateway, and workload-identity logs and for the Lambda functions, each with a 90-day retention period and kept after stack deletion.
- A "Quick Setup Buddy" AWS Quick chat agent, optionally shared with the
principals you pass in
QuickSetupBuddySharePrincipals.
The stack doesn't create the AWS Quick MCP action connector, because custom MCP connectors can't be created with CloudFormation. You create it by hand in Step 3.
MCP tools
The server exposes the following tools.
| Tool | Purpose |
|---|---|
list_connector_catalog |
List the supported integrations and the configuration each one needs |
set_productivity_suite |
Record the tenant's productivity suite (Microsoft 365 or Google Workspace), which gates the catalog |
enable_action_connector |
Create an AWS Quick action connector |
disable_action_connector |
Delete an action connector the server created |
enable_kb_integration |
Create an AWS Quick knowledge base (and its data source) |
disable_kb_integration |
Delete a knowledge base the server created |
share_action_connector |
Share an action connector with AWS Quick users or groups |
share_kb_integration |
Share a knowledge base with AWS Quick users or groups |
get_tenant_configuration |
Return the tenant's recorded configuration |
get_onboarding_summary |
Summarize onboarding progress across connectors, knowledge bases, and extensions |
list_extensions |
List the AWS Quick extensions and their attested status |
set_extension_status |
Record the administrator-attested status of an extension |
Inputs, outputs, every Result_Status value, and the connector catalog are in
the Tool reference.
Prerequisites
You need the following before you deploy:
- AWS Command Line Interface (AWS CLI) version 2, with credentials for the target account and Region and permission to create the resources in What gets created (CloudFormation, IAM, Cognito, DynamoDB, AWS KMS, Amazon Bedrock AgentCore, Lambda, Secrets Manager, CloudWatch Logs, Amazon Elastic Container Registry (Amazon ECR), and AWS Quick chat agents).
- Docker with
buildx, to build alinux/arm64image. - An AWS Quick account with an Enterprise subscription, where you are an administrator and can add MCP action connectors.
- Amazon Bedrock AgentCore available in the target Region.
- Python 3.12 or later, only to run the tests locally.
Get the code
git clone https://github.com/aws-samples/sample-amazon-quick-suite-knowledge-hub.git
cd sample-amazon-quick-suite-knowledge-hub/infrastructure/aws-quick-admin-buddy-mcp
Run every command that follows from this folder.
Step 1: Build and push the container image
AgentCore Runtime pulls the server image from Amazon ECR and runs on AWS
Graviton, so build for linux/arm64. A plain docker build on an x86_64 host
produces an amd64 image that the Runtime can't run.
export AWS_REGION=us-east-1
export ACCOUNT_ID=$(aws sts get-caller-identity --query Account --output text)
export ECR_REPO=quick-admin-buddy-mcp
export IMAGE_TAG=0.1.0
export IMAGE_URI="${ACCOUNT_ID}.dkr.ecr.${AWS_REGION}.amazonaws.com/${ECR_REPO}:${IMAGE_TAG}"

# 1. Create the ECR repository (first time only)
aws ecr create-repository \
  --repository-name "${ECR_REPO}" \
  --region "${AWS_REGION}" \
  --image-scanning-configuration scanOnPush=true

# 2. Authenticate Docker to ECR
aws ecr get-login-password --region "${AWS_REGION}" \
  | docker login --username AWS --password-stdin \
      "${ACCOUNT_ID}.dkr.ecr.${AWS_REGION}.amazonaws.com"

# 3. Build for the AgentCore Runtime architecture and push
docker buildx build --platform linux/arm64 -t "${IMAGE_URI}" --load .
docker push "${IMAGE_URI}"
The image is built from the project
Dockerfile.
It uses Python 3.12, runs the server as an unprivileged user, and listens on
port 8000 inside the container. You don't need to run the container locally.
If you do, publish the port to loopback only (docker run -p 127.0.0.1:8000:8000 ...),
because the server has no authentication of its own; the Gateway provides it
in AWS.
Step 2: Deploy the stack
The template is larger than the CloudFormation inline limit of 51,200 bytes, so
aws cloudformation deploy must stage it in an Amazon Simple Storage Service
(Amazon S3) bucket with --s3-bucket.
# 1. Reuse a bucket for CloudFormation templates, or create one (first time
#    only; bucket names are globally unique)
export TEMPLATE_BUCKET="cfn-deploy-${AWS_REGION}-${ACCOUNT_ID}"
aws s3 mb "s3://${TEMPLATE_BUCKET}" --region "${AWS_REGION}"

# 2. Deploy. --template-file is the local path; the CLI uploads it to the
#    bucket and prefix given by --s3-bucket and --s3-prefix.
aws cloudformation deploy \
  --region "${AWS_REGION}" \
  --stack-name quick-admin-buddy-mcp \
  --template-file infrastructure/template.yaml \
  --s3-bucket "${TEMPLATE_BUCKET}" \
  --s3-prefix quick-admin-buddy-mcp \
  --capabilities CAPABILITY_NAMED_IAM \
  --parameter-overrides \
      ContainerImageUri="${IMAGE_URI}" \
      CognitoDomainPrefix="${ACCOUNT_ID}-quickonboarding" \
      QuickSetupBuddySharePrincipals="arn:aws:quicksight:${AWS_REGION}:${ACCOUNT_ID}:user/default/<quick-user-name>"
CognitoDomainPrefix(required) is a globally unique, lowercase prefix for the Cognito OAuth 2.0 endpoints.QuickSetupBuddySharePrincipals(optional) is a comma-separated list of AWS Quick user, group, or namespace Amazon Resource Names (ARNs) to share the "Quick Setup Buddy" chat agent with. Leave it out to keep the chat agent visible only to its creator.
The stack's resource names are fixed, so you can deploy only one stack per account and Region. The Deployment guide lists every parameter and output.
Step 3: Connect the server to AWS Quick
To connect the server, create an MCP action connector in AWS Quick that points at the Gateway. First, read the values you need from the stack outputs:
aws cloudformation describe-stacks \
  --region "${AWS_REGION}" \
  --stack-name quick-admin-buddy-mcp \
  --query "Stacks[0].Outputs"
Then follow these steps, from Set up MCP integration:
- In the AWS Quick console, choose Connectors, choose the Create for your team tab, and then choose Model Context Protocol (MCP).
- For Name, enter the
ActionConnectorSuggestedNameoutput. For MCP server endpoint, enter theActionConnectorBaseEndpointoutput unchanged; it already ends in/mcp. For Connection type, choose Public network. Then choose Next. - Choose User authentication (OAuth), and enter Client ID
(
CognitoUserPoolClientId), Client Secret (from the secret inCognitoClientSecretArn), Token URL (CognitoTokenEndpoint), Authorization URL (CognitoAuthorizationEndpoint), and Redirect URL (ActionConnectorRedirectUrl). - Choose Create and continue, review the integration, and choose Next.
When AWS Quick asks you to sign in, use the Cognito user in CognitoUsername.
Its password is in the Secrets Manager secret in
CognitoUserCredentialsSecretArn. The
Deployment guide has the commands to read both
secrets and explains how to give other AWS Quick users access to the
connector.
After the connector is created, install the Quick Admin Onboarding Buddy skill in the AWS Quick desktop application and start the onboarding conversation.
Update the stack with a change set
To ship a new build, push a new IMAGE_TAG and run the Step 2 command again
with the new ContainerImageUri. After a container update, refresh the
Gateway's tool list as described in the
Deployment guide. Then open the connector's details
page in AWS Quick, choose Sync, and sign in again when AWS Quick asks. AWS
Quick doesn't pick up new or renamed tools on a custom MCP connector until its
owner syncs it.
Use an explicit change set instead when you want to review what will change (replacements, deletions, IAM changes) before anything is applied:
export STACK_NAME=quick-admin-buddy-mcp
export CHANGE_SET_NAME="update-$(date +%Y%m%d%H%M%S)"

# 0. The raw create-change-set API caps an inline template at 51,200 bytes, so
#    upload the template to S3 and reference it with --template-url.
aws s3 cp infrastructure/template.yaml \
  "s3://${TEMPLATE_BUCKET}/quick-admin-buddy-mcp/template.yaml" \
  --region "${AWS_REGION}"
export TEMPLATE_URL="https://${TEMPLATE_BUCKET}.s3.${AWS_REGION}.amazonaws.com/quick-admin-buddy-mcp/template.yaml"

# 1. Create the change set (does not modify the stack)
aws cloudformation create-change-set \
  --region "${AWS_REGION}" \
  --stack-name "${STACK_NAME}" \
  --change-set-name "${CHANGE_SET_NAME}" \
  --change-set-type UPDATE \
  --template-url "${TEMPLATE_URL}" \
  --capabilities CAPABILITY_NAMED_IAM \
  --parameters \
      ParameterKey=ContainerImageUri,ParameterValue="${ACCOUNT_ID}.dkr.ecr.${AWS_REGION}.amazonaws.com/quick-admin-buddy-mcp:NEW_TAG" \
      ParameterKey=CognitoDomainPrefix,UsePreviousValue=true \
      ParameterKey=OnboardingStateTableName,UsePreviousValue=true \
      ParameterKey=ActionConnectorName,UsePreviousValue=true \
      ParameterKey=TenantId,UsePreviousValue=true \
      ParameterKey=QuickSetupBuddyAgentId,UsePreviousValue=true \
      ParameterKey=QuickSetupBuddySharePrincipals,UsePreviousValue=true

# 2. Wait for the diff, then review it
aws cloudformation wait change-set-create-complete \
  --region "${AWS_REGION}" --stack-name "${STACK_NAME}" --change-set-name "${CHANGE_SET_NAME}"
aws cloudformation describe-change-set \
  --region "${AWS_REGION}" --stack-name "${STACK_NAME}" --change-set-name "${CHANGE_SET_NAME}"

# 3. Execute it after the diff looks correct, and wait for the update
aws cloudformation execute-change-set \
  --region "${AWS_REGION}" --stack-name "${STACK_NAME}" --change-set-name "${CHANGE_SET_NAME}"
aws cloudformation wait stack-update-complete \
  --region "${AWS_REGION}" --stack-name "${STACK_NAME}"
- Keep
UsePreviousValue=truefor every parameter you are not changing. Otherwise CloudFormation resets it to the template default. - If the change set reports
didn't contain changes, there is nothing to update. Delete it withdelete-change-set. - Don't execute a change set that shows
Replacement: Trueon a stateful resource such as the DynamoDB table or the Cognito user pool. Replacement deletes and recreates the resource.
Development
python3 -m venv .venv
source .venv/bin/activate
pip install -e ".[dev]"
pytest
cfn-lint infrastructure/template.yaml
The tests are unit tests plus Hypothesis property-based tests. They run at a
minimum of 100 Hypothesis examples through the quick_admin_buddy profile in
tests/conftest.py. DynamoDB tests use moto, so no AWS account is needed.
At startup the server writes one JSON log line with the settings it read from its environment (see Stack parameters). If a value is invalid, it stops with an error that names the variable. Each tool call then writes one JSON log line to the Runtime's CloudWatch Logs log group. The line holds the tool name, connector or extension key, result status, AWS request IDs, and duration, with no arguments or secret values.
Cleanup
aws cloudformation delete-stack --region "${AWS_REGION}" --stack-name quick-admin-buddy-mcp
The following resources are retained or live outside the stack, and you remove them yourself:
- The AWS Quick MCP action connector you created in Step 3.
- Any action connectors and knowledge bases the server created in AWS Quick.
Turn them off with the
disable_*tools before you delete the stack, or delete them in the console. - The DynamoDB table, the AWS KMS key, and the CloudWatch Logs log groups,
which the template retains (
DeletionPolicy: Retain). - The Amazon ECR repository and the template bucket.
The Deployment guide lists the retained resources in detail and explains how to redeploy into the same account afterwards.
Security
The sample controls access as follows:
- Inbound requests need a valid Cognito access token, which the Gateway's
CUSTOM_JWTauthorizer checks. The Cognito user pool allows only users that an administrator creates, and the app client issues tokens only through the hosted-UI authorization code grant. - The Runtime accepts only requests signed with AWS Signature Version 4 by an
IAM principal allowed to call
InvokeAgentRuntime, and the container publishes no port. - The runtime role can call only the AWS Quick operations the server uses, in
this account, and can read only Secrets Manager secrets whose names start
with
quick-admin-buddy/. - The tools accept credentials only by Secrets Manager secret name. A secret value passed as a tool argument is rejected, so credentials don't pass through the chat.
- The Cognito client secret, the sign-in user's password, and the integration credentials are in Secrets Manager, encrypted with the stack's AWS KMS key. Stack outputs contain secret ARNs, not secret values. This repository contains no credentials.
- The caller's identity isn't passed to the backend, so everyone who can use the connector acts on the same AWS Quick account. The skill is meant for account setup, when only the administrator uses it; share the connector only with the administrators who should onboard the account.
- The stack creates one shared Cognito sign-in user. The skill and this backend help administrators set up AWS Quick before regular users get access, to speed up the initial deployment, and are meant to be removed once the account is ready to onboard regular users. The user is created so that you can sign in right after the stack is deployed.
This sample uses Amazon Cognito so that it works without an existing identity
provider. In your own deployment you can point the Gateway's CUSTOM_JWT
authorizer at the OpenID Connect (OIDC) identity provider your organization
already uses. See Authentication and authorization model
for the full model.
Repository layout
The project folder is organized as follows:
aws-quick-admin-buddy-mcp/
├── src/quick_admin_buddy_mcp/
│   ├── server.py              # MCP entry point: tool registrations, streamable HTTP
│   ├── config.py              # Settings read from environment variables at startup
│   ├── observability.py       # Startup and per-tool-call structured log lines
│   ├── domain/                # Catalog, request models, validation, Tool_Result
│   │   └── operations/        # One class per onboarding operation (MCP tool)
│   ├── quick/                 # AWS Quick admin API client (boto3), Secrets Manager
│   └── state/                 # Onboarding state persistence (in memory and DynamoDB)
├── infrastructure/
│   └── template.yaml          # Single CloudFormation template for the whole backend
├── docs/
│   ├── tool-reference.md      # Tool inputs, outputs, Result_Status values, catalogs
│   ├── deployment-guide.md    # Parameters, outputs, connector setup, updates, teardown
│   └── auth-model.md          # Inbound, gateway-to-runtime, and outbound auth
├── tests/                     # Unit, property-based, and moto integration tests
├── images/                    # Architecture diagram used in this README
├── Dockerfile                 # linux/arm64 image for AgentCore Runtime
└── pyproject.toml             # Package metadata, pinned dependencies, pytest and ruff config
Contributing
See How to Contribute.
License
This library is licensed under the MIT-0 License. See the LICENSE file.