Databricks Unity Catalog (3LO) - Data Source Setup Guide
This guide walks through connecting Amazon Quick to Databricks Unity Catalog with three-legged OAuth (3LO), end to end.
With 3LO, each Quick user signs in with their own Databricks identity, so Unity Catalog permissions (table access, row filters, column masks) are enforced per user.
It complements the official Amazon Quick documentation for Databricks 3LO.
Once the data source is created, you can use Databricks Unity Catalog in two ways (see Part 5):
- Agentic mode: explore your Unity Catalog through a conversation, with the Explore data button
- Dataset source: create datasets from the data source, then build topics and dashboards
Prerequisites:
- Databricks account admin access to the account console (
https://accounts.cloud.databricks.com) - A Databricks workspace with Unity Catalog enabled and a running SQL warehouse
- Amazon Quick administrator access (to add an OAuth client application)
- The AWS Region of your Amazon Quick account (used in the redirect URL, for example
us-west-2)
DirectQuery only
Identity enforcement works only for DirectQuery datasets. If a dataset is switched to SPICE or has transformations applied, identity enforcement does not apply.
Placeholders used in this guide
Replace them with your own values before you paste.
<your-account-id>: your Databricks account ID (Part 1, step 1)<region>: the AWS Region of your Amazon Quick account, for exampleus-west-2
Part 1 - Create the OAuth app connection in Databricks
1) Log in to the Databricks account console at https://accounts.cloud.databricks.com
Copy your Databricks account ID from the account menu (top right, your user name).
You will need it for the federation policy and for the token and authorization URLs.
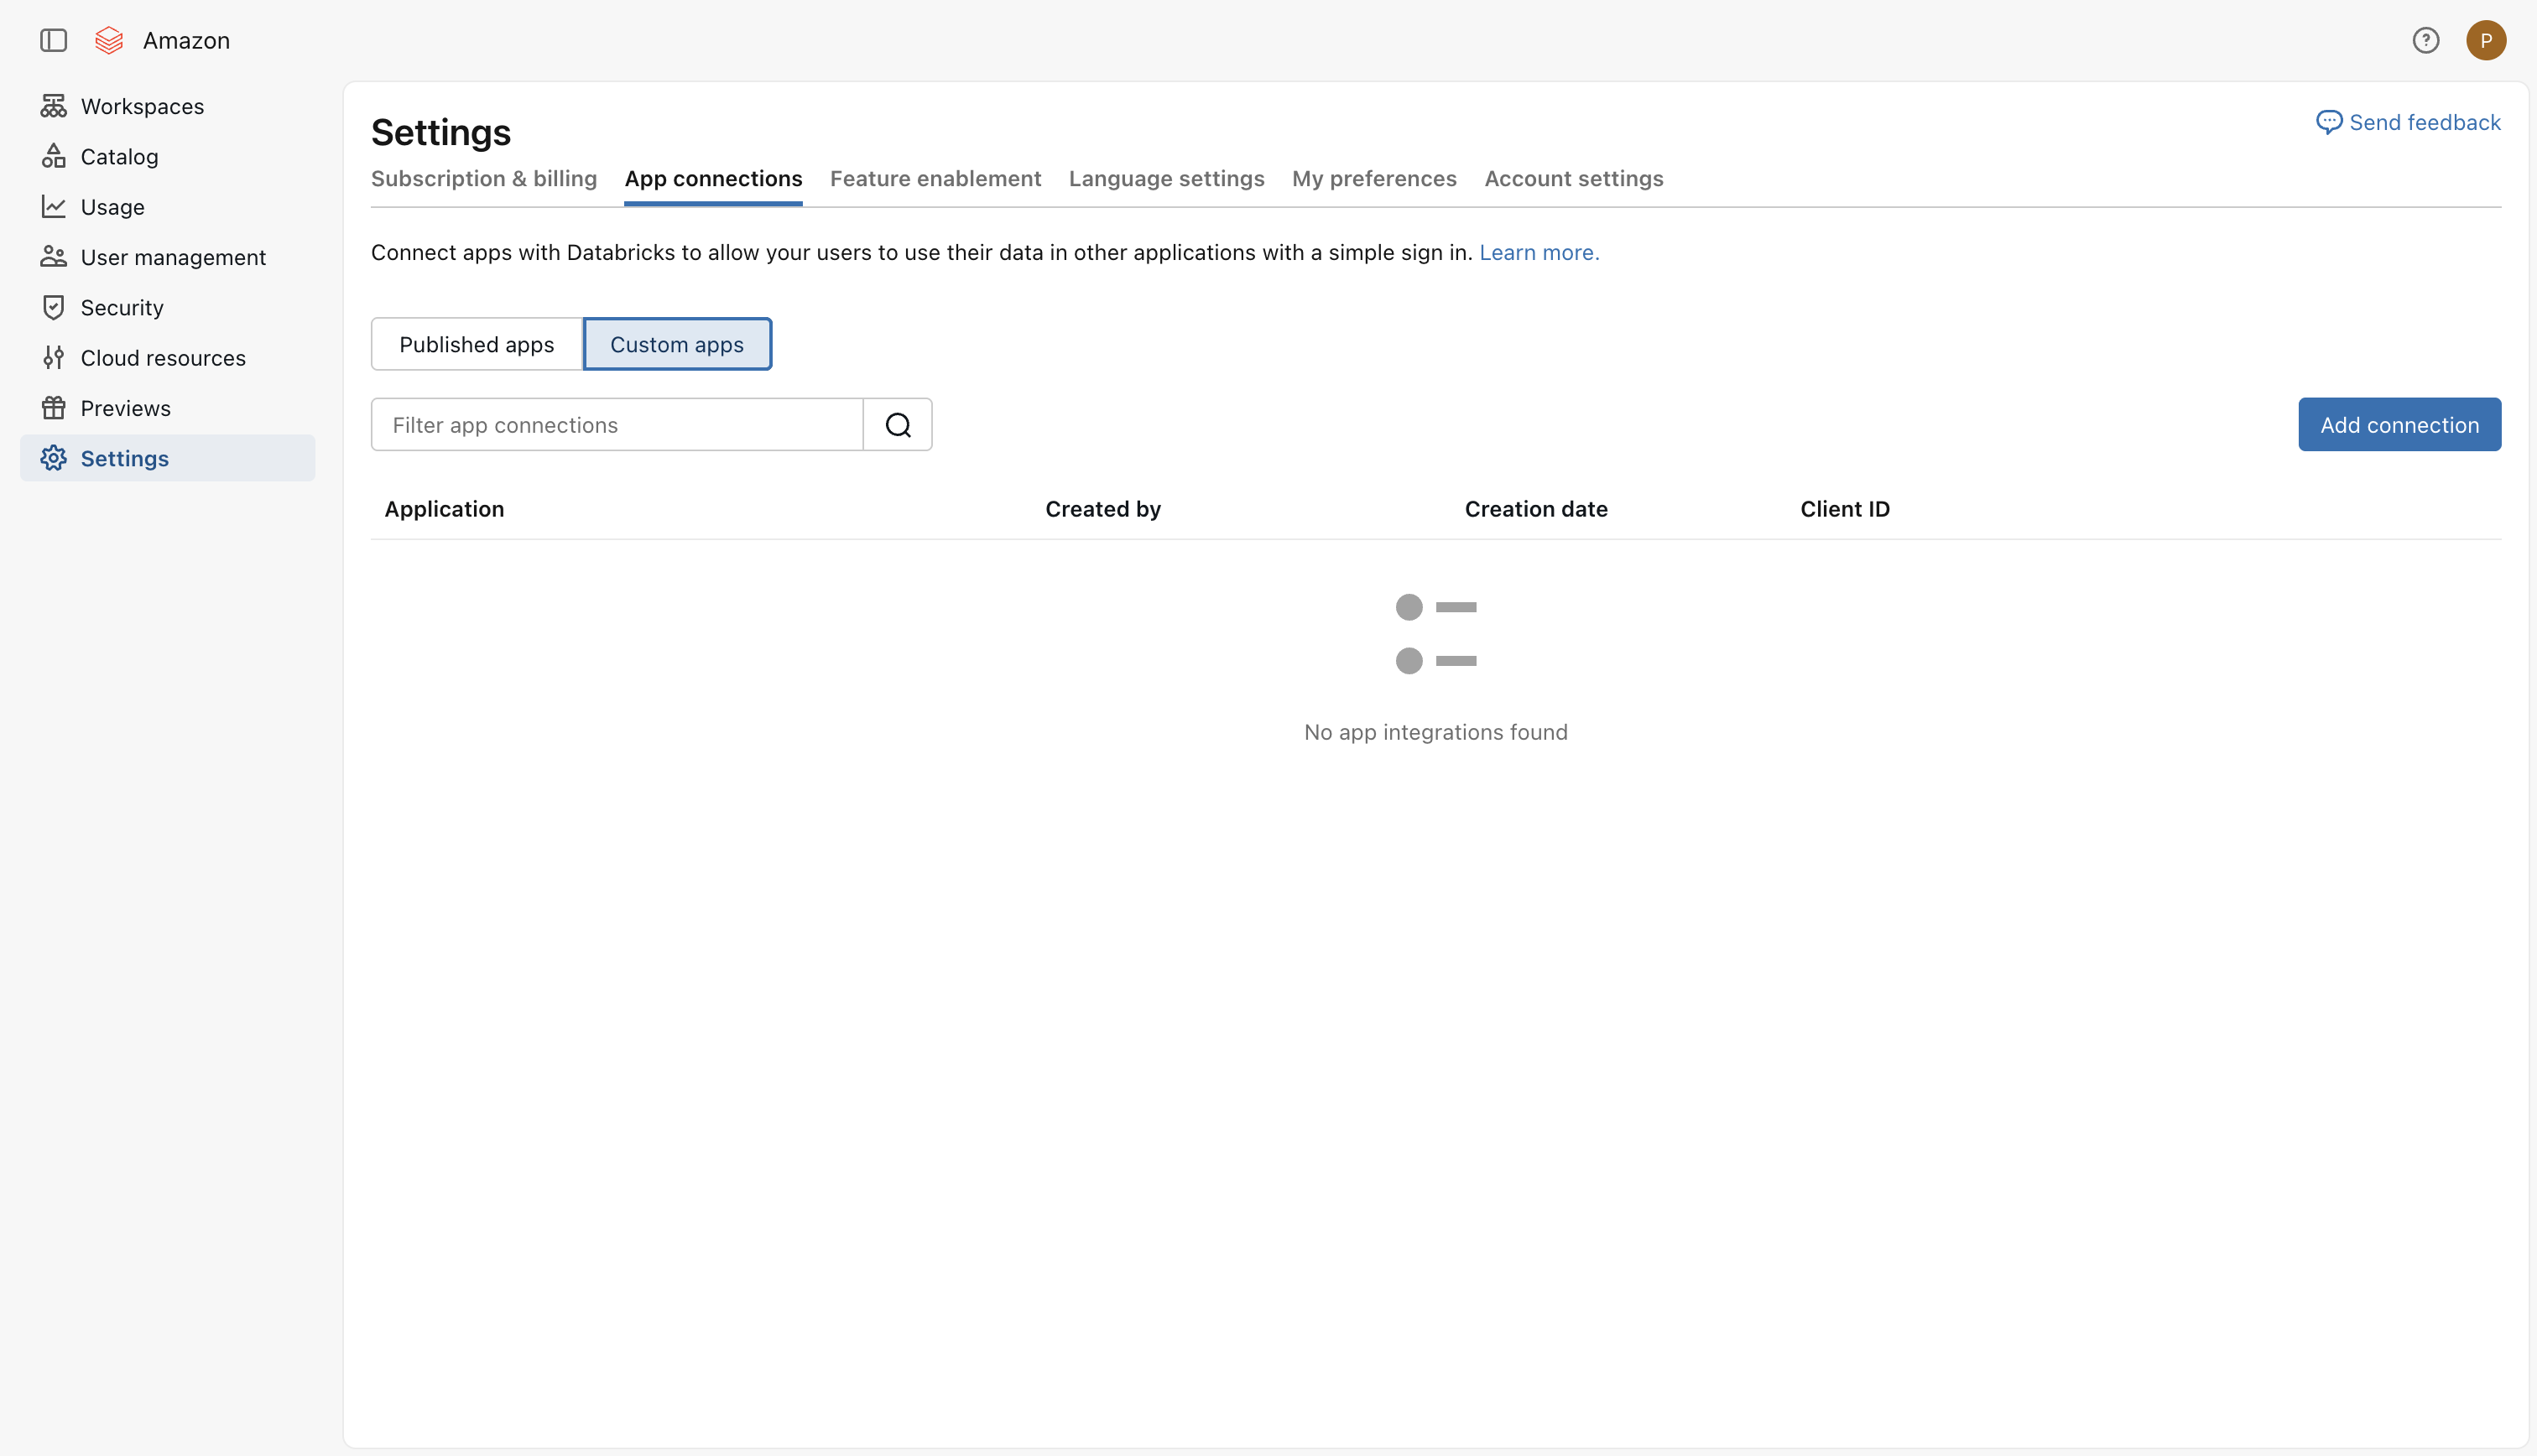
2) From the left navigation menu, go to Settings → App connections → Custom apps, then choose Add connection
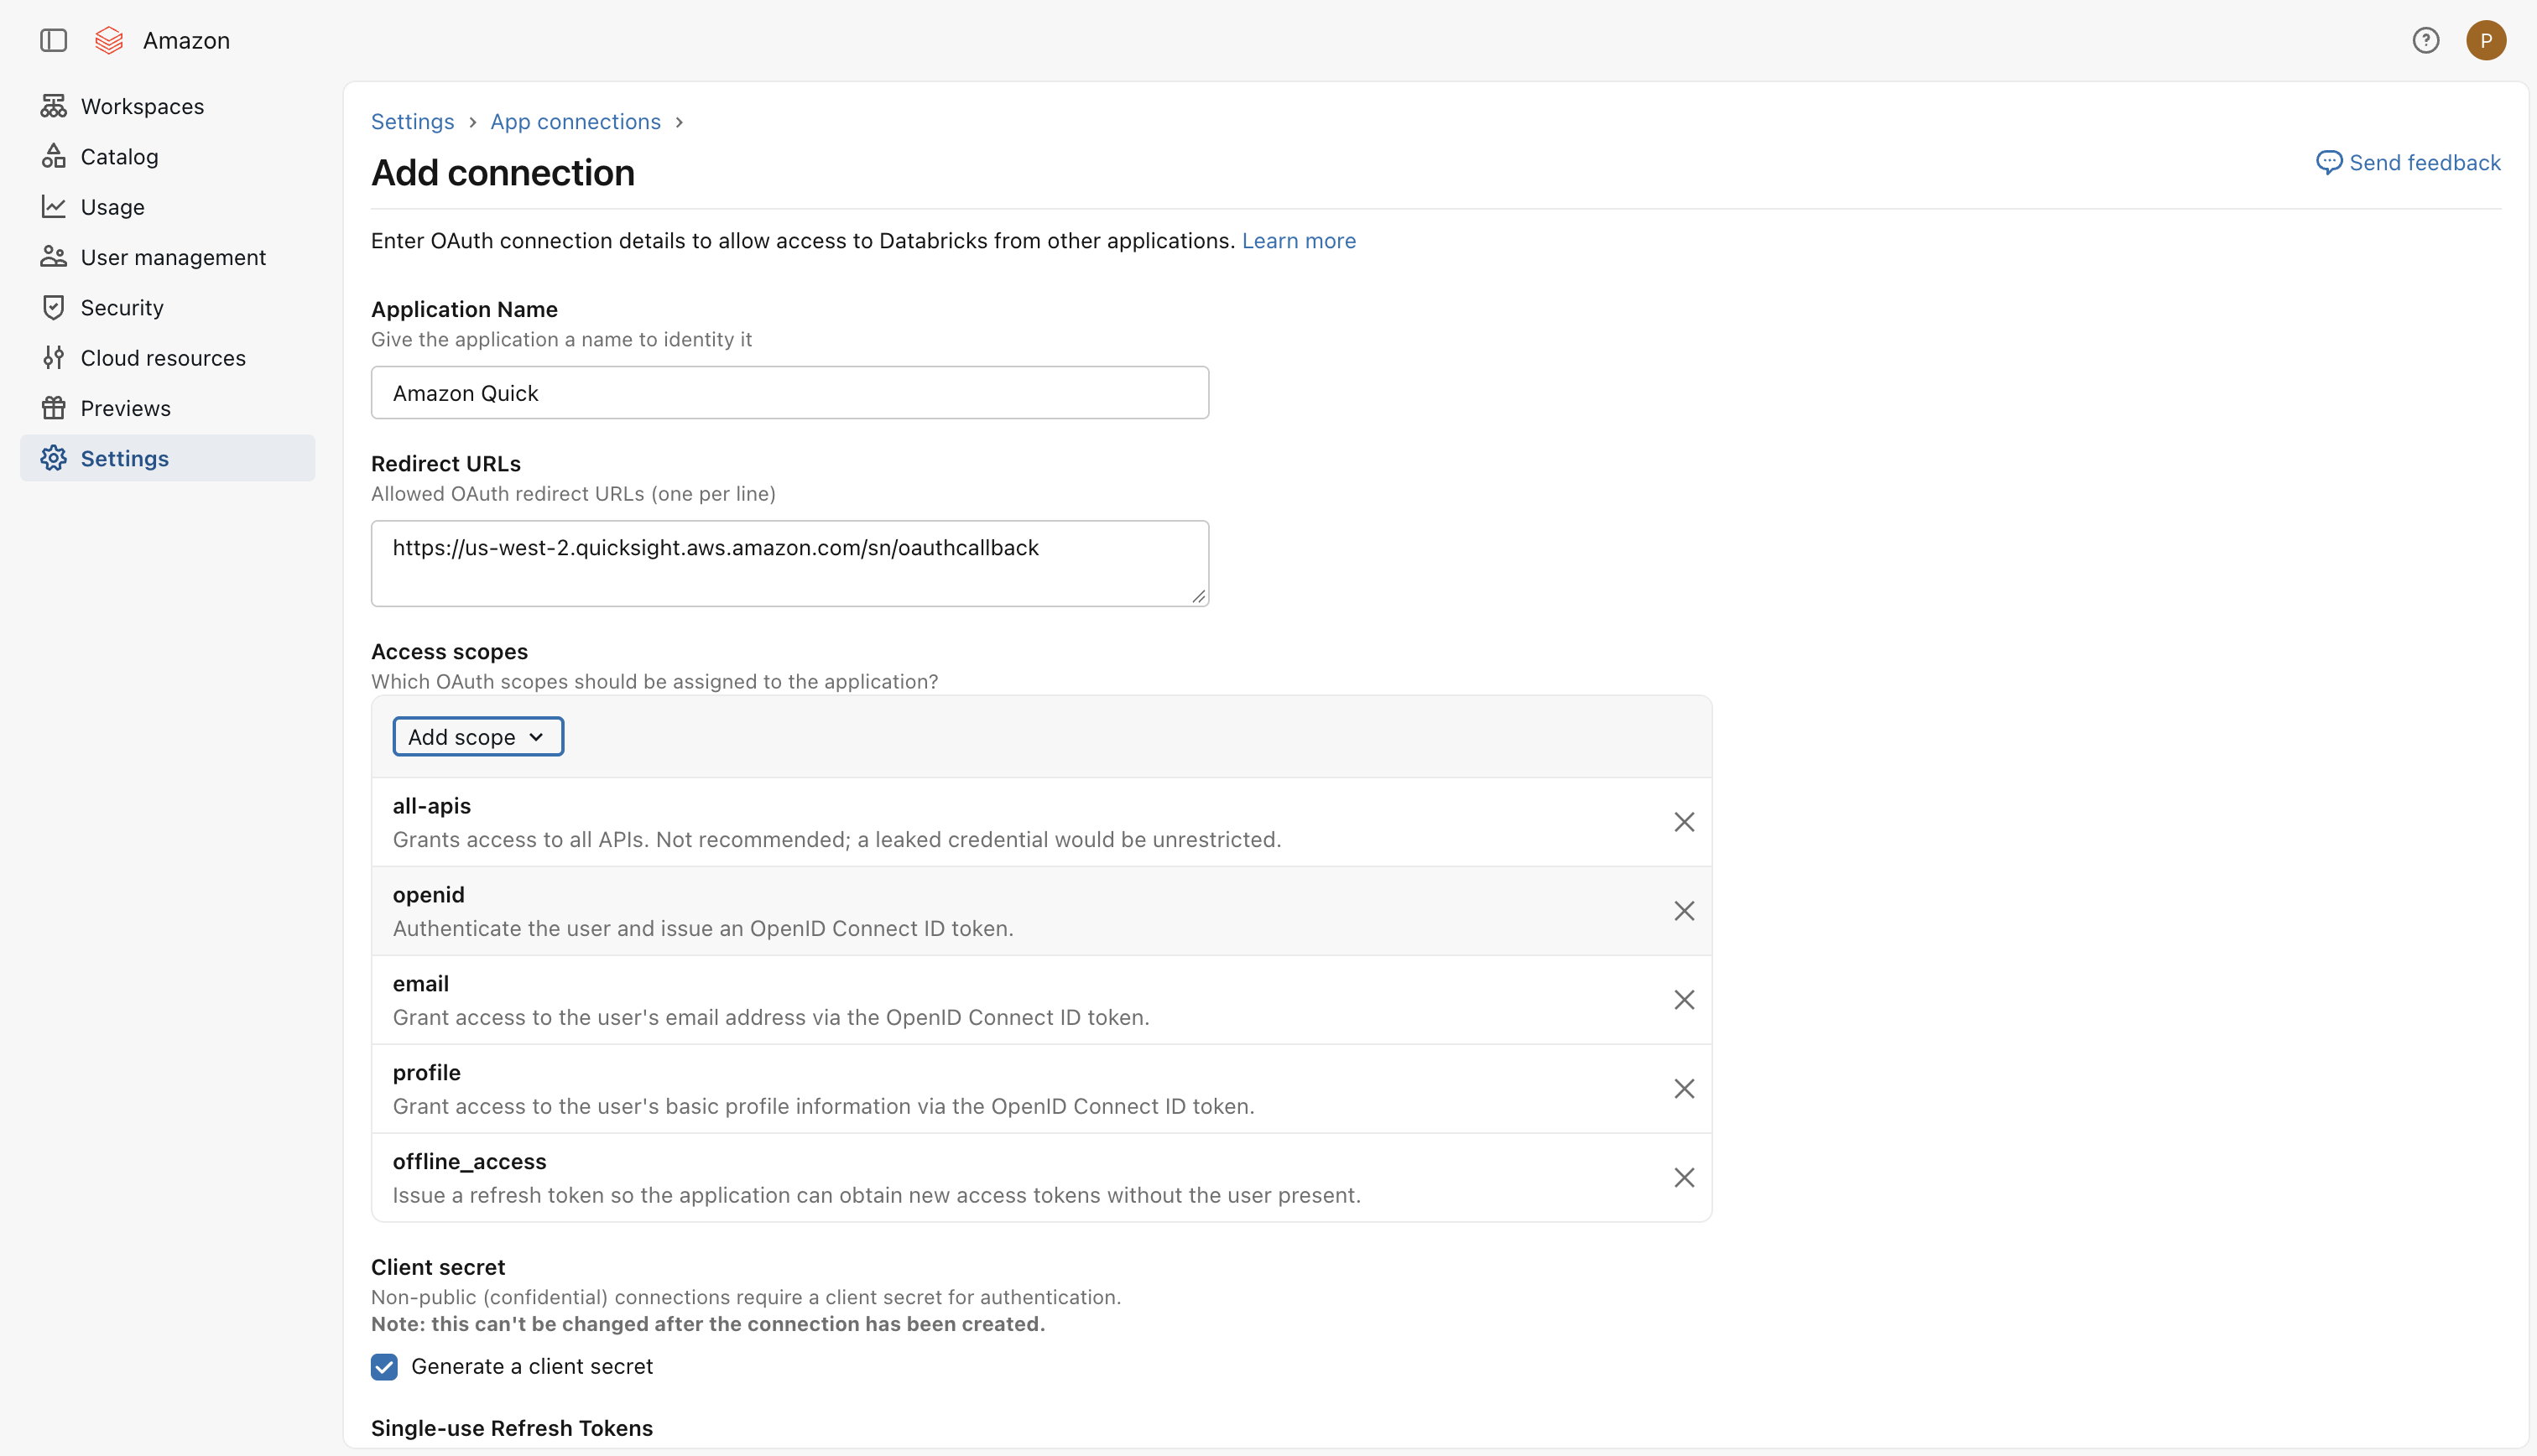
3) On the Add connection page, enter the following information:
Application Name:
Amazon Quick
Redirect URLs:
https://<region>.quicksight.aws.amazon.com/sn/oauthcallback
For example, for an Amazon Quick account in us-west-2:
https://us-west-2.quicksight.aws.amazon.com/sn/oauthcallback
Note
The Region in the redirect URL must match the Region of your Amazon Quick account.
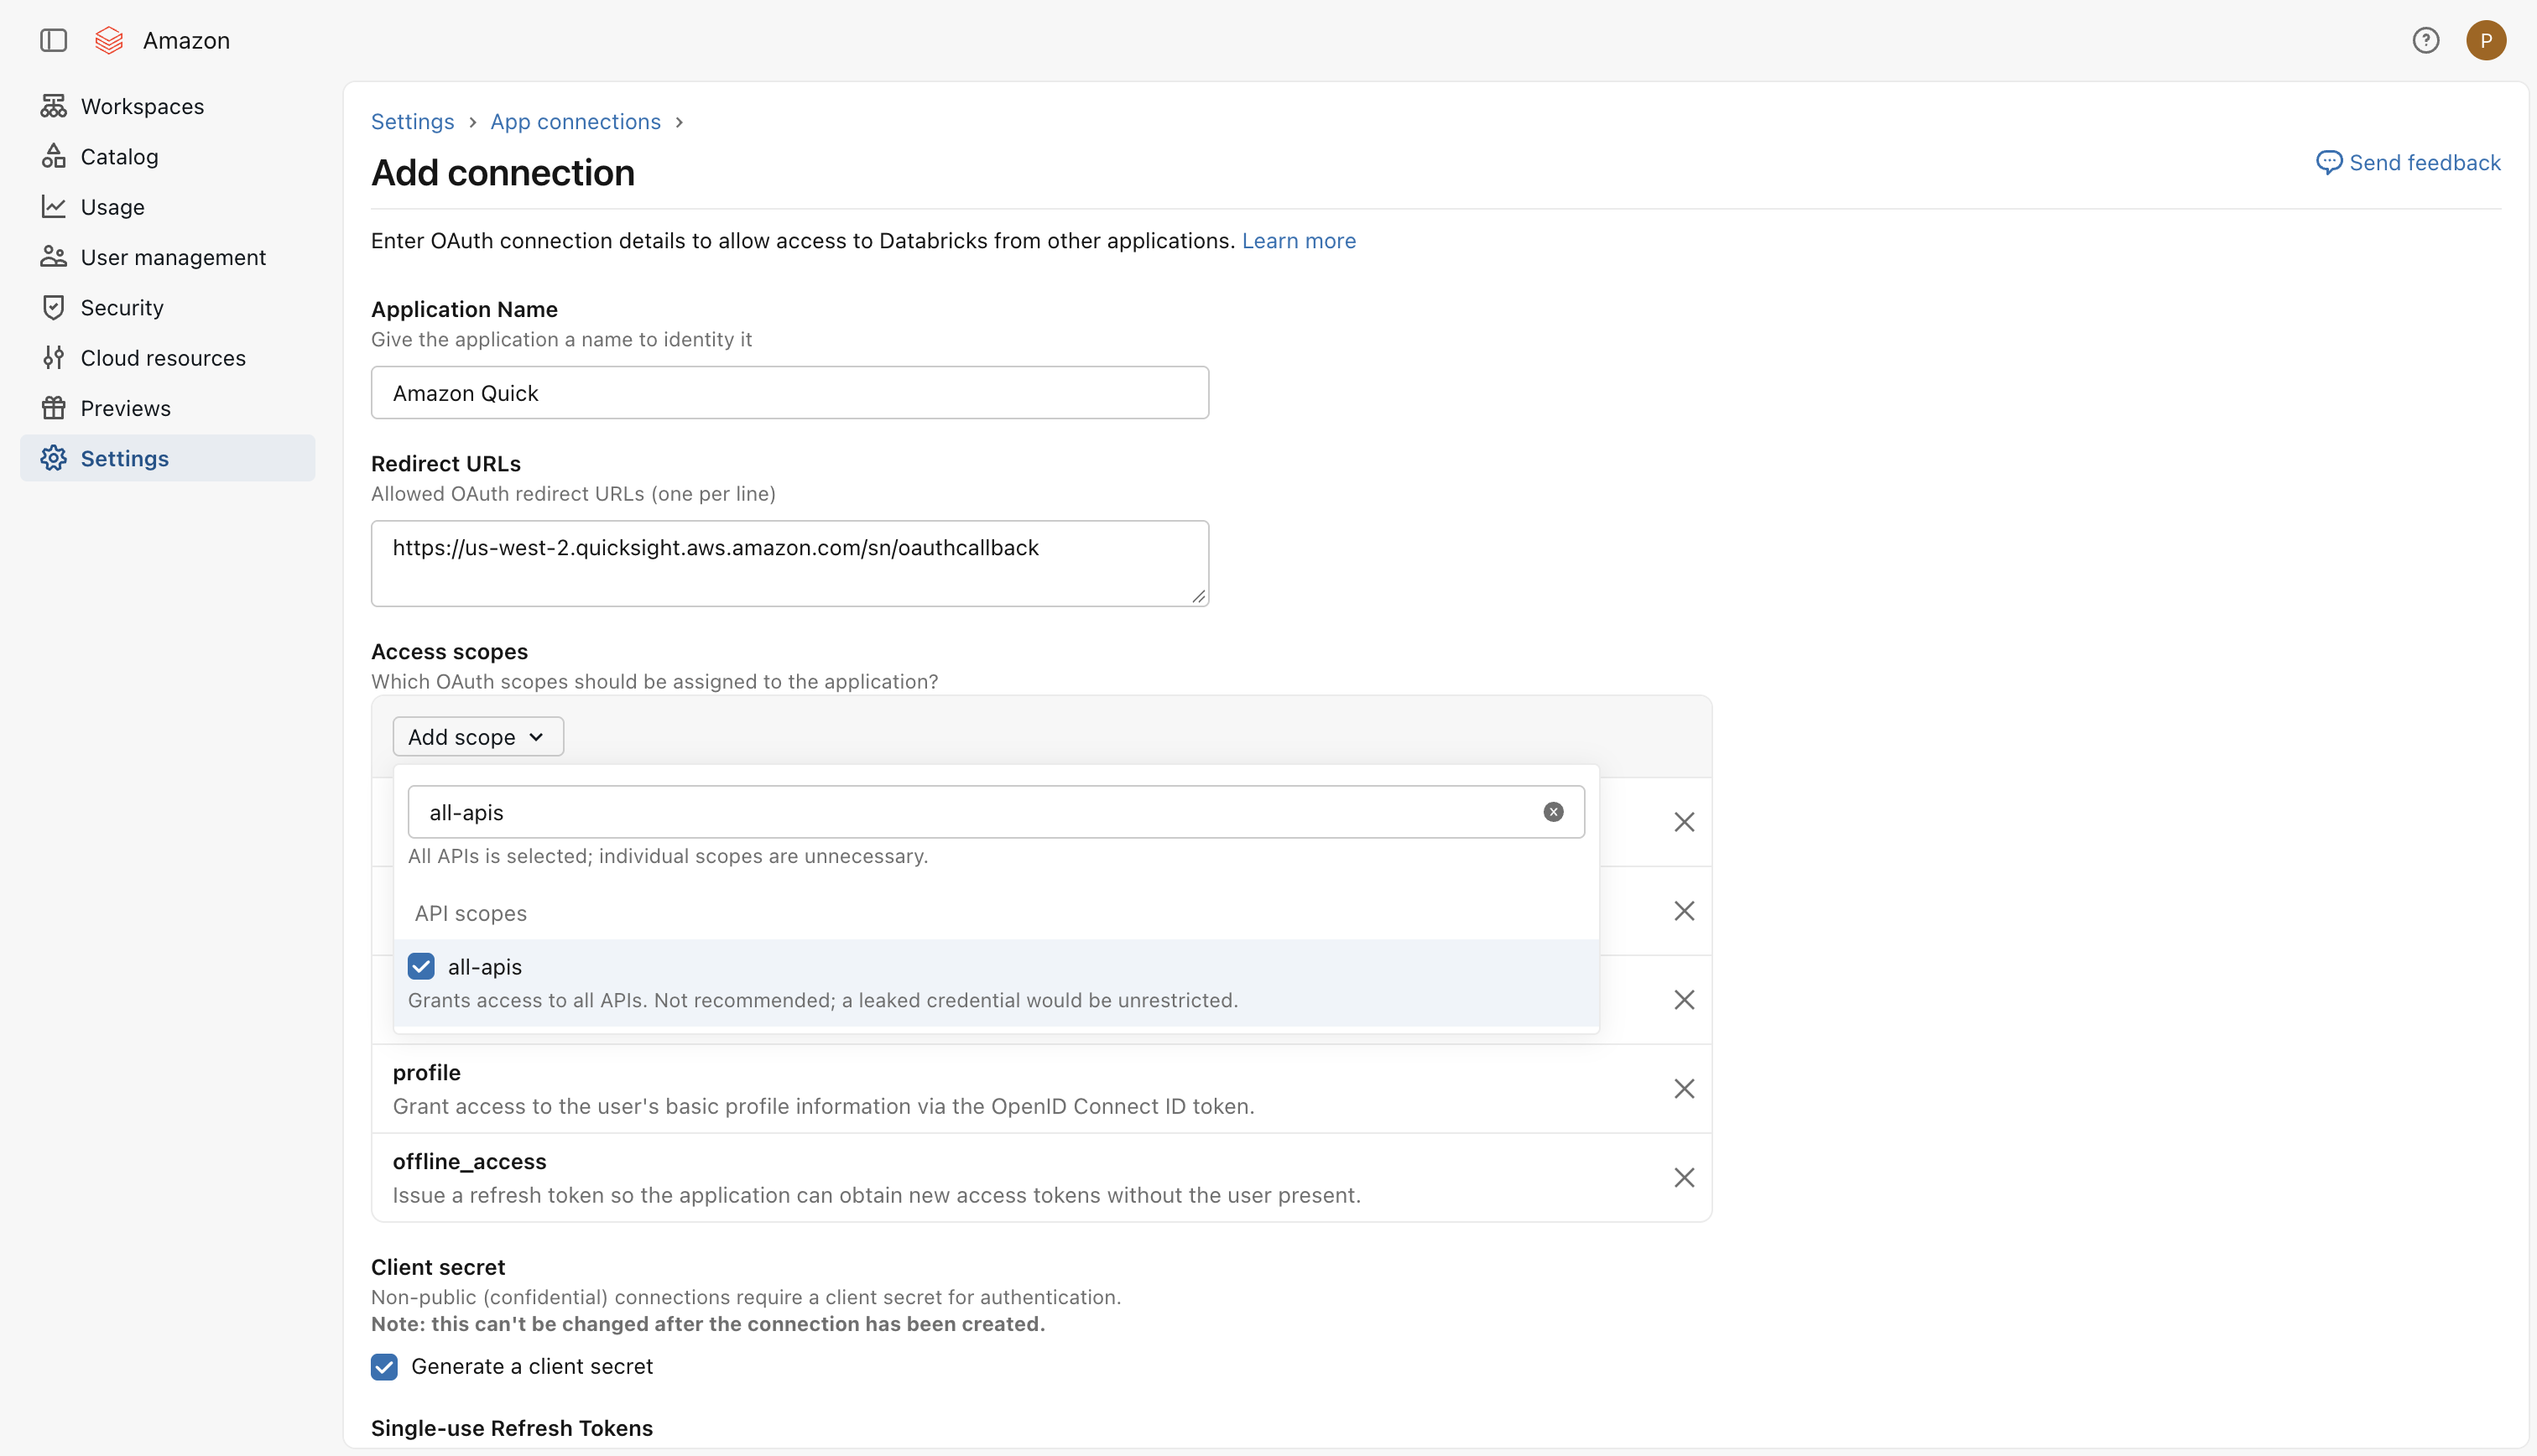
4) In Access scopes, choose Add scope, search for all-apis and select it
Note
Selecting all-apis replaces the default sql scope, because all-apis already covers it.
Keep the other scopes present by default. Your scopes should look like this:
all-apisopenidemailprofileoffline_access
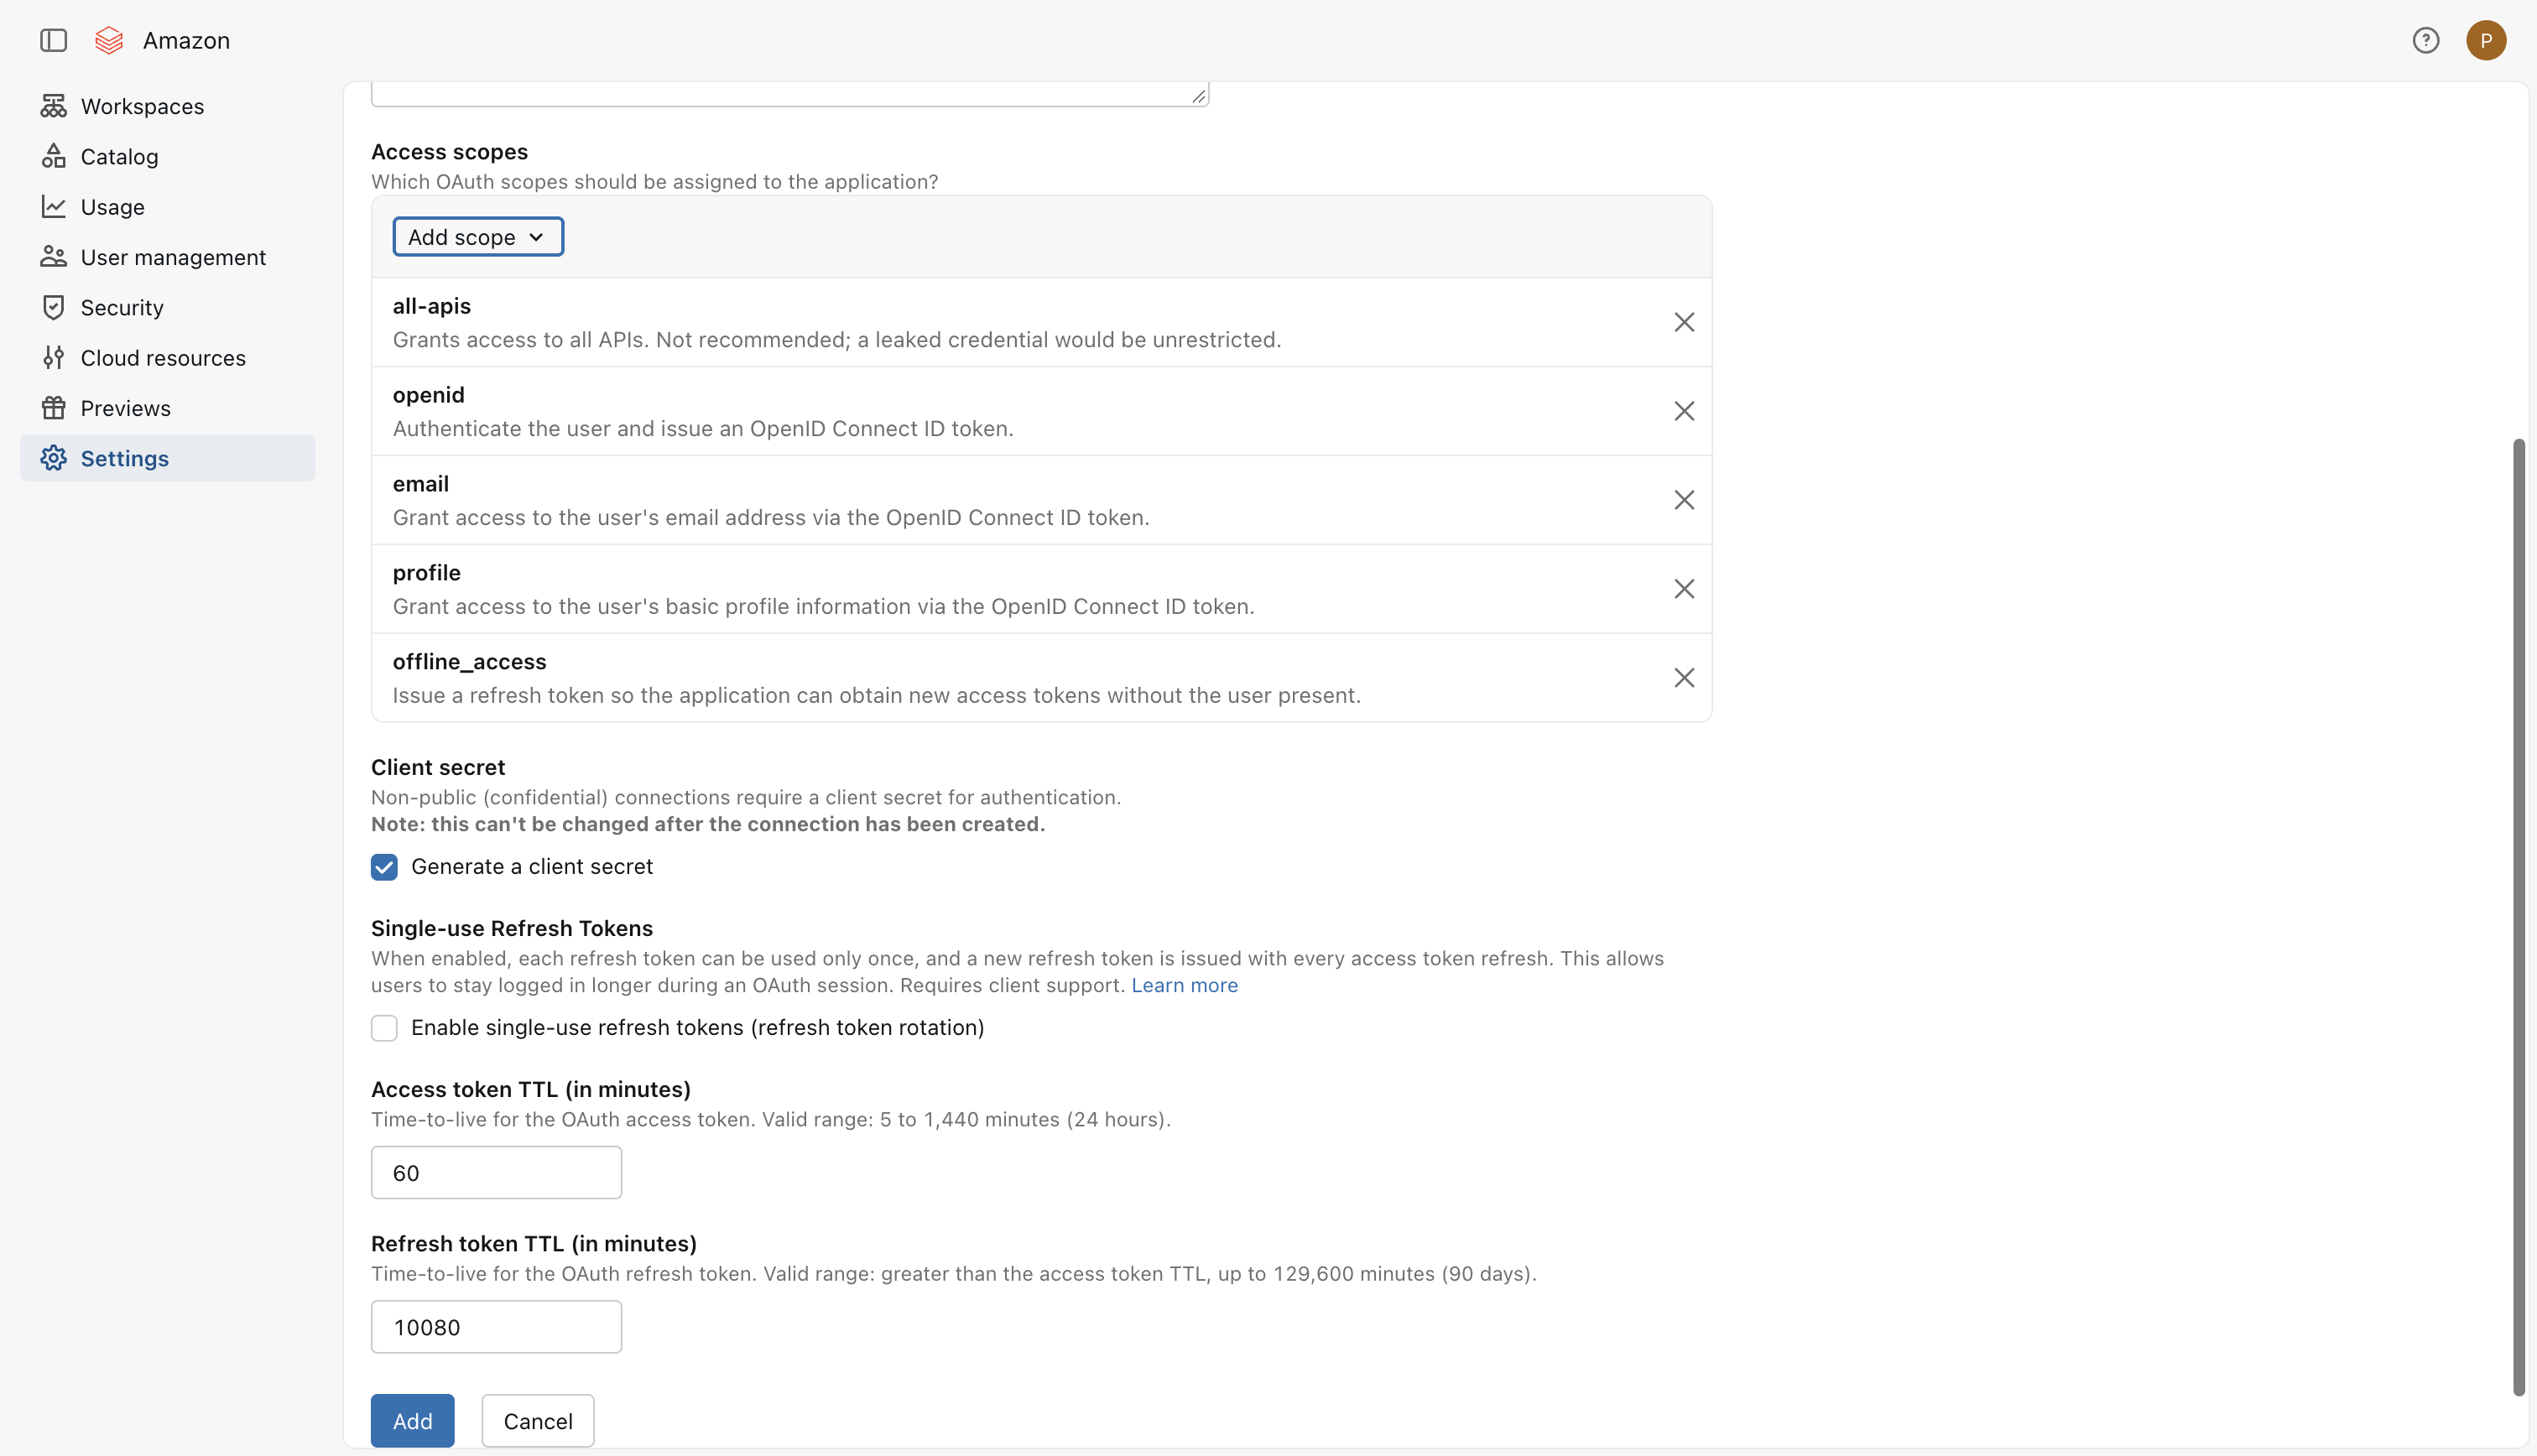
5) Leave everything else to its default value:
- Client secret:
Generate a client secretchecked - Single-use Refresh Tokens: unchecked
- Access token TTL (in minutes):
60 - Refresh token TTL (in minutes):
10080
Then choose Add
6) Get the Client ID and Client secret
After you choose Add, Databricks displays the Client ID and Client secret of the new connection.
Copy both values and store them securely.
Save the client secret now
The client secret is displayed only once. If you lose it, you have to create a new secret for the connection.
Part 2 - Create the workload identity federation policy in Databricks
With Trusted Identity Propagation, Amazon Quick presents to Databricks the OIDC token issued by your Databricks account during the 3LO sign-in.
Databricks only accepts this token if a federation policy trusts your Databricks account as issuer.
Without this policy, the connection fails with a federation policy error. The error message lists the exact issuer and audience the policy must contain.
1) In the Databricks account console, go to Security → Identity provider setup
Under Federation policies → Workload identity federation, choose Create policy
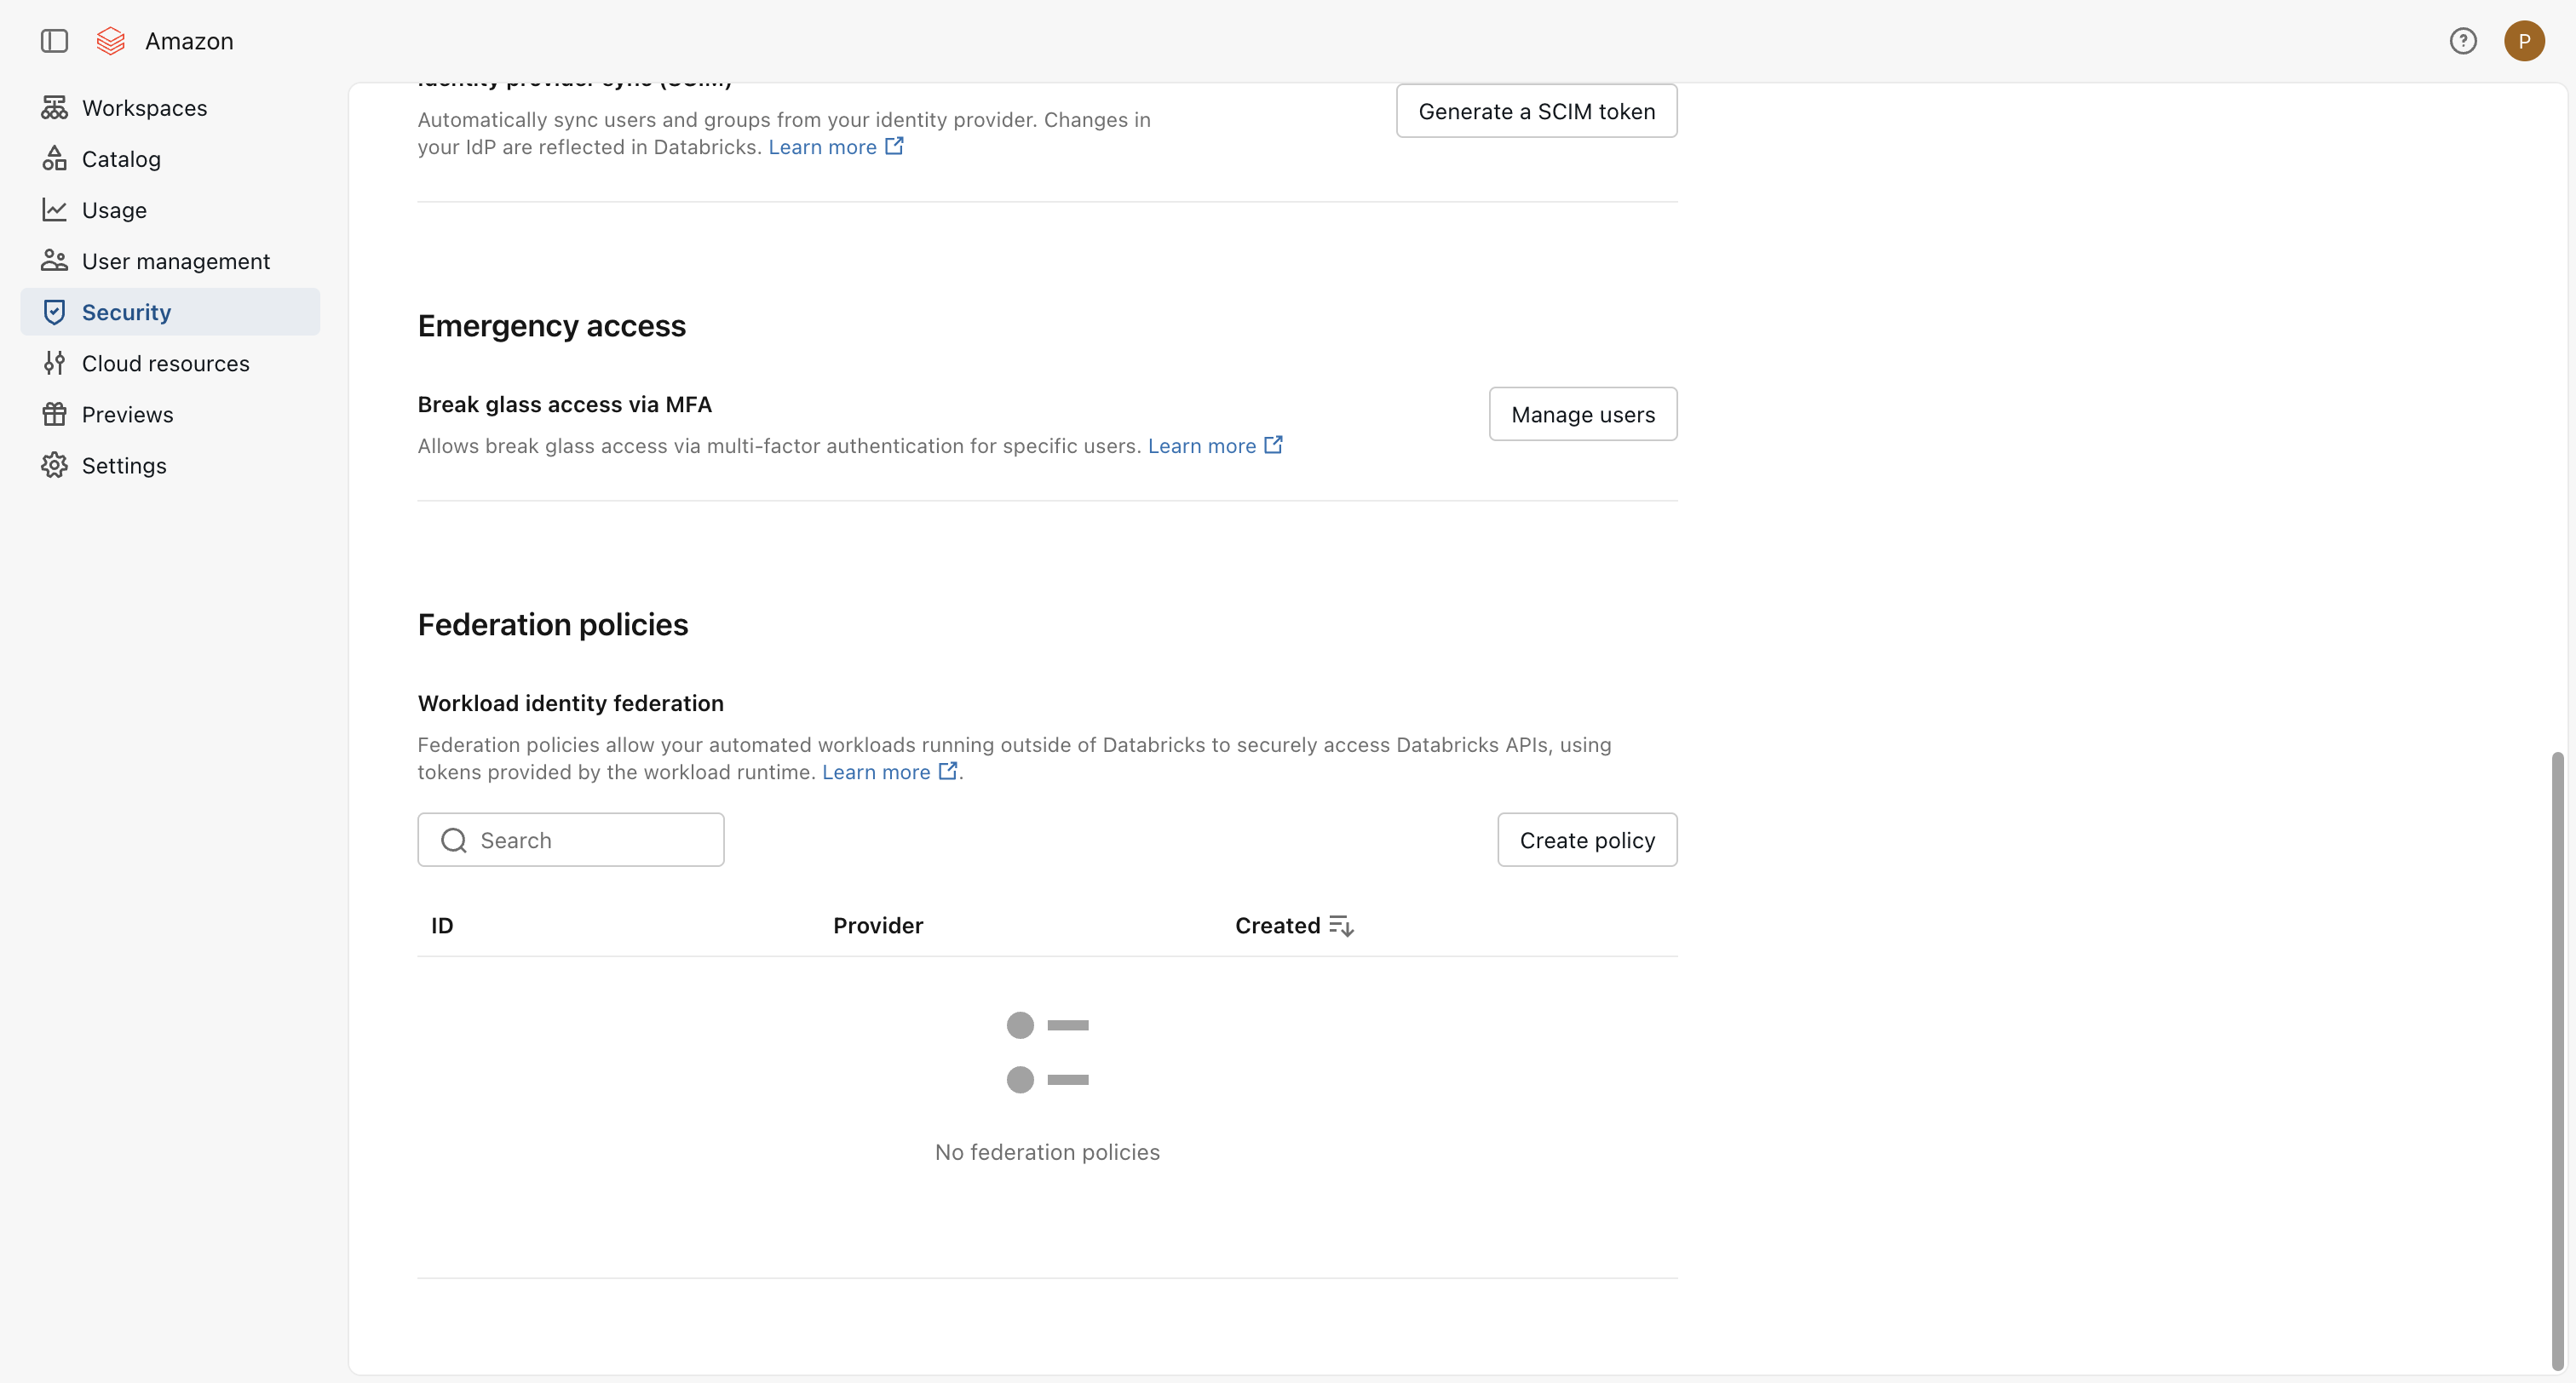
2) Insert the following data, where <your-account-id> is your Databricks account ID (from Part 1, step 1):
Issuer URL:
https://accounts.cloud.databricks.com/oidc/accounts/<your-account-id>
Audiences:
<your-account-id>
Subject claim: leave empty (default sub)
Advanced fields → Token signature validation: Issuer (recommended) (default)
Your configuration should look like this:
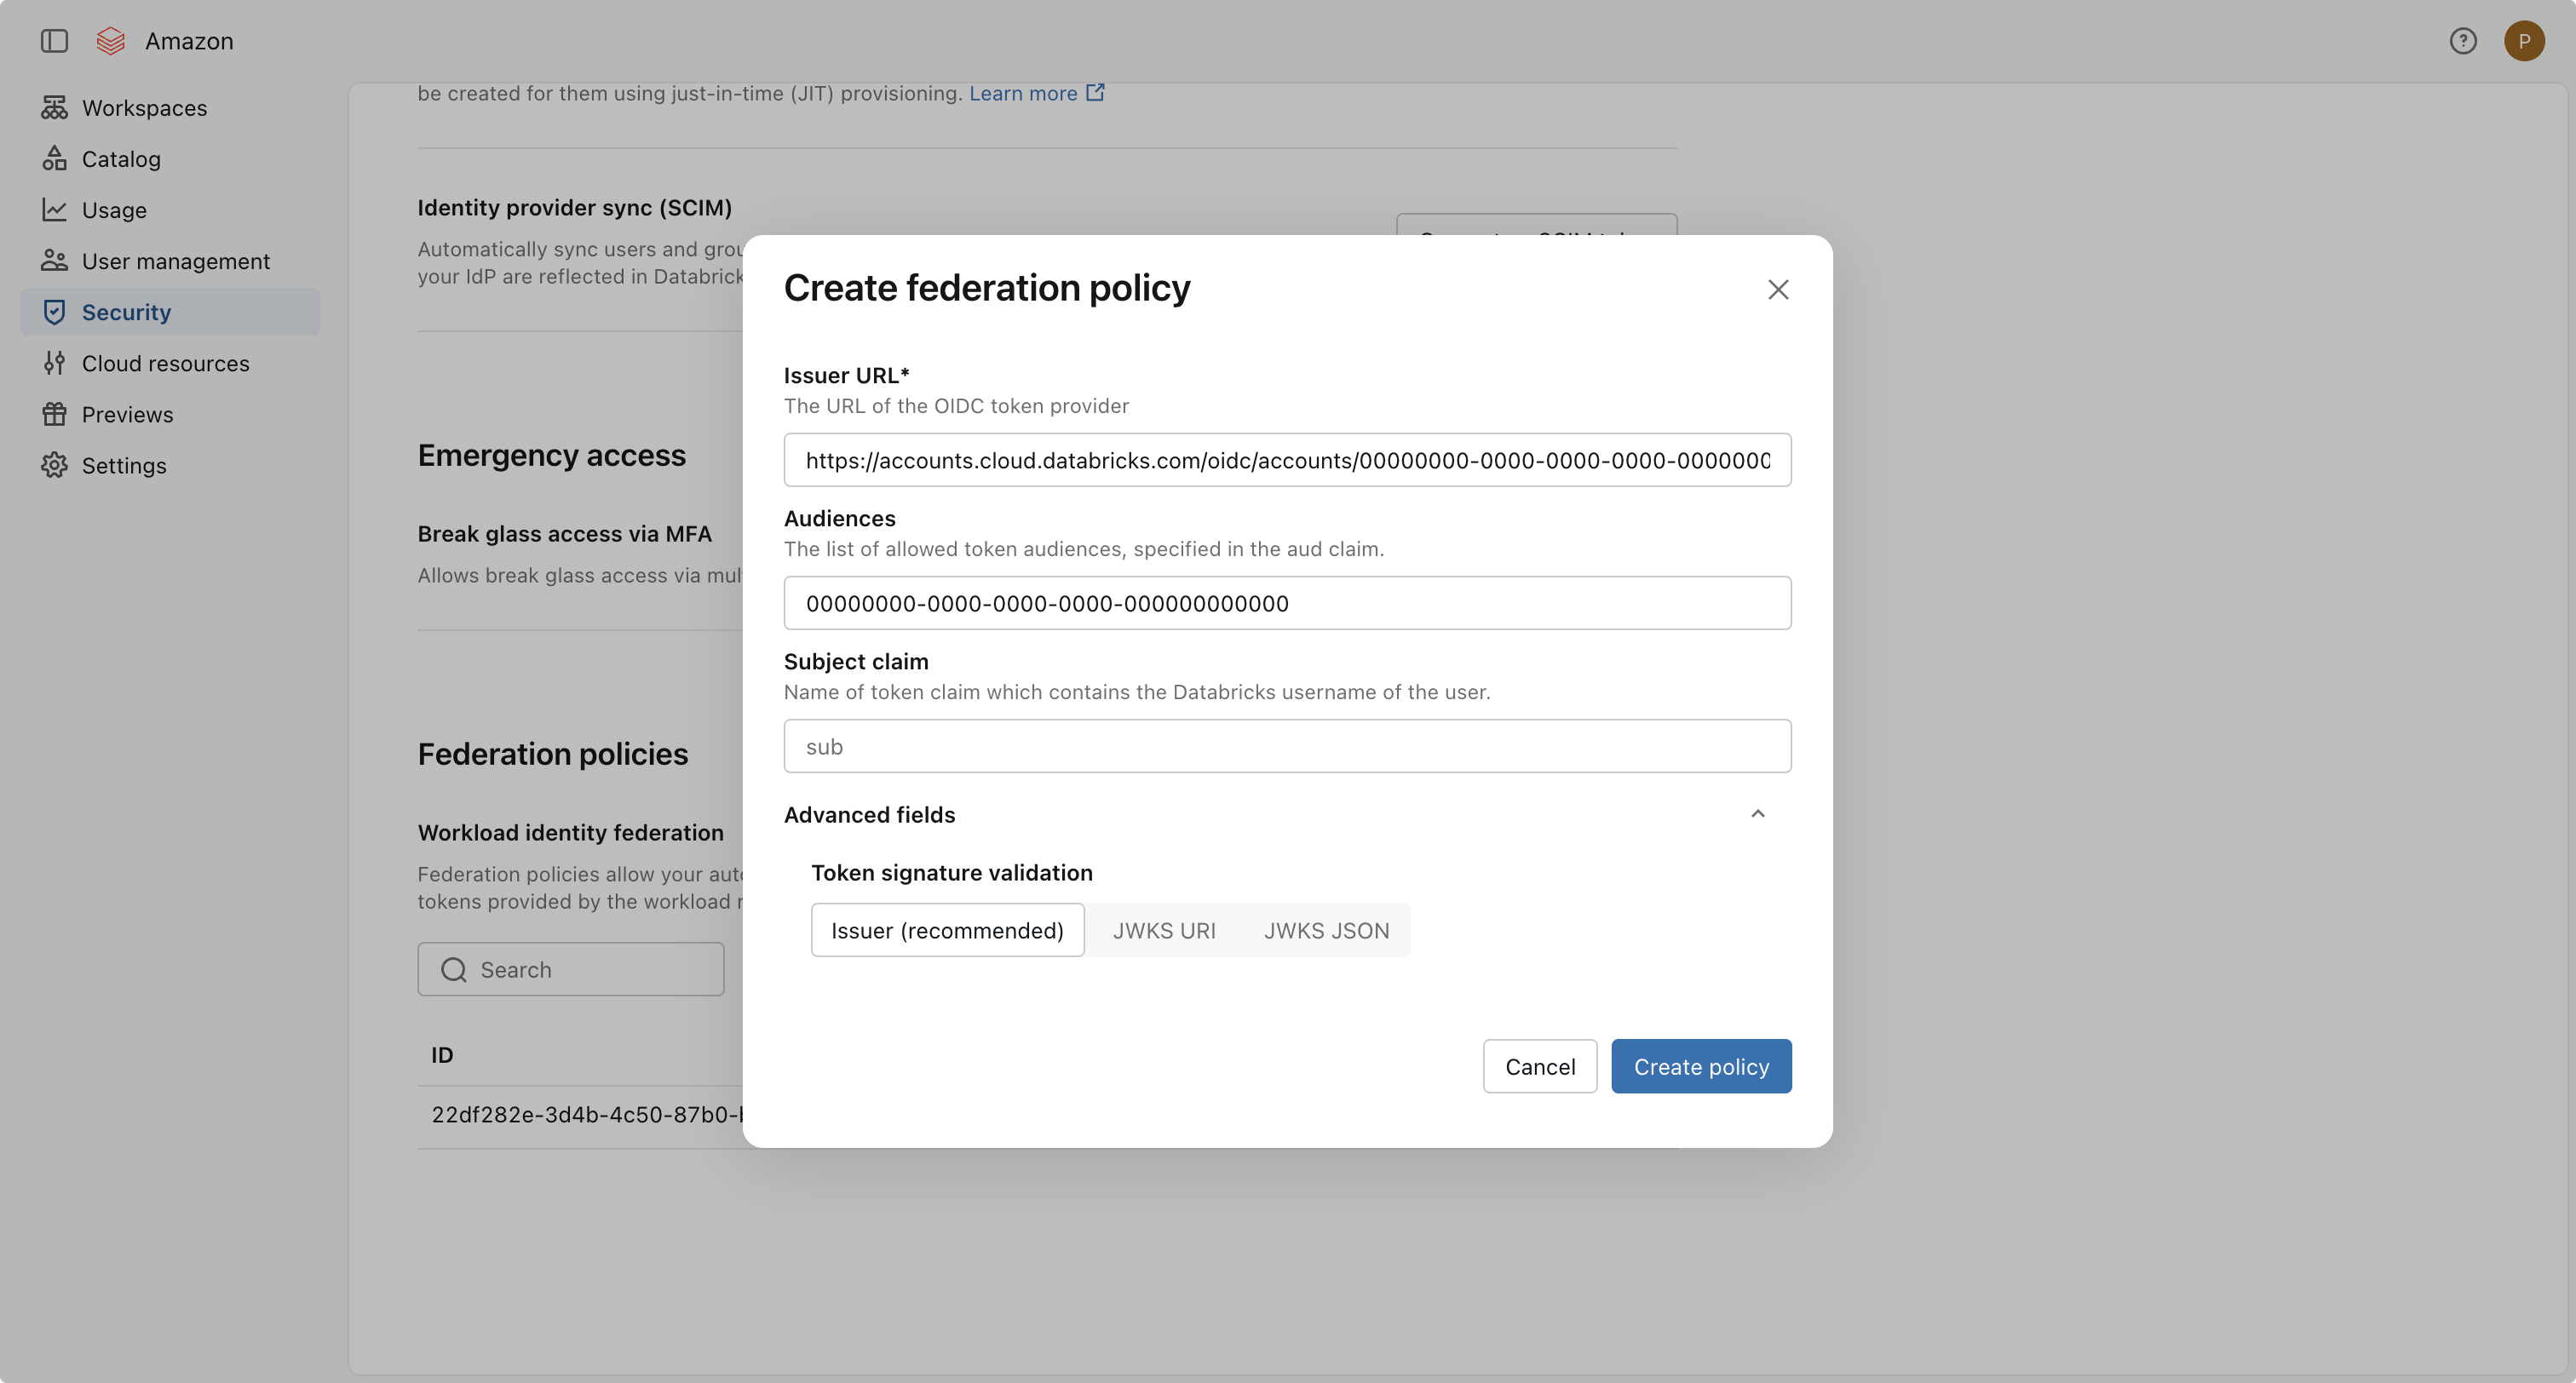
Note
In the screenshot, the account ID is replaced by 00000000-0000-0000-0000-000000000000. Use your own Databricks account ID.
The issuer is the same Databricks account OIDC endpoint used for the token and authorization URLs in Part 3, without the /v1/token or /v1/authorize suffix.
3) Choose Create policy
Part 3 - Add the OAuth client application in Amazon Quick
1) In the Amazon Quick console, choose your profile → Manage account
Under Security, choose Manage OAuth Client Applications, then choose Add OAuth Client Application
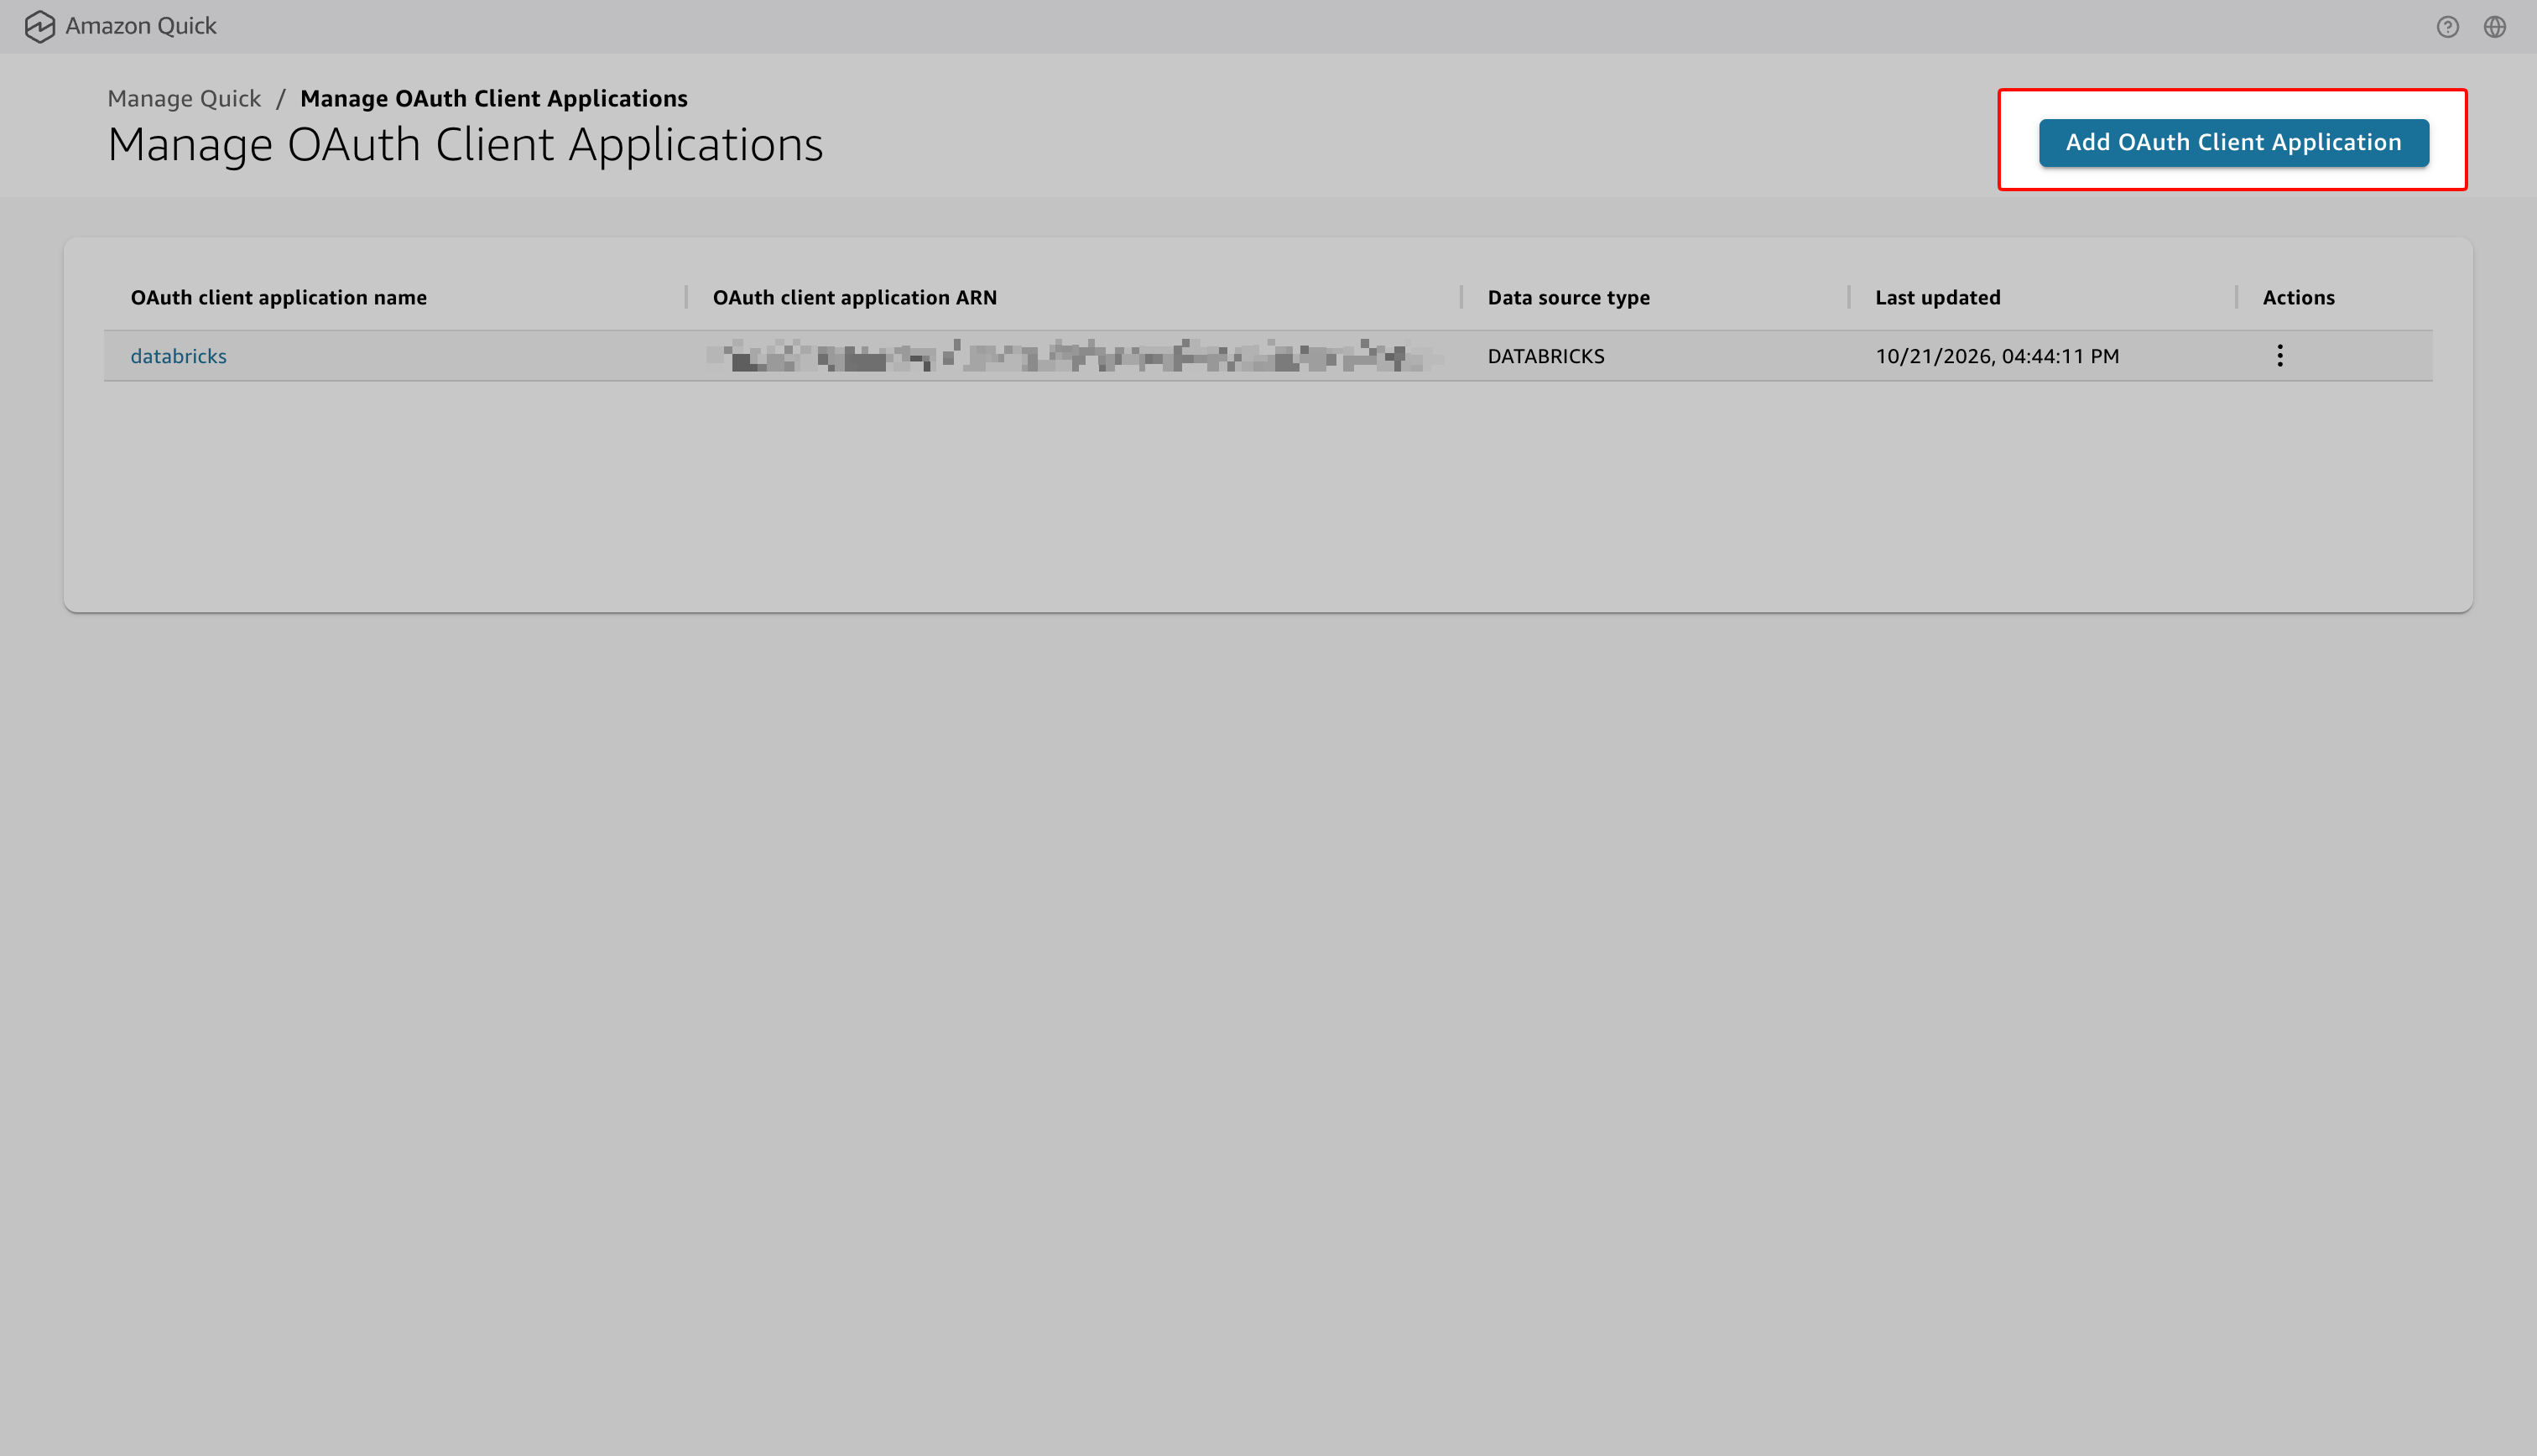
2) Insert the following data:
Config ID: a unique identifier, for example:
databricks-3lo
OAuth client application name: for example:
Databricks Unity Catalog
Authentication type: TOKEN (default)
Client ID: the Client ID from Part 1, step 6
Client secret: the Client secret from Part 1, step 6
Token endpoint URL:
https://accounts.cloud.databricks.com/oidc/accounts/<your-account-id>/v1/token
Authorization endpoint URL:
https://accounts.cloud.databricks.com/oidc/accounts/<your-account-id>/v1/authorize
OAuth scopes: the scopes from Part 1, step 4, separated by spaces:
all-apis offline_access openid email profile
VPC connection ARN (optional): leave empty, unless your Databricks workspace is reachable only through a private network
Data source type: DATABRICKS
Your configuration should look like this:
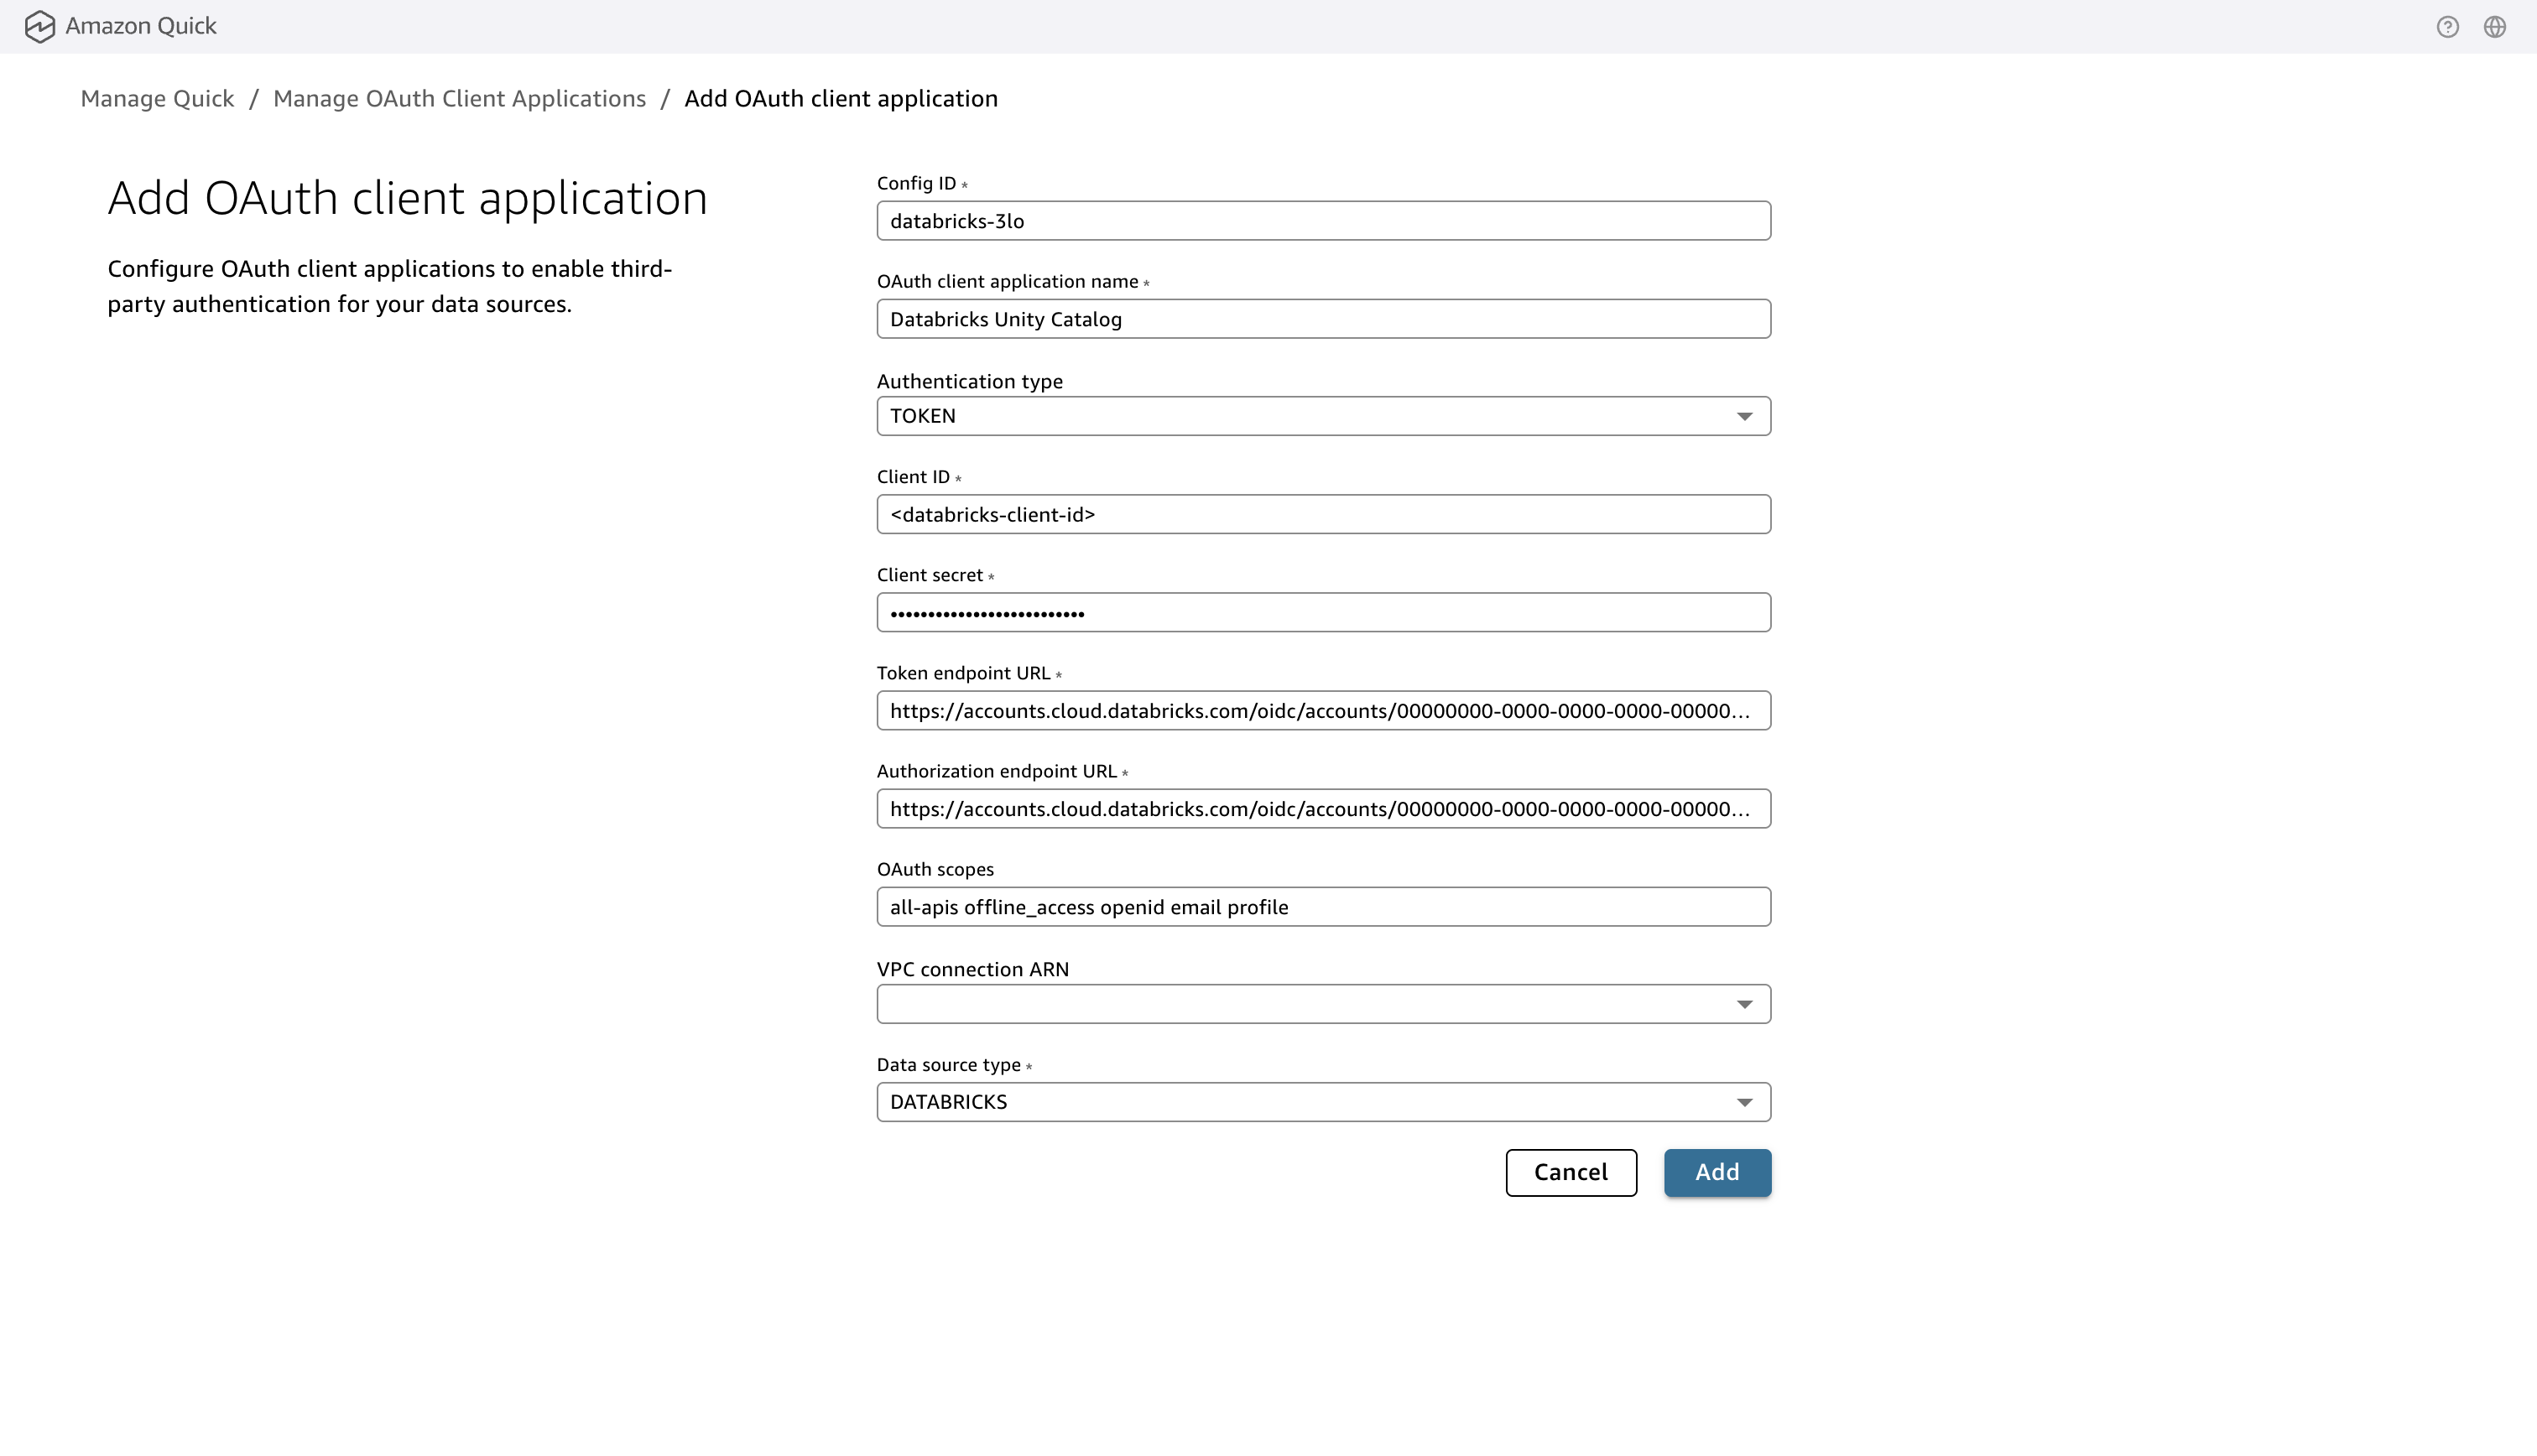
Note
In the screenshot, the account ID is replaced by 00000000-0000-0000-0000-000000000000 and the Client ID by a placeholder. Use your own values.
3) Choose Add to save the client application
Part 4 - Create the Databricks data source with 3LO (author)
1) In Amazon Quick, go to Data → Data sources, then choose Create data source

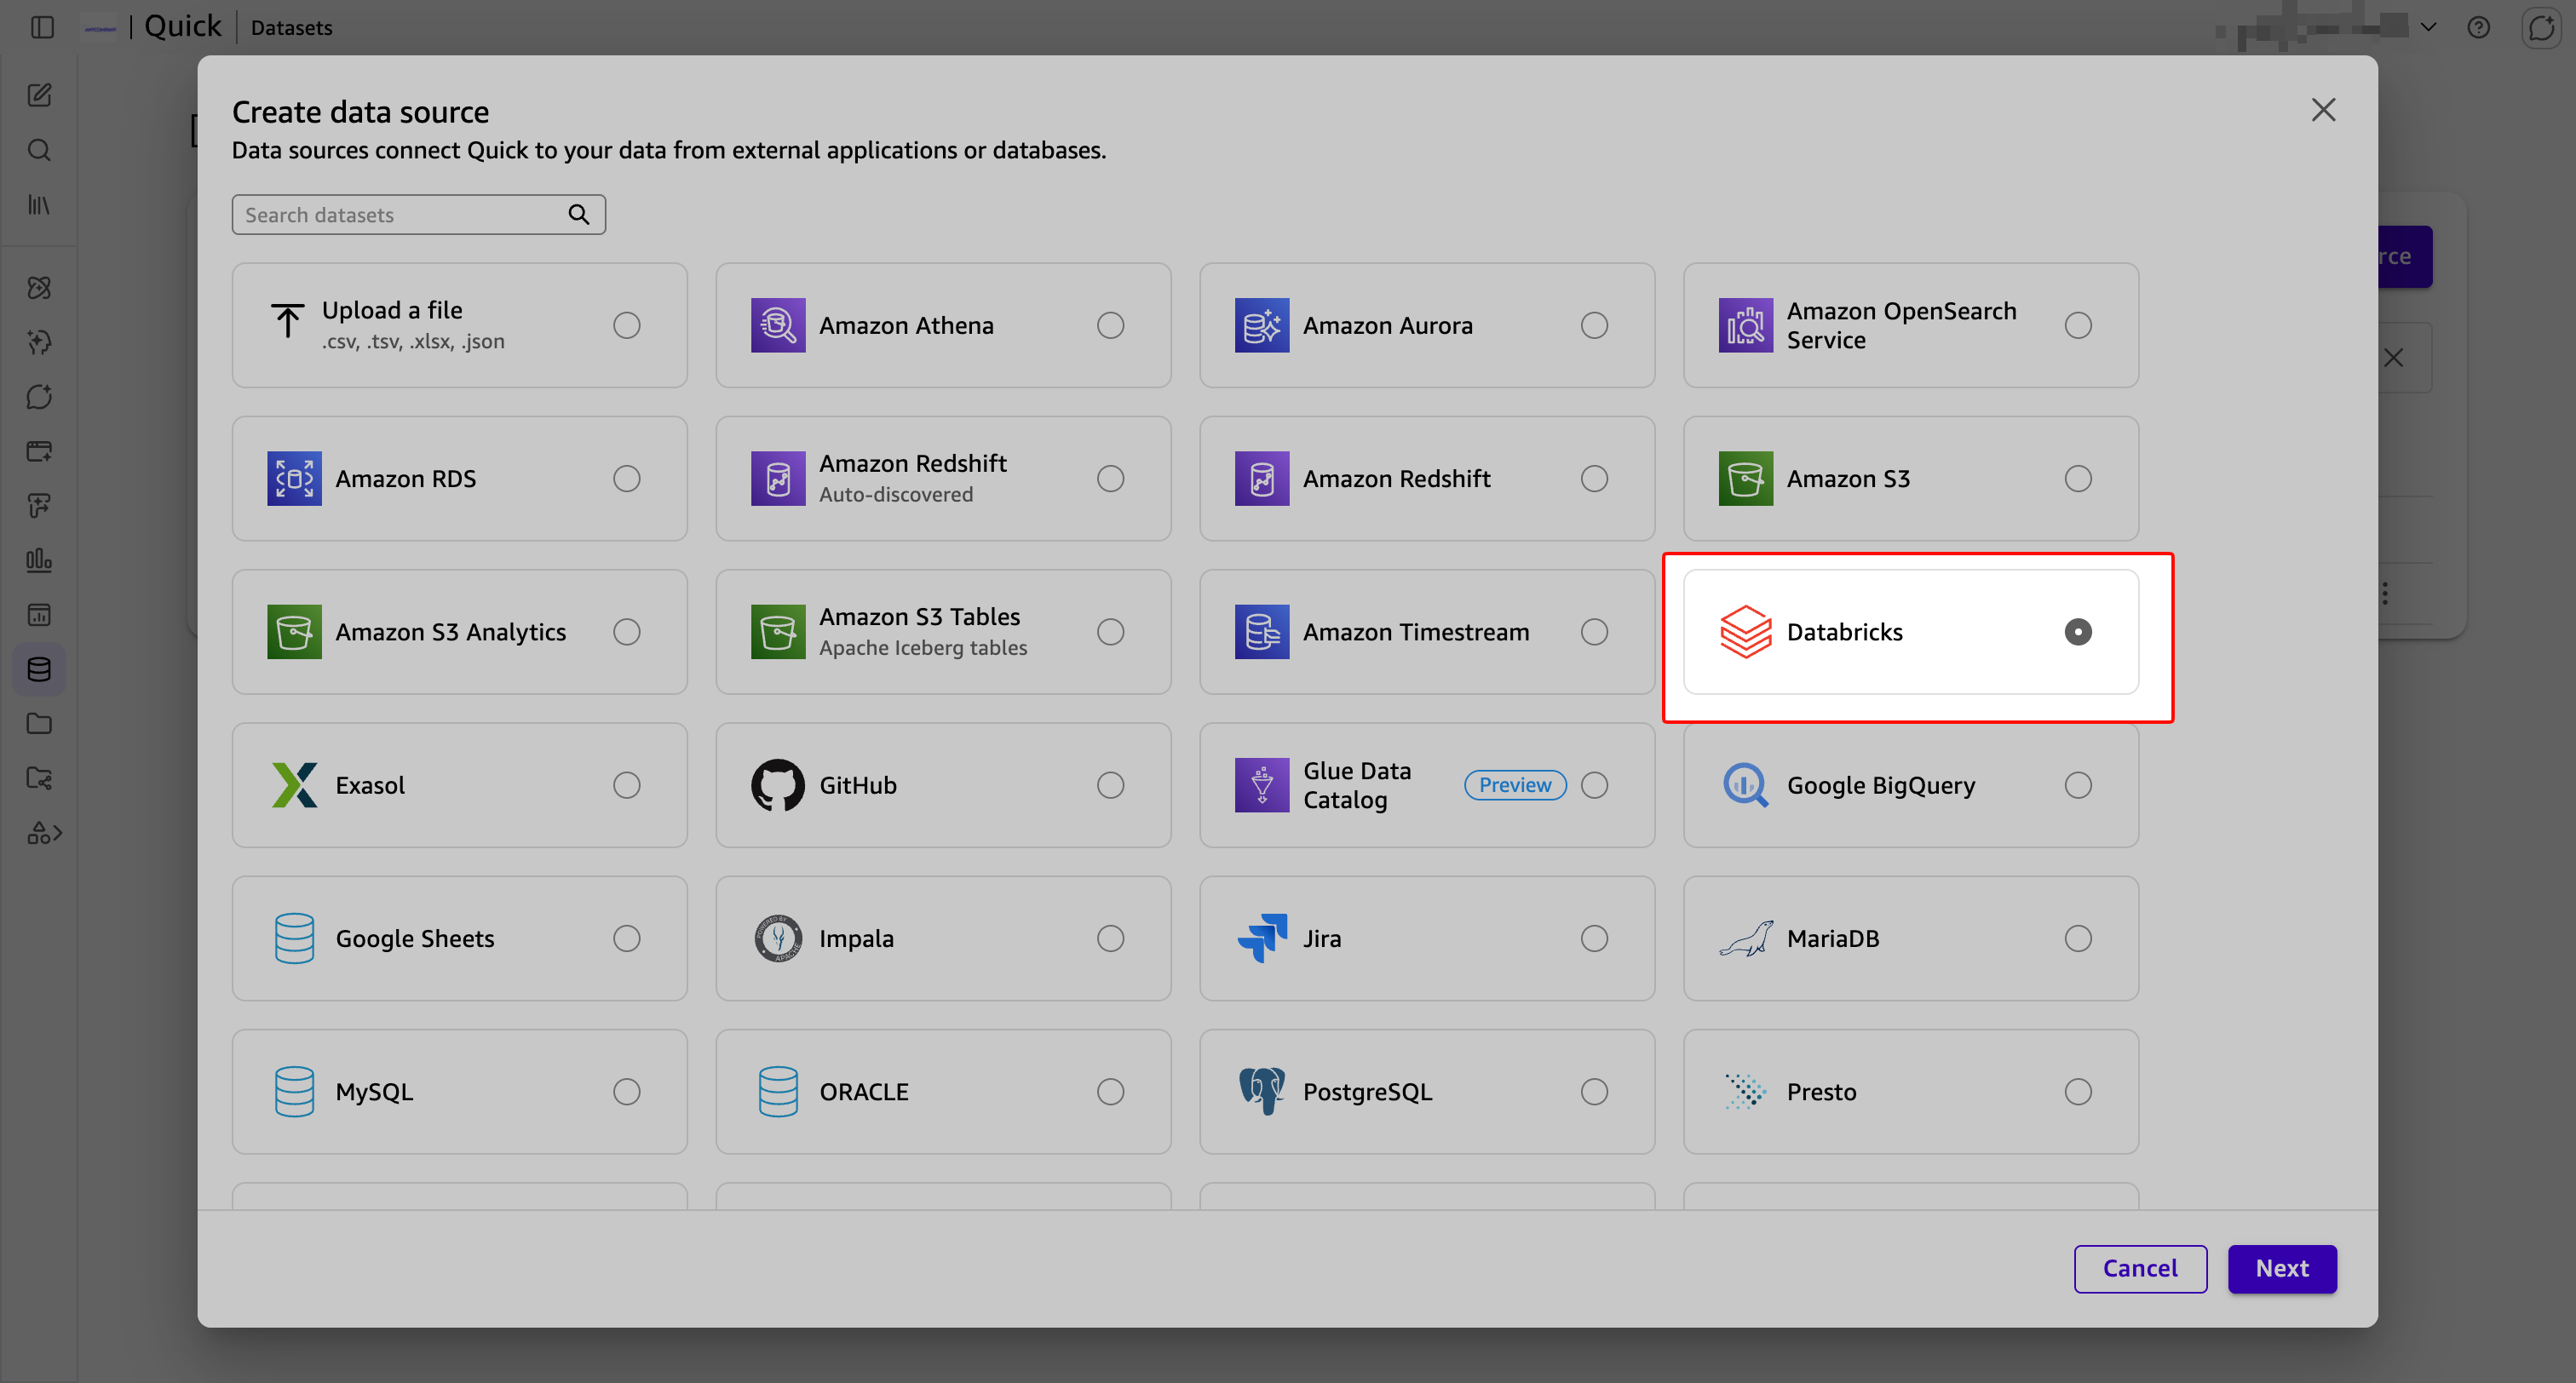
2) Select Databricks and choose Next
3) In New Databricks data source, insert the following data:
Data source name: for example:
databricks-uc-3lo
Connection type: Public network (or your VPC connection)
Database server: your workspace host name, for example dbc-xxxxxxxx-xxxx.cloud.databricks.com
HTTP Path: from your SQL warehouse in Databricks (SQL Warehouses → your warehouse → Connection details), for example:
/sql/1.0/warehouses/<warehouse-id>
Port:
443
Authentication Type: 3LO
Username: the email address of your Databricks user (see the note below)
OAuth client application: the client application from Part 3
Username is only used for the first connection
Quick uses it to start the OAuth sign-in and validate the data source when you create it. After that, each user authenticates with their own Databricks credentials through the OAuth flow.
4) Select Trusted Identity Propagation
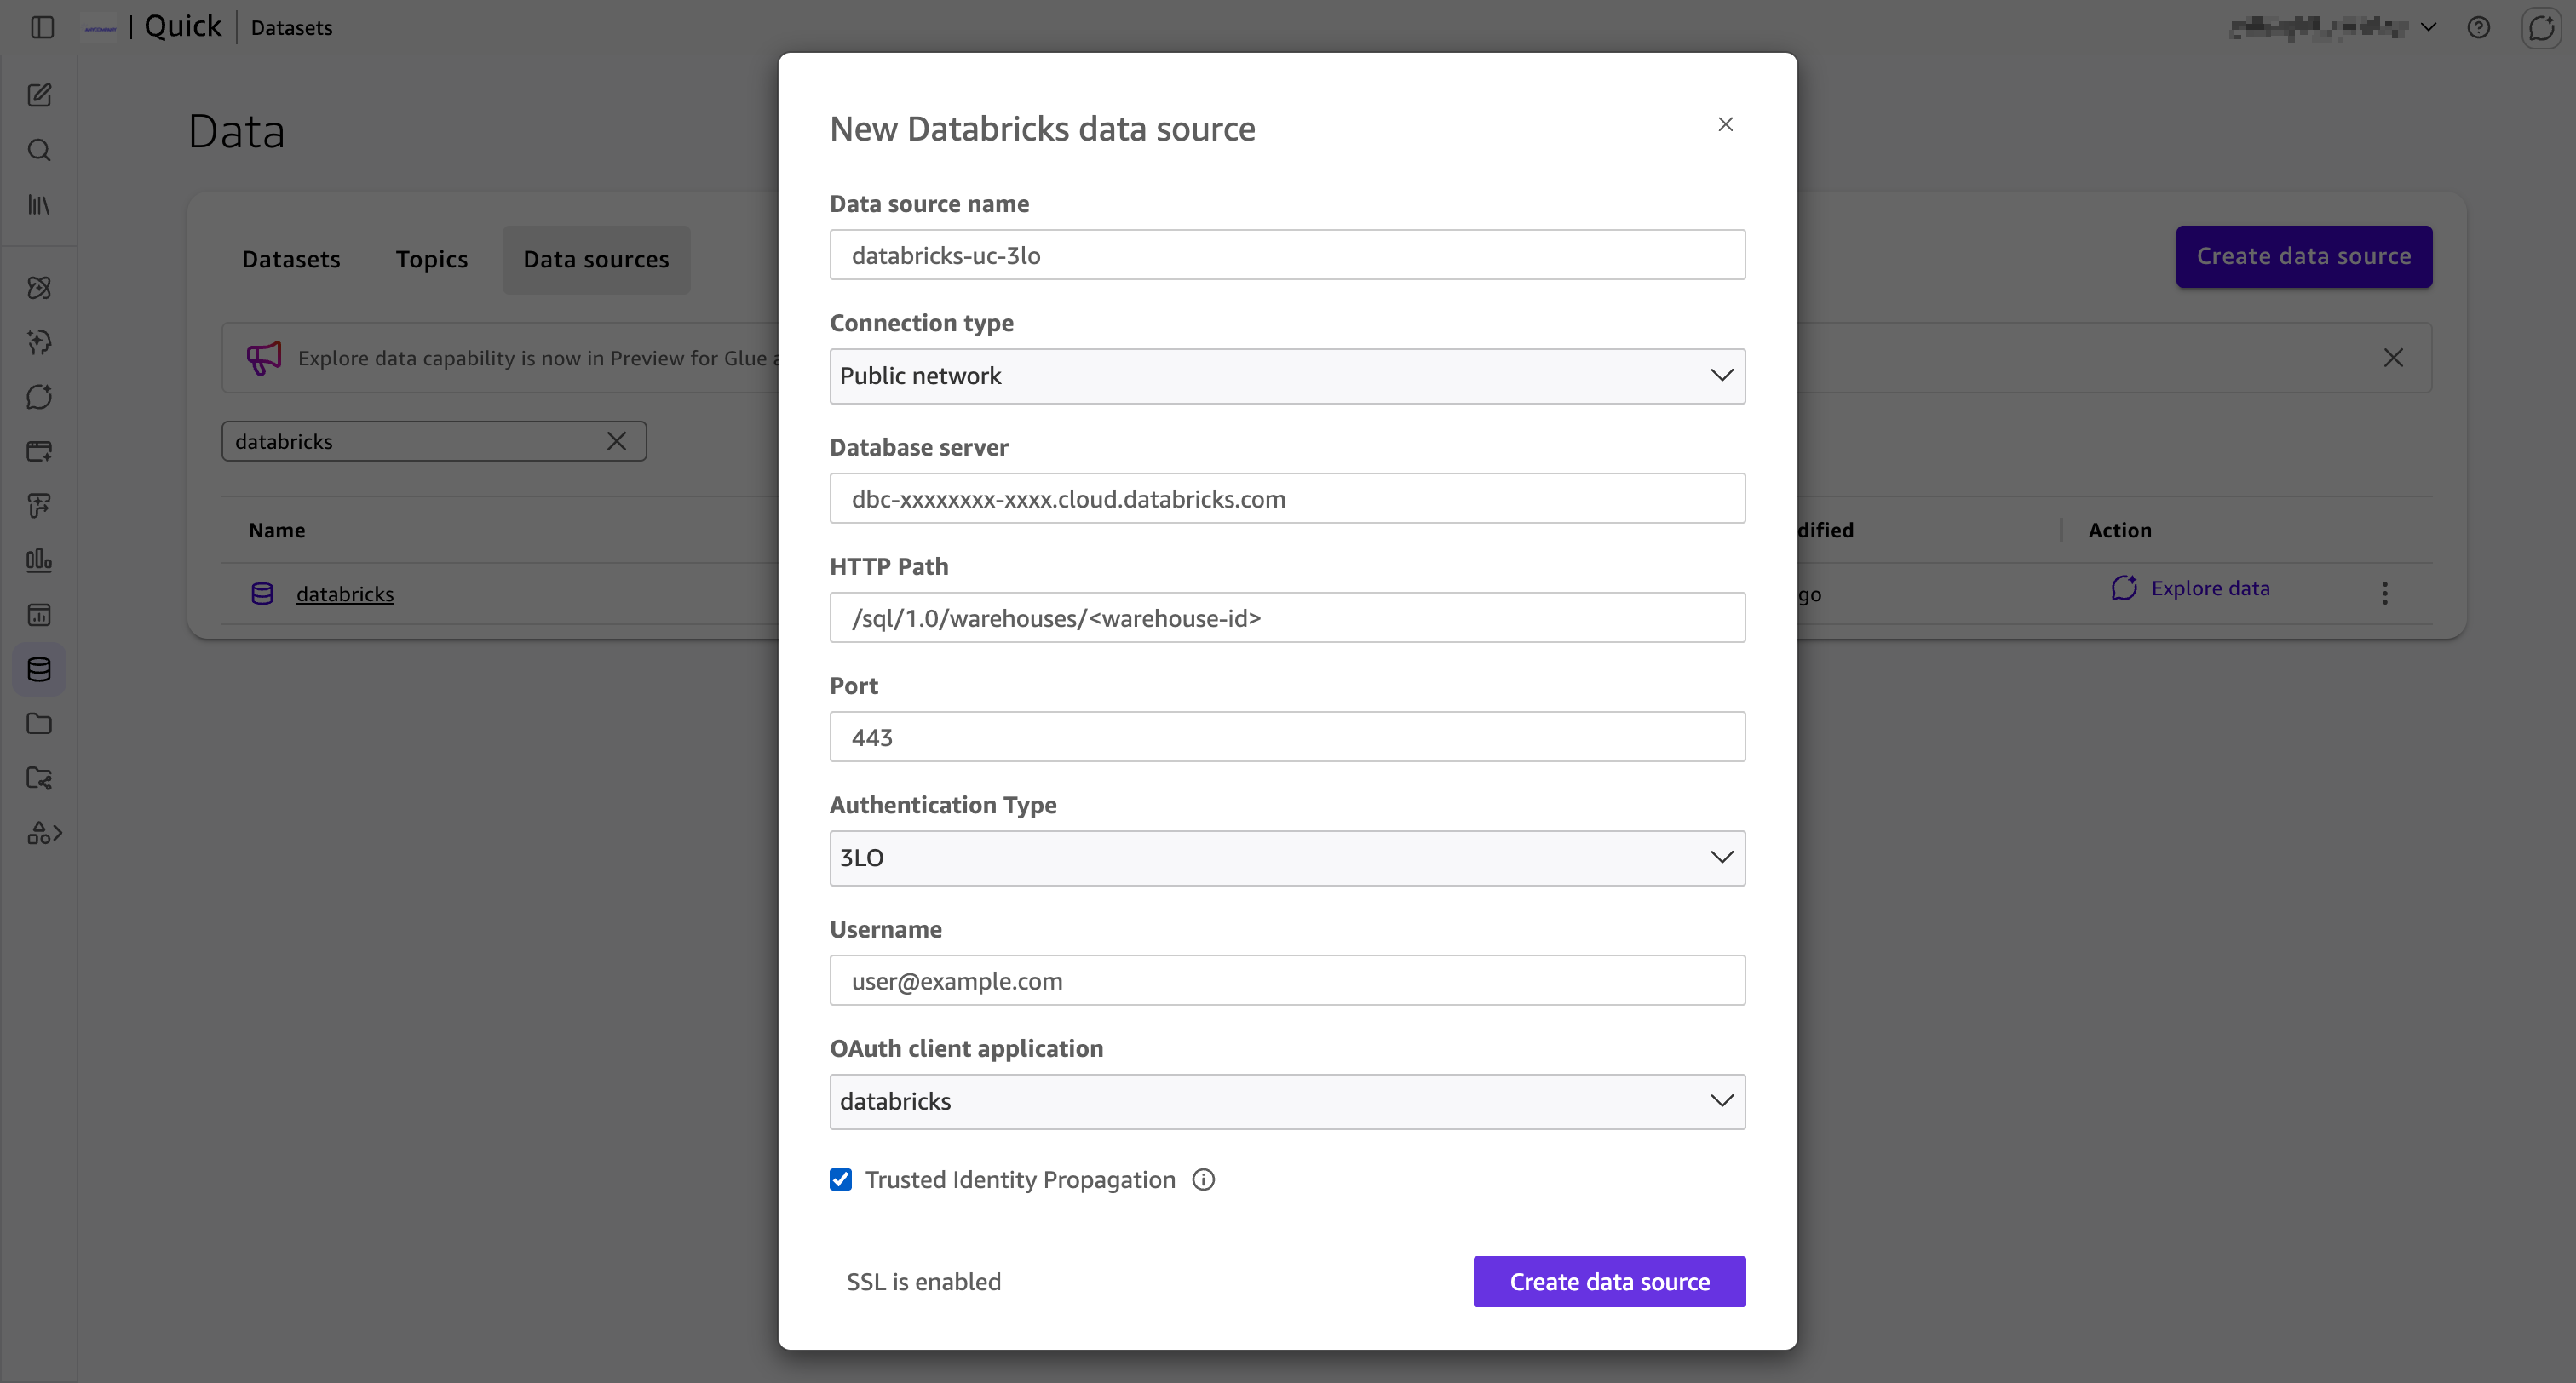
Trusted Identity Propagation is mandatory
Check it if you want Quick to assume the credentials of each end user.
- Checked: every query runs with the Databricks identity of the user who views the data, so their Unity Catalog permissions (table access, row filters, column masks) apply.
- Not checked: every user shares the author's Databricks credentials and permissions.
5) Choose Create data source
A sign-in window opens: log in to Databricks and allow access for the Amazon Quick app connection.
Part 5 - Use the Databricks data source
You can use the Databricks data source in two ways.
Option A - Agentic mode (Explore data)
1) In Amazon Quick, go to Data → Data sources
2) On the Databricks data source row, choose Explore data
3) A conversation opens: ask questions in natural language to discover catalogs, schemas and tables, and to create datasets and topics from them
Agentic catalog experience
The agentic experience (discover, create, inherit semantics) works with both PAT and 3LO authentication.
With 3LO and Trusted Identity Propagation, the conversation only shows what your Unity Catalog permissions allow.
Option B - Dataset source
1) In Amazon Quick, go to Data → Datasets, then choose Create dataset
2) Select the Databricks data source created in Part 4
3) Choose the catalog, schema and table (or write a custom query)
4) Select Directly query your data (DirectQuery), then build your analyses, topics and dashboards
Keep DirectQuery for identity enforcement
Per-user permissions apply only to DirectQuery datasets. If you switch the dataset to SPICE or apply transformations, every user sees the same data.
Part 6 - End-user experience
1) The author shares both the data source and the dashboard with the end user.
2) The end user signs in to Amazon Quick, opens the Data source page, enters their own Databricks credentials (OAuth sign-in) and saves.
3) When the end user opens the dashboard, they see only the data their Unity Catalog permissions allow.
Troubleshooting
redirect_urimismatch: the redirect URL in Databricks (Part 1, step 3) must exactly matchhttps://<region>.quicksight.aws.amazon.com/sn/oauthcallbackfor the Region of your Quick account.invalid_client: check the Client ID and Client secret (Part 1, step 6), and that the token and authorization URLs contain your Databricks account ID.- Federation policy error: the token sent by Quick is rejected because no federation policy accepts it. Create the policy from Part 2, step 2. The error message shows the exact expected issuer and audience.
- Users see the author's data: Trusted Identity Propagation was not selected (Part 4, step 4), or the dataset uses SPICE instead of DirectQuery (Part 5, Option B).
- Least privilege: Databricks flags
all-apisas not recommended. If your use case allows it, you can try the narrowersqlscope instead, and update the OAuth scopes in Part 3, step 2 to match.